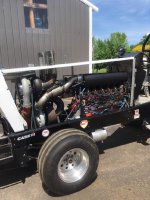
Went by my brothers garage other day and he had another 440, priming it up, and getting it ready to mount into the run stand for a 20 minute run time.
-

-.
-
-.

Follow along with the video below to see how to install our site as a web app on your home screen.
Note: This feature may not be available in some browsers.
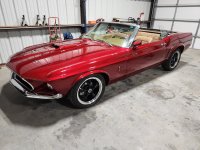
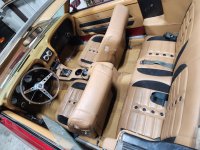
Beautiful 69 Vert!Here was my 1969 mustang convertible that I've rebuilt. Bought in in 2014 and sold it this spring. I did all the work except the body/paint. Electrical, suspension, interior, motor, everything. Has 351w w/ efi, 4r70w transmission, digital gauges, coil over suspension. Did the 2016 power tour in it and drove it for a daily a few months.

Beautiful 69 Vert!
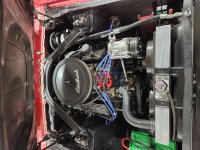
Sounds like you drove her quite a bit before selling.....looks like a good set up under the hood with the MSD, Fuel injection, AC, 24" radiator with electric fans. Would you change anything there?
We just spent the past few days completely stripping the 1969 Mach 1. Getting a new floor, torque boxes, strut braces and partial toe boards. The complete driver side front apron including shock tower and radiator support will be cut and re-done as well. If this Mustang could talk it would have some wild ass stories.....I quite sure of that.
View attachment 8309378View attachment 8309379View attachment 8309380
I am so jealous of you guys with your own shops and/or lifts in your garage. So fucking jealousTaking a break from the fun projects to do some maintenance on the van's front axle:
View attachment 8310027
Dana 60s have some robust parts. It's a good upper-body workout.
The project gods must be looking favorably upon me, as all the ball joints popped out with minimal hassle:
View attachment 8310026
Hopefully we can get this moving back towards the assembled state before I get dragged to a NYE party tomorrow night.
“How much boost does this thing make?”Plumb on it until it runs. Dumb dirt farmer
Depends on how long you want parts to last, but 115 psi will make a ways over 4000 hp. Probably a little north of 4000 ft lbs torque. And that'll throw parts out“How much boost does this thing make?”
“…Yes”
Performance costs money, lots of itDepends on how long you want parts to last, but 115 psi will make a ways over 4000 hp. Probably a little north of 4000 ft lbs torque. And that'll throw parts out
Since you're bringing up tractor pulling.
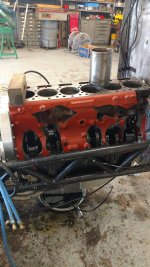
"Milling the head to gain compression ". The head gasket choice is a cheaper option. I'm not really familiar with what is available for an LS but since it's the platform of choice right now. There's probably a vast choice of quality gaskets with different thickness.I've got to go chat with 2 or 3 machine shops to "interview" them so to speak after the experience I had at the last machine shop I used wasnt fantastic. Am I out of line bringing in a typed up sheet like this so that I get all my questions answered and get their opinions on things? I have certain parts I want used(like the King XPC bearings) and certain tolerances I am aiming for after doing a bunch of research on them. I dont want to simply drop a box of shit off and say "put this together" like I did last time, mostly because "I didnt know what I didnt know" so I am trying to go into this with a little better idea and be a little better informed. I "assume" a lot of the stuff on my lists is SOP at most machine shops.
BLOCK: 6.0 aluminum LS
Hot tank/clean
Measure cylinder bores
Measure cam tunnel bores
Inspect lifter bores
Measure main bores
-line hone?
-studs vs. bolts(dont have a full set of bolts so need to buy something)?
-pin caps vs. dowels on inner bolt(like LSX block)?
-piston oil squirters(Katech vs. Get M Garage)?
Hone/bore cylinder bores to fit pistons
Deck block
Cam bearings(King XPC vs. Durabond 25T?)
Main bearings(King XPC)
-desired clearance of ~0016
Need pistons/rings
4032 vs. 2618 for road racing?
-interested in Mahle Power Pack 4032 pistons
945 floating pin for gen 4 rods
As small an oversize as possible to keep cylinder wall strength…
Rings gapped for N/A road race usage
Rods: GM Gen 4 4.8
Replace bushings/hone for piston pin fit(King/durabond?)
Check/hone big end if needed
ARP Pro bolts
bearings(king XPC)
-Desired clearance of 0020-0021
Crank: GM Gen 4 4.8
Hot tank/clean
Measure journals
Check straightness/straighten if needed
Balance
Polish journals
Heads: GM 821 w/hollow stem intake
Hot tank
Inspect
Measure guides
Check seats
Mill head to raise compression(unknown until I can measure PTV, but suspect 020-030)
Open push rod holes for 3/8 push rods
I've got to go chat with 2 or 3 machine shops to "interview" them so to speak after the experience I had at the last machine shop I used wasnt fantastic. Am I out of line bringing in a typed up sheet like this so that I get all my questions answered and get their opinions on things?
"Milling the head to gain compression ". The head gasket choice is a cheaper option. I'm not really familiar with what is available for an LS but since it's the platform of choice right now. There's probably a vast choice of quality gaskets with different thickness.
Since you're bringing up tractor pulling.
"Milling the head to gain compression ". The head gasket choice is a cheaper option. I'm not really familiar with what is available for an LS but since it's the platform of choice right now. There's probably a vast choice of quality gaskets with different thickness.
Are you starting with a new block or used? A new crank or used?
I'm sure they will give you some guidance and should not have any issues with sitting down and going over your list. If they do it's time to take your wallet and go down the road.
Nope, not out of line whatever IMO. Seems like it's much preferable to walking in there with a vague idea and shrugging your shoulders when important questions are asked.
Why not put the engine together yourself? That way you know what parts are in it and you know what the bearing clearances are, what fasteners are torqued to, etc.
They make bearings that are +- .001 and so on so that YOU get the exact measurement you want and don't rely on a machine shop to hopefully give you what you asked for. Then YOU know it's done right. I'd personally rather spend the money it takes to pay a shop to assemble the engine elsewhere like on the EFI or throttle body, etc.
Do NOT let them do any work on the cylinders until you have both pistons and rings in hand.And + or - .-001 doesnt mean shit when you are 005 over or under need to be machine to the next 001... or you need your main caps honed 0007 and then a line hone to bring everything to the 001... A machine shop that is assembling a short block will likely give a shit about those numbers if they are assembling the lower end. If they arent, I could see them not giving two shits about the numbers they hit... "fuck it, not our problem"...
Again, I would never, personally, ask a machine shop to bring me to the 001 tolerance, or 0001 tolerance, only for me to bring everything back to my house to assemble myself. If they are assembling and cant hit those numbers, well, I didnt do my homework and picked the wrong shop.
Having a short block assembled is a very small portion of total machine work cost and USUALLY when you do that a machine shop stands behind their work.
My experience on the cost to have a machine shop assemble a bottom end is pretty minuscule in the grand scheme of an engine build and USUALLY they stand behind their work.
Again, I would never, personally, ask a machine shop to bring me to the 001 tolerance, or 0001 tolerance, only for me to bring everything back to my house to assemble myself.
Do NOT let them do any work on the cylinders until you have both pistons and rings in hand.
Most modern pistons and rings have specs for cylinder wall finish.....and they can differ a shit ton.
If you just have the bores slopped and mopped it will most likely be a generic finish that your new pistons or rings won't like.
I would seriously consider getting aftermarket rods if you want the engine to last.
They aren't that expensive as companies like Eagle and a few others can hook you up for not a bunch more than the mod work on stock rods cost and the stockers still won't be at the aftermarket level.
 That's a problem to address later.
Besides building the motor I have been doing body work so that the car is ready when it's done.
The motor is at my buddies machine shop. I have a corner to store stuff and drag it out when I get time to work on it. The body shop is in my garage. The woman hates it because she's parking her daily driver outside and her 66 Oldsmobile is outside under a cover.Engine work and body work at the same time?
View attachment 8319011
I wonder what it's like to do one task without tripping over parts and tools from other tasks.

I've built a few Dana 60 rears for some of the Mopar crowd in my area. The Dana engineers are a backwards bunch with this rear end. Carrier shims for setting backlash are UNDER the press fit carrier cone and rollers. The pinion depth shim is under the press fit rear pinion bearing race. I ended up buying a set of extra bearings and honing the IDs out on the carrier bearings to a slip fit so I can easily work up the shim thicknesses for a proper backlash setting. I sanded down a rear pinion bearing race OD to a slip fit for easily selecting a pinion shim. Once I know my shim thicknesses, I final assemble with the final press fit bearings and recheck the pattern.I was able to wrap up the front axle rebuild on my E350 yesterday. Since a D60 needs to be stripped down pretty much to the housing in order to replace all the wear items (including the inner axle seals), it only made sense to reassemble it with a new Eaton (Detroit) Truetrac helical LSD (AKA Torsen) to match the one that I installed in the rear axle during the initial build:
View attachment 8317325
View attachment 8317326
Got that thing shimmed via trial-and-error to the point where I was confident in the gear mesh, slapped on the rest of the parts back on, hit all my new grease zerks, and did a proper "toe and go" alignment:
1000 hp Ford against a Tesla Plaid. Ford slipped his clutch a bit or he would have been closer.
Rocket on a roller skateOur ‘26 Model T Coupe w/440 Chrysler and a ‘68 C10 we’ve had for going on 35 years….at the local Cruise.
View attachment 8319996
Last year I did some similar maintenance on my 84 CJ7 with a Dana 44 front. Ton of work to replace those $5 seals so I went ahead and did all the ball joints as well and the manual locking hubs were in dire need of attention so it was a good learning experience pulling it all apart. I really struggled to get the gear out of the front of the housing. "Just get a couple pry bars behind it and it pops right out" ..... Yeah right.I was able to wrap up the front axle rebuild on my E350 yesterday. Since a D60 needs to be stripped down pretty much to the housing in order to replace all the wear items (including the inner axle seals), it only made sense to reassemble it with a new Eaton (Detroit) Truetrac helical LSD (AKA Torsen) to match the one that I installed in the rear axle during the initial build:
View attachment 8317325
View attachment 8317326
Got that thing shimmed via trial-and-error to the point where I was confident in the gear mesh, slapped on the rest of the parts back on, hit all my new grease zerks, and did a proper "toe and go" alignment:
View attachment 8317327
These plates from TMR make this task so easy on a solid front axle - highly recommended.
Unfortunately we don't have any snow or ice to facilitate testing of the new front diff, but a couple boosted footbrake launches on a gravel road suggests that she lays down the power to all four wheels with minimal drama.
The MGM front spring mounts result in the coils being laterally positioned just a bit too narrow, with the result that the passenger's side lightly contacts the frame on occasion (particularly during left-wheel jounce). I put some turns on the adjustable track bar, and have now moved the problem to the other side. Did I count how many turns of adjustment that I made so that I can easily take out about half that much? No, my dumb ass did not do that
Auto transmissions have been more consistent and faster for quite a while.When it comes to drag racing, an automatic trans is hard to beat for consistent launches. The 10 speed autos that Ford and GM co-engineered easily outrun the stickshift versions of the same car. There's plenty of the new 10 speeds running 9s in the quarter mile.
Firs time I drove an automatic dual clutch PDK I was blown away @ how fast it shifts.Auto transmissions have been more consistent and faster for quite a while.
A lot of Dana axles are set up to use a case spreader to ease the task of pulling the carrier out. Once the cover is off, there is usually a hole at 3 and 9 o'clock for the spreading device's pins to engage in. If you look at E.Bryant's pics, you will see his spreader at work.Last year I did some similar maintenance on my 84 CJ7 with a Dana 44 front. Ton of work to replace those $5 seals so I went ahead and did all the ball joints as well and the manual locking hubs were in dire need of attention so it was a good learning experience pulling it all apart. I really struggled to get the gear out of the front of the housing. "Just get a couple pry bars behind it and it pops right out" ..... Yeah right.
I ended up putting a motorcycle soft tiedown strap around it and hooked up its winch cable. Kinda funny, it was like pulling it's own tooth as it broke loose with a bang and dropped into a box of rags.
A lot of Dana axles are set up to use a case spreader to ease the task of pulling the carrier out. Once the cover is off, there is usually a hole at 3 and 9 o'clock for the spreading device's pins to engage in. If you look at E.Bryant's pics, you will see his spreader at work.
Carrier shims are selected to provide about a .004-.006" preload squeeze per side beyond just a simple slip in fit without the use of a spreader. I have seen some shop manuals specify using a dial indicator to track how far the case spreader has spread the housing. The job can be done without a spreader, but the right tools do make it easier.
A lot of Dana axles are set up to use a case spreader to ease the task of pulling the carrier out. Once the cover is off, there is usually a hole at 3 and 9 o'clock for the spreading device's pins to engage in. If you look at E.Bryant's pics, you will see his spreader at work.
Carrier shims are selected to provide about a .004-.006" preload squeeze per side beyond just a simple slip in fit without the use of a spreader. I have seen some shop manuals specify using a dial indicator to track how far the case spreader has spread the housing. The job can be done without a spreader, but the right tools do make it ea
Now that makes more sense, thanks for the education. I picked around on the web and never came across a case spreader for removal.A lot of Dana axles are set up to use a case spreader to ease the task of pulling the carrier out. Once the cover is off, there is usually a hole at 3 and 9 o'clock for the spreading device's pins to engage in. If you look at E.Bryant's pics, you will see his spreader at work.
Carrier shims are selected to provide about a .004-.006" preload squeeze per side beyond just a simple slip in fit without the use of a spreader. I have seen some shop manuals specify using a dial indicator to track how far the case spreader has spread the housing. The job can be done without a spreader, but the right tools do make it easier.