• Watch Out for Scammers!

    We've now added a color code for all accounts. Orange accounts are new members, Blue are full members, and Green are Supporters. If you get a message about a sale from an orange account, make sure you pay attention before sending any money!

Modifying A&D FX-120 Draft Shields

daved

Full Member
Full Member
Minuteman
Mar 28, 2013
163
20
Las Vegas, NV
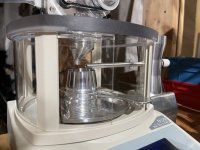
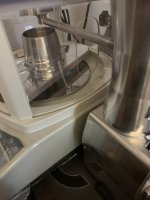
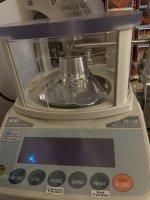
I've noticed in various pix of the Autotrickler/Autothrow that some users have modified the draft shields of the FX-120 scale. The most common mod appears to be a hole in the right shield for the trickler tube. It also looks like some have cut the front shield in half vertically. I'd like to apply both of these mods to my draft shields. Though I have a moderate amount of woodworking experience, I have no experience working with plastics, particularly curved plastic sheets. I'd appreciate any advice from folks who have performed these mods, or who generally have experience cutting and drilling plastic.

Thanks,

Dave
 
Are you guys reloading during a tropical storm with the windows open?

I leave just the rear and left panels on, the right and front are wide open. Even with A/C moving I notice no fluctuation. I mean, yeah... if I sneeze.
 
To cut the front wind screen in half, use a hacksaw and finish with a belt sander. Use a Dremel tool with a high speed bit for the side hole mod. There are some people that have started with small bits and sequentially increased the diameter until it is as large as they wanted. Patience is the key. Rush things and you will crack the plastic.

If anyone breaks or ruins a front screen cutting it in half, send me a message. I have the other half that is perfect.
 
Last edited:
To cut the front wind screen in half, use a hacksaw and finish with a belt sander. Use a Dremel tool with a high speed bit for the side hole mod. There are some people that have started with small bits and sequentially increased the diameter until it is as large as they wanted. Patience is the key. Rush things and you will crack the plastic.

This. I would recommend against using bits though as once you get to around 1/4" bit it starts to grab the plastic rather than cut. You could use the small bits to drill a pilot hole, but swap to the dremel to make it any bigger than ~5/32".
 
I bought some 1/16” clear acrylic and used a heat gun to form and a uni-bit to drill. That way I’m not worried about cracking an original. You can get it cheap in 1 ft squares from Amazon or a plastics store
 
I tried the drill bits and cracked one. I probably stepped the bits up too quick. U ended up using a dremel with a carbide bit to cut to opening and the drum sander bit to clean it up. I slotted mine for adjustments too
 
Trick is to use hacksaw slowly for straight lines, or brand new spade drills bits spun in reverse on the highest RPM and don't push on the bit, let gravity do its think with the weight of the drill, and melt thru the plastic. Might need to clean up melted plastic burrs but you'll make it thru. Elongated slots = two smaller holes and then cut two lines from each hole with a hack saw and clean up the cuts with a fine file. Or you can use a CNC machine like me 👍
 
Someone should just sell modified windows. I'm looking at you Area 419 & DNA Custom Engraving.
 
Thanks for the comments - looks like a lot of ways to skin this cat!

Cutting the front panel with a hack saw and finishing with a belt sander looks very straight forward - you can even correct any minor error with the saw on the sander.

Still not certain on the right panel hole - it seems like using any bit runs the risk of cracking the plastic. The reamer looks like the safest way to go. Thoughts--?

4F773ABE-3323-4B69-99F5-8D8BF769D0E5.jpeg

Step bit works fine. Go slow no issues, I didn’t even use tape.
 
Masking tape on both sides helps keep it from cracking. There's a reason plexiglass and lexan come with a film taped to each side...

I used a 3/8" endmill with the shield held in a machinist's vice. Took about 90 secs...peeled the remaining tape off, and it was done.
 
I went straight through mine with one of the Milwaukee Cobalt bits. 1/2”. Cracked one because I got too confident with the speed. Second one no worries. Low and slow is the ticket. My front is wide open and it hasn’t caused me too much grief. I just hold my breathe, don’t move, and don’t run the A/C.
 
3B3AC723-CFEB-44D0-959E-AFC49F81AEC7.jpeg
29109728-739F-4ACB-AB7C-5CFEC5BB5782.jpeg

I cut the front by drawing a line with a sharpie, then traced beside the lines with an exacto knife. I started tracing with light pressure and increased pressure as I went on. Probably traced 30-40 times. Then I flipped the plastic over and broke it that way. The break was clean. I did not use any tape. Make sure you leave enough room open to easily get your cup in and out.
I cut the side hole using a step drill bit, as others have mentioned. I simply figured out the approximate straw location, marked with a sharpie, and started drilling. I supported it using a 2x4. Did not have any cracking issues here either.
Good luck!
Parker
 
  • Like
Reactions: blbennett1288
Thanks again for all your input.

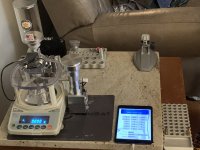
After reviewing a few youtube videos on the AT v3, I saw that some of the users just take the right side draft shield off, bring the trickle tube in at an angle from the right rear and place the powder cup under the spout at an angle from the right front and leave the front shield in place. I gave this a try - eureka! The front shield prevents slight drafts due to my breathing and movement from upsetting the scale. And placing the powder cup from the right seems more natural.

I guess if I wanted to further protect the scale from drafts, I could cut the right shield in half and drill a hole for the trickle tube, but for now, I going to avoid doing any cutting or drilling and just use the setup I described.

Thanks again for your suggestions - I learned a lot for future use!
 
Dremel!
 

Attachments

  • F1BA43DB-3B72-454A-AE58-C33DFB2691FC.jpeg
    F1BA43DB-3B72-454A-AE58-C33DFB2691FC.jpeg
    403 KB · Views: 106
I milled a slot in the right side windscreen for the AutoTrickler. I trimmed the front of the Area 19 top so I could slide the front wind screen up and off when I use the scale.

SCALE 1.jpg


SCALE 2.jpg
 
Last edited:
I left some material along the right hand side of the front panel to slide down the slot along with a strip along the top of the panel. Works great. The upgraded 419 top is a must.
 

Attachments

  • 33295F4A-ECD8-4FBC-87CC-39726462044B.jpeg
    33295F4A-ECD8-4FBC-87CC-39726462044B.jpeg
    392.7 KB · Views: 90
  • 4531D5F7-3046-43DC-9F5A-3C99445D3B23.jpeg
    4531D5F7-3046-43DC-9F5A-3C99445D3B23.jpeg
    341.8 KB · Views: 82
  • B6AE8205-DC07-45DF-98EE-AF702BCDBA77.jpeg
    B6AE8205-DC07-45DF-98EE-AF702BCDBA77.jpeg
    698.6 KB · Views: 114
Did you make the cover on your auto trickler? Please share the details
I did, I was using a plastic automotive panel plug as a cover and decided my trickler needed a top more befitting it so I spun one up on the lathe. Area 419 offers a hopper/cover upgrade for the AutoTrickler.
 
Last edited:
  • Like
Reactions: ACard
I removed both side and front makes no difference unless you are in a windy room or outside
 
Last edited:
I have the front open now and a little hole for the trickler on the side.
I’m thinking about putting in a half shield back in the front because sometimes I mess it up with my breathing from giggling at how fast it is.