• The Shot You’ll Never Forget Giveaway - Enter To Win A Barrel From Rifle Barrel Blanks!

    Tell us about the best or most memorable shot you’ve ever taken. Contest ends June 13th and remember: subscribe for a better chance of winning!

    Join contest Subscribe

Please Help me with an old AR-15 Receiver Extension Locking Nut

Rogerthatout

Private
Full Member
Minuteman
Mar 20, 2017
616
163
56
Sorry to create a new topic on such a narrow-minded discussion. I will remove the thread when I can remove my nut, lol.
Also, this is my first AR project, I am a newbie with limited understanding of the AR's taxonomy .. so excuse me. :)

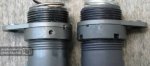
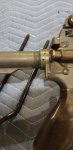
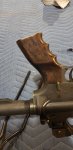
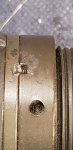
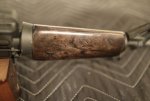
I am trying to find the right wrench to get this nut off. I have the nut shown on left side of the attached picture. From my research, it is from a Colt 609 CAR-15 (better known as a Cotl XM177 Commando) the first AR carbine with a collapsable stock as we know them today. I have this nut on a gov issue A2.

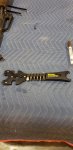
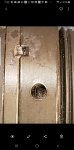
I have a wheeler tool that doesn't help me here, I show that in the gallery too.
 

Attachments

  • Colt XM177 Commando.jpg
    Colt XM177 Commando.jpg
    28.4 KB · Views: 296
  • 2019-06-09 09.31.22.jpg
    2019-06-09 09.31.22.jpg
    388.8 KB · Views: 145
  • 2019-06-09 09.31.40.jpg
    2019-06-09 09.31.40.jpg
    240.3 KB · Views: 149
  • 2019-06-09 09.31.48.jpg
    2019-06-09 09.31.48.jpg
    305.5 KB · Views: 150
As stated above it looks Staked. If you could provide a close up shot of the area that looks staked we can take a closer look and see if it is for sure, and you'll need a tool like this. Pending on whether or not you wish to reuse some of these parts, you want to do a clean job to remove the Staking just take a 7/64 Drill bit and drill it out if you do it right it'll look clean and you can reuse your parts.

IMG_20190611_110442344.jpg


if you need any further assistance getting your nut off I'd be happy to lend a hand.
 
As stated above it looks Staked. If you could provide a close up shot of the area that looks staked we can take a closer look and see if it is for sure, and you'll need a tool like this. Pending on whether or not you wish to reuse some of these parts, you want to do a clean job to remove the Staking just take a 7/64 Drill bit and drill it out if you do it right it'll look clean and you can reuse your parts.

View attachment 7093452


if you need any further assistance getting your nut off I'd be happy to lend a hand.


The folks on here give the best advice, they never jerk a guy off.
 
Pictures.. pinned?
How would you approach ?
 

Attachments

  • 20190611_185337.jpg
    20190611_185337.jpg
    191.5 KB · Views: 99
  • Screenshot_20190611-193227_Gallery.jpg
    Screenshot_20190611-193227_Gallery.jpg
    160.1 KB · Views: 97
  • Screenshot_20190611-193244_Gallery.jpg
    Screenshot_20190611-193244_Gallery.jpg
    171.1 KB · Views: 83
Pictures.. pinned?
How would you approach ?

It sure is...

I personally don't think you're going to be able to just spin it off even with the correct tool.. so it's up to you which route you decide to take to remove it.

Me personally, Id drill it in all spots that are staked, just make sure you don't drill into your receiver extension. I would just be worried due to the age of the parts if you put a lot of undue stress that you may crack or break something that cannot be replaced.
 
Last edited:
Just turn it off, the staking is there to prevent the castle nut from loosening under vibration. When you apply mechanical force to it with the wrench, it will shear that bit of staking and spin off. Replace it with a new end plate.

+1 to this, just unscrew it with the right wrench, the staking won't stop it from turning. I've removed several just like that with the DPMS wrench, you can get those on MidwayUSA.

Some of these guys seem to thing staking makes the nut a lot more secure than it actually does; it'll actually shear off pretty easily, you don't need to drill, dremel, or anything else.
 
  • Like
Reactions: plong and loveha
+1 to this, just unscrew it with the right wrench, the staking won't stop it from turning. I've removed several just like that with the DPMS wrench, you can get those on MidwayUSA.

Some of these guys seem to thing staking makes the nut a lot more secure than it actually does; it'll actually shear off pretty easily, you don't need to drill, dremel, or anything else.

If you dont have the wrench it isnt going to turn right off...and if you dont plan to reuse it I see no reason to buy the wrench. Cut/drill the stake, takes 1min then tap the nut off with a punch and hammer.
 
  • Like
Reactions: VegasHKShooter
Thanks everyone. I was tempted to do this on my own with all the solid advice I got here, but felt I was a little to "green" to wrestle with this AR. I brought my gun to Tabacco Valley Guns so Kris can take a look. He actually used all the tactics I got from you guys here (with exception to drilling out the pin). Kris tapped that stake a few times with a punch to flatten it out than used that wrench you guys posted pictures of to FORCE it open. After a few rough attempts, Kris put a solvent on the thread to help it off. He had the experience and confidence to force it off with aggressive force.

Thanks everyone!
 

Attachments

  • Colt A2 - Gov Carbine -TN.jpg
    Colt A2 - Gov Carbine -TN.jpg
    87.1 KB · Views: 106
  • Colt A2 - Gov Carbine -3.jpg
    Colt A2 - Gov Carbine -3.jpg
    396 KB · Views: 128
  • Colt A2 - Gov Carbine -7.jpg
    Colt A2 - Gov Carbine -7.jpg
    277 KB · Views: 82
  • Colt A2 - Gov Carbine -17.jpg
    Colt A2 - Gov Carbine -17.jpg
    403.7 KB · Views: 80
  • Colt A2 - Gov Carbine -6.jpg
    Colt A2 - Gov Carbine -6.jpg
    205.5 KB · Views: 79
Neat.

Where is the wood from, is it early mil surp, looks kind of aged.

I know Brownells sells new AR wood but I dont think it looks that aged.
 
Neat.

Where is the wood from, is it early mil surp, looks kind of aged.

I know Brownells sells new AR wood but I dont think it looks that aged.


This is brand new walnut, I finished this furniture to match the patina on the rifle by distressing it with about 5 tools than finished it with black pigment and lacquer.

The finish is meant to look period. I should call it "mil surp"

:)