• Watch Out for Scammers!

    We've now added a color code for all accounts. Orange accounts are new members, Blue are full members, and Green are Supporters. If you get a message about a sale from an orange account, make sure you pay attention before sending any money!

Real Avid Scope Leveling Kit

murph1118

Private
Minuteman
Jul 19, 2022
18
7
Florida
Anyone ever use this thing? Seems pretty simple. I couldn’t find anything about it in the search.


Real Avid Scope Leveling Kit & Precision Scope Level System, Complete Scope Mounting Kit for Mounting, Aligning & Leveling Rifle Scopes, Perfect Tool for Gunsmithing & Hunters
 
Flashlight
Bubble levels
Copy papper
T-square ruler
 

Attachments

  • Screenshot_20220323-095743_Photos~2.jpg
    Screenshot_20220323-095743_Photos~2.jpg
    235.8 KB · Views: 348
  • Screenshot_20220802-103801_Signal.jpg
    Screenshot_20220802-103801_Signal.jpg
    442.4 KB · Views: 358
Just eyeball it.
Or tie a sting onto a rock and let gravity give you a perfectly plumb line to align with.
Some guy’s will never understand how easy this really is, sad actually.
 
^^^^^^^^^
This member brings up a solid talking point. Body position and cheek weld need to be mentioned BEFORE you torque the scope down.

I highly recommend you try this procedure first.

Lightly torque down your scope so that it's in the ballpark. Get down behind the gun and position yourself with the buttstock against your shoulder. Close your eyes and place your face on the cheek riser on the until you feel completely comfortable. See if you're not stressing any muscles in your neck or your lower back.
Open your eyes.
This is the position where you will make your eye relief setting. If your eye doesn't lineup with the scope, adjust cheek riser for perfect alignment.

This builds a "Natural point of aim".

Then go and level your reticle. I've had great results with this procedure.
Good luck
TP....
 
I don't understand. Can you unpack this a bit more?
If you shine a flashlight through your scope from the front to the back, it will show your reticle line on the wall. Get a plumb line on the wall and line the two up. I prefer getting in position and using a vertical line like a thick string hanging to line it up with my reticle with me in shooting position though.
 
^^^^^^^^^
This member brings up a solid talking point. Body position and cheek weld need to be mentioned BEFORE you torque the scope down.

I highly recommend you try this procedure first.

Lightly torque down your scope so that it's in the ballpark. Get down behind the gun and position yourself with the buttstock against your shoulder. Close your eyes and place your face on the cheek riser on the until you feel completely comfortable. See if you're not stressing any muscles in your neck or your lower back.
Open your eyes.
This is the position where you will make your eye relief setting. If your eye doesn't lineup with the scope, adjust cheek riser for perfect alignment.

This builds a "Natural point of aim".

Then go and level your reticle. I've had great results with this procedure.
Good luck
TP....
I feel like this process makes sense for getting your eye on the same plane as the centerline of the scope and it would also help with getting the correct eye relief. However, it also seems like you could introduce a small amount of windage error if you don't have the centerline of the scope exactly above the centerline of the bore. Think of how an old SMLE rifle scope that is canted off the left side will hit to the left of the POA on targets closer than the zero and to the right of POA on targets farther than the zero (assuming a converging zero and not a parallel zero). This is an extreme example but is similar to if you had your rifle canted to one side as part of finding the most comfortable position and then you leveled the scope.
 
Last edited:
  • Like
Reactions: TacticalPlinker
If you shine a flashlight through your scope from the front to the back, it will show your reticle line on the wall. Get a plumb line on the wall and line the two up. I prefer getting in position and using a vertical line like a thick string hanging to line it up with my reticle with me in shooting position though.
Sorry I should have been more specific. The flashlight and plumb line picture makes perfect sense. The copy paper and t-square was what I didn't understand. The way he presented the information made it seem like 4 things were required. Was he really just trying to show two ways of doing the same thing?
 
Sorry I should have been more specific. The flashlight and plumb line picture makes perfect sense. The copy paper and t-square was what I didn't understand. The way he presented the information made it seem like 4 things were required. Was he really just trying to show two ways of doing the same thing?
I think he was just using the copy paper to draw the line on
 
  • Like
Reactions: TacticalPlinker
Sorry I should have been more specific. The flashlight and plumb line picture makes perfect sense. The copy paper and t-square was what I didn't understand. The way he presented the information made it seem like 4 things were required. Was he really just trying to show two ways of doing the same thing?
I'd assume the t-square was to draw the grid and a stack of copy paper/notebooks as in the pic to raise the butt of the rifle to the grid.
 
  • Like
Reactions: TacticalPlinker
I feel like this process makes sense for getting your eye on the same plane as the centerline of the scope and it would also help with getting the correct eye relief. However, it also seems like you could introduce a small amount of windage error if you don't have the centerline of the scope exactly above the centerline of the bore. Think of how an old SMLE rifle scope that is canted off the left side will hit to the left of the POA on targets closer than the zero and to the right of POA on targets farther than the zero (assuming a converging zero and not a parallel zero). This is an extreme example but is similar to if you had your rifle canted to one side as part of finding the most comfortable position and then you leveled the scope.
Yes. Read the comment again and the one he is responding to: You intentionally induce a tiny amount of error instead of accidentally inducing a bunch of error when you shoulder it.
 
Anyone ever use this thing? Seems pretty simple. I couldn’t find anything about it in the search.


Real Avid Scope Leveling Kit & Precision Scope Level System, Complete Scope Mounting Kit for Mounting, Aligning & Leveling Rifle Scopes, Perfect Tool for Gunsmithing & Hunters


As for leveling a scope: Excluding operator error, THE ONLY important things are gravity and wind. Thats' all the bullet cares about to hit where you aim it. For that, the only important thing is that the reticle's elevation crosshair perfectly points to the center (pull) of gravity. Doing this, the windage crosshair is automatically taken care off as well.

The only way to make this work is with a plumb line - period. Nothing else on the planet is perfectly level with the pull of gravity, including: the scope's body alignment with the reticle, the rail you're mounting the rings on, your bench, the floor it sits on, even how you naturally position the stock of you rifle in your shoulder pocket.

Once you have a plumb reticle all you need is a quality bubble level attached to the rifle/scope for verification (a rough one)
before taking the shot. Install it at the same time you plumb your scope.

Note: If you are not concerned about your hold on your rifle then by all means use a quality level to level your rifle first. And do so only on the rail, making sure you have the level perfectly perpendicular to the rifle/rail. I use this one:
i-HDzWDQp-S.jpg
 
Last edited:
Yes. Read the comment again and the one he is responding to: You intentionally induce a tiny amount of error instead of accidentally inducing a bunch of error when you shoulder it.
Yes , that's where I was going 😉
 
Sorry I should have been more specific. The flashlight and plumb line picture makes perfect sense. The copy paper and t-square was what I didn't understand. The way he presented the information made it seem like 4 things were required. Was he really just trying to show two ways of doing the same thing?
Yes. I do the grid pattern at home first with the flashlight. Then move everything outdoors for a plumb line at distance. Ideally a tall target test would be the way I'd prefer , but thats usually not available to do for me.

I tend to do extra things to ensure reticle alignment. It relaxes me 😎
 
As a piece of history, information, whatever you want to call it,

We now test every scope in our classes, we used only test scopes in the PR2 ones, and now it's done in all of them.
_LG_0475.jpg


Most people don't understand rifle setup, and this goes beyond just getting the scopes plumb on the rifle.

The reality is that manufacturers use the flat at the bottom, so if you match the Flat with the flat of the rail, you are probably 99% there; the final test is quite simple, get behind the rifle and drop a plumb line to confirm.

The leveling kits are a straight-up gimmick, majorly overpriced for what we are doing.

As someone noted, the bullet only cares about gravity, but how you set the rifle up matters, as that is one of the biggest problems we see. Students hunting for the optic, the shooter doesn't bring the scope to them, instead, they stretch to the scope. Once we remove the optic, check its travel and make sure it's not canted in the rings (More on this), we mount the scope with the shooter in place to ensure everything is correct.

_LG_0463.jpg


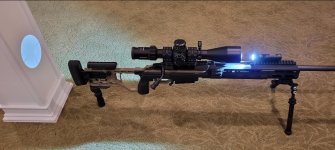
Notice there is no scope on the rifle above we set them up first

_LG_0464.jpg


Then we mount the scope with the shooter in place. Torque it properly and begin class.

In a 12-person class, we find that 1/3 of the students arriving will have the scope canted in the rings. This is not necessarily a mounting issue where the person doesn't know how to level the scope. But more of a case of scope rings biting the tube and pulling the scope over while tightening the rings. In this part of the process, the installer is not necessarily watching the reticle anymore. Such tools like the Spuhr Key help and the Business card method because it holds the scope straight when torquing.

We find the best defense to make sure the scope is correct is a Plumb line; it costs nothing and is about as effective if not more so, than the bubble levels. The bubbles suffer from the device it is being held in. Those devices are not well made and not calibrated correctly, as demonstrated in two posts now, mine and the other, where every level is "off."

Don't overthink it; make sure the reticle matches the fall of gravity, which a weighted string can tell you in a second and you are good.

The shooter should then set up the optic with them correctly positioned behind the rifle. Bipod and Rear Bag in place as if you are actually shooting, get comfortable behind the optic, and aim at a plumb line, End story
 
I use this:
Level kit
Works pretty good except when using low rings.
Just added to my cart, thanks! Of course, low rings are best if you can match them up to your scope and rifle. These look like they will help a lot when the rings are up there!
 
I use a construction laser level to true the rifle vertically through action and stock in sandbags. Then, I project a vertical across the neighborhood onto an unoccupied structure. Align verticals and tighten carefully to avoid torquing scope out of true. It works pretty well. I used to use a plumb line, but wondered about the rifle itself. The laser works pretty well but you have to consider if the stock has a cast to it. Bubble levels are ballpark at best.
 
Knock off of the Arisaka kit. Often find it is too tall to fit in many cases. The Spuhr thing has an advantage in that the base is already part of the mount.

Frank's suggested business cards work well for shorter gaps. The near "universal" tool I use 99% of the time is the flat bar on my bolt disassembly tool. A flat L or T framing brace from the hardware store makes a suitable inexpensive alternative. Edge in a slot other edge against the housing flat and gently twist to level them to each other. Keep pressure on it while tightening the cap screws and done.
 
  • Like
Reactions: C4MC
Anyone ever use this thing? Seems pretty simple. I couldn’t find anything about it in the search.


Real Avid Scope Leveling Kit & Precision Scope Level System, Complete Scope Mounting Kit for Mounting, Aligning & Leveling Rifle Scopes, Perfect Tool for Gunsmithing & Hunters

Seems kind of hokey to me. I just use a Wheeler scope levels and laser to rough it in and then go to the range and fine tune it.
 
I’ve got some bubble levels and Arisaka wedges somewhere but when it comes down to final adjustment it’s always plumb line and eyeballing it from comfortable shooting position. That’s what works for me. As HMFIC says don’t overthink it.
 
I bought one for my M40a1. I found it easy to use. I could not find a decent way to use the business card or feeler gauge trick on it. I also used it to checked my other scopes I did with a feeler gauge and they are dead on to it.

Is it over priced for what it is. Yes. Does the plumb bob work. Yes. I used Cabela’s points and nothing technically came out of pocket. It does work but like everyone else said I would use the feeler gauge/business card trick and it’s way cheaper.
 
Last edited:
  • Like
Reactions: murph1118
As for leveling a scope: Excluding operator error, THE ONLY important things are gravity and wind. Thats' all the bullet cares about to hit where you aim it. For that, the only important thing is that the reticle's elevation crosshair perfectly points to the center (pull) of gravity. Doing this, the windage crosshair is automatically taken care off as well.

The only way to make this work is with a plumb line - period. Nothing else on the planet is perfectly level with the pull of gravity, including: the scope's body alignment with the reticle, the rail you're mounting the rings on, your bench, the floor it sits on, even how you naturally position the stock of you rifle in your shoulder pocket.

Once you have a plumb reticle all you need is a quality bubble level attached to the rifle/scope for verification (a rough one)
before taking the shot. Install it at the same time you plumb your scope.

Note: If you are not concerned about your hold on your rifle then by all means use a quality level to level your rifle first. And do so only on the rail, making sure you have the level perfectly perpendicular to the rifle/rail. I use this one:
i-HDzWDQp-S.jpg
That Starrett looks like a fine little quality instrument. How do you mount it to your rifle? I don't see a mount offered on it's Amazon site. Tks.
 
The Starrett level isn't meant to mount, is meant to replace the crappy plastic housing levels for the reference level on your rail or turret.
 
mm
The Starrett level isn't meant to mount, is meant to replace the crappy plastic housing levels for the reference level on your rail or turret.
This is correct. It's a multi-purpose level. That said, it is very precise, and this can give the impression that it is malfunctioning because you can't find anything to test it with that will center the bubble. That's because most things are not level.

Also, it is not a substitute for getting behind the rifle and doing the plumb line test. That is the ultimate test. I use it to get the rifle as level as possible on a vise before I do the plumb line test. Then I get behind the rifle and do the real plumb line test again.
 
mm

This is correct. It's a multi-purpose level. That said, it is very precise, and this can give the impression that it is malfunctioning because you can't find anything to test it with that will center the bubble. That's because most things are not level.

Also, it is not a substitute for getting behind the rifle and doing the plumb line test. That is the ultimate test. I use it to get the rifle as level as possible on a vise before I do the plumb line test. Then I get behind the rifle and do the real plumb line test again.

 
30AB5C28-4A9C-4B33-969B-36059F77AA10.jpeg

I sometimes borrow some surveying equipment from work to level my scope before lock down. And a plumb laser against my garage door right around dusk. Kinda overkill lol. On a side note, that 10 degree wedge that Spuhr provides when you buy their mounts is always spot on. No bullshit! I just don’t know why I still check it. Wth…