Join the Hide community
Get access to live stream, lessons, the post exchange, and chat with other snipers.
Register
Download Gravity Ballistics
Get help to accurately calculate and scope your sniper rifle using real shooting data.

Install the app
How to install the app on iOS
Follow along with the video below to see how to install our site as a web app on your home screen.
Note: This feature may not be available in some browsers.
You are using an out of date browser. It may not display this or other websites correctly.
You should upgrade or use an alternative browser.
You should upgrade or use an alternative browser.
Rifle painting, advice welcome!
- Thread starter TanktheFrank
- Start date

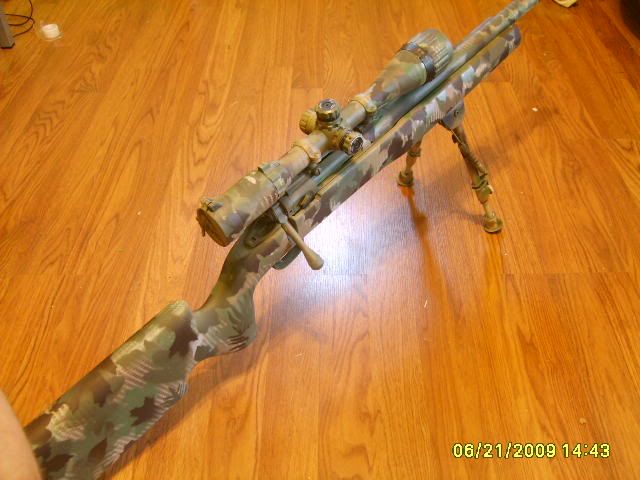
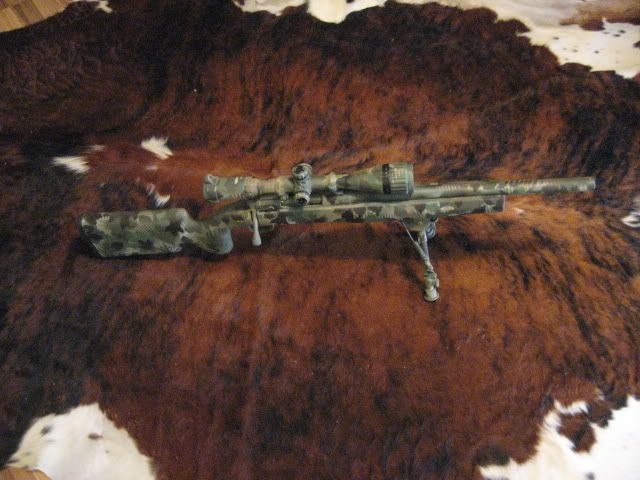
Slightly different finish on the tripod, but both “patterns” seem to be effective in my neck of the woods.
Start with light colors then move to dark. I freehanded a base camo scheme, then laid out stencles over that, then reversed the previous “pattern”.
Brake cleaner will reverse any huge errors, but the whole point is randomness, so just go with the flow.
I hung this rifle up for the initial coats, then laid it flat for the finishing touches.
I tape down everything off using frog tape and a razor. Then filled the scope with cotton balls and taped over the end. Pulled the bolt and inserted rolled up notecards to fill the gap. Degreased with Alcohol and laid down two base coats of rustoleum khaki then hit it with stripes of rustoleum dark earth or dark brown. Then went back on the dark brown with a piece of mesh and shot some more khaki.

Last edited:
You're wearing a blue shirt.
Under a big white roof, as well.
There used to be an earlier version of this topic.
In it I suggested that the new user start out by going to the toy store and buying a plastic toy AR/tommygun/etc. Degrease it thoroughly and start practicing.
When you're done, and you want to start over with a clean slate; simply put the toy gun in a trash bag. Add some of this stuff, bleed out the air, seal the bag and leave it overnight. The next day, take out the toy, let it drain into the bag, and wipe it down with a wet sponge. Hose off any remainder. The degreaser should have completely loosened the rattle can paint, and the toy should now be a clean canvas. This way you can perfect your techniques without doing anything that threatens your real rifle.
I know this Castro Super Clean stuff works great with rattle can camo paints, and it's even supposed to be biodegradable. You can recover the used degreaser by straining it through some cheese cloth back into the jug, and use it again over and over. I've only ever used it straight from the gallon jug.
You'll probably decide, as I did, that rattle can paints simply show the wear too quickly. When you do, the Castro Super Clean can strip it off pretty effectively. Just be really careful with optical coatings, etc.
I've often wondered how well it might work in the bore for carbon rings, etc... But I'm not quite ready to be the guinea pig on that front just yet... The stuff is impressive; I use it as a low-toxicity paint stripper.
I'm not saying anything about whether it works with the more durable coatings, I simply don't know. I do know that it will attack exposed aluminum, taking the shine right off overnight. Maybe that's a plus.
If you're working with masking tape and you want a softer line, raise the edge that establishes the border, and spray paint it LIGHTLY at a right angle to the surface, less is better.
I'd done a lot of research into the science behind color, lighting, and how it all best applies to camo. I reduced it down to a set of base colors using three shades of gray, with color tints added to adjust the color scheme to the local environment. Dark colors work poorly and stand out; most beginners forget that the rifle will probably be getting used in shaded areas providing cover, and that they need to be lighter to take the shadow and still look realistic. I tended toward something I ended up calling 'shark-flage'; incorporating the base grays with the darkest shade atop, the medium shade alongside, and the lightest on bottom. This adjusted the colors so they more closely resembled the lighting effects on the surrounding shaded environment.
This can all get pretty complex, but in the end, I threw about half of it out the window and went with large, more indistinct shapes, much as Uncle Sugar had already perfected long before me. I discarded those small intricate details because, simply, they cannot be resolved by the eye at any serious distance.
IMO, in nature, snakes do it best.
Greg
I once had a chance to visit the USMC RTE (Rifle Team Equipment) Shop at Quantico at the Garand Road compound back in the mid-1990's. They had a newly completed M40 that was ready for issue to a new Scout Sniper. It had been sent out to a retired 8541, and he had done a custom woodland camo job on it using Polane(?) and an Air Brush. It was a true work of art, and the thing that especially caught my eye was the tiny subtle highlights with a light spring(?) shade of green.
I think that all camo is local and that the Operator needs to be capable of redoing their camo on their own; things change a lot, and often.
I toyed with the idea of a two layer camo, with a near impervious epoxy under layer of the grays, repeatedly being touched up to reflect changing local camo needs using a translucent acrylic top layer that could be stripped periodically using the Castro Super Clean. I would use a low luster acrylic floor wax as the top coat medium, tinted with acrylic enamels. I never got to actually try it.
Last edited:
Started with a CZ 455 Varmint 22lr Purchased a Boyds Black Pro Varmint Stock Masked the Black and sprayed the complete stock Khaki them masked the Khaki and sprayed the complete stock Olive removed all the masking and sprayed 3 coats of Matte Clear


.jpg")
Krylon's base plastic primer is great for adhesion after roughing the surface and degreasing. I like their textured paints for basecoat after adding devcon where I want a bit more bite. The I hit it with the sponges for your camo blotches and several matte clear sprays to keep thing where they are. The rifle below has been handled pretty rough and I haven't noticed any wear yet, but it is only a matter of time. Everything on a stock can be removed with some elbow grease...

This is from a long time ago but here is a Savage I did. I did a base of textured tan then I draped it in a laundry bag to give it the scales using brown and a few different greens to spray blotches. And finally I printed off some B&W pictures of leaves that I cut out for stencils and used the same browns and greens to fill in the open areas.
I used krylon for all the colors and one of the green colors had a sheen to it. It blended really well to my east TN surroundings.
I used krylon for all the colors and one of the green colors had a sheen to it. It blended really well to my east TN surroundings.
These are some great looking rifles!
Thanks! I appreciate the comment. I am still learning how to paint well. I find new things to improve upon each time. I actually like it as most people do not, so I hear.
Beautiful Duracoat and stencil work, EKG.
Duracoated this one in 2006 or 07, gets used constantly and the paint has held up.


A word of caution: Duracoat sometimes dries a different color than you thought it would be.
This was supposed to be “Barney Purple” on my 6.5CM:

I called LCW to complain and they said, sometimes it dries pink.....
This rifle infuriates just about everyone who sees it.
Duracoated this one in 2006 or 07, gets used constantly and the paint has held up.
A word of caution: Duracoat sometimes dries a different color than you thought it would be.
This was supposed to be “Barney Purple” on my 6.5CM:
I called LCW to complain and they said, sometimes it dries pink.....
This rifle infuriates just about everyone who sees it.
My buddy (a former 8541) and I were shooting on the thousand yard range one day and he looked down the line and asked me, “Since when did we all become assassins? “ Guys were all dressed in multicam, etc.
I said I was gonna paint my rifle purple and he said he was gonna paint his blue.
He never did paint his rifle....
I said I was gonna paint my rifle purple and he said he was gonna paint his blue.
He never did paint his rifle....
I strongly recommend the sponge technique. I did my Ruger RPR and Burris scope after talking to tech support to make sure it wouldn't affect the warranty. They gave me a few tips. When I learn how to post picks with posts, I'll include some pictures. I love the way it turned out. This winter I'll be doing the new lens caps to match.
If you do all the prep work correctly, that Krylon will never come off completely unless you use sandpaper. It is arguably not as durable as the Imron type paints (Duracoat) but the difference is negligible. I don't use Krylon on my weapons anymore but only because Lauer Weaponry has such a wide choice of the tactical flat colors available.
Here is my first attempt at a semi pro finish
Good degreasing alcohol prep
Brownells alumahyde 2
Hit with heat gun first and after every coat
I think whole rifle fde, with 4 or 5 brown stripes
Taped of 1/2 with eyeballed bdu or tiger frogtape pattern
Then Od with different brown
Then added blk sqiqqles.
I tried to do 1/2 sharp edges , half blended transitions
It’s a PSA premium 20” a4 with colt surplus carry handle, mbt trigger
Should be a fun useful addition esp for $.
Last edited:
Here’s another same prep. Same product/ colors. Done at night with no tape just diagonal stripes
It’s a sweet bpm (Barnes Precision Machine) 16” hyperfire trigger. Vltor a5, Alg handgaurd , radian ch,
First owner had painted it with 4 colors of mud brown. Needs a little more woodland
Heat gun is good and friend of the impatient man. I think it’s functionaly as camo but I did in 1/4 time. Contrast was a little bold, I dusted the whole thing in OD prob in overreaction to the brown.
Last edited:
Two that I’ve painted. The bolt gun was sprayed black and then sponged. In order to sponge I just sprayed some cardboard dipped the sponge in the paint and applied. The ar10 I used primary arm multi cam stencil. Same rustolem camo paint
Attachments
I used Krylon on my work m4. Took paint remover to get the dang thing off. Sooo I’d say it works lol
The biggest thing for a successful paint job is all in the prep. Clean all your parts, I use a grease and wax remover from a auto parts store. Wipe everything down until your rags is clean . Scuff all your parts I use 320-400. Use adhesive promoter on all plastic/synthetic parts ( it only take a very light coat). Of course mask off anything you do not want painted. From there use a tack rag to make sure all lint is removed, then go for broke. I have used both Krylon and Duracoat and Duracoat wears better so that is what I use now. Either way you can't go wrong with either, I would just put on an extra coat of clear on the Krylon.
Here’s a 300 blk Bartz/lmt first sponge attempt needs another round


Actually looks very good - remember, the goal isn't to make it look nice, it's what it doesn't look like that counts. Set it in the tall grass or brush and see what it looks like 50-100 feet away. Don't loose it!Here’s a 300 blk Bartz/lmt first sponge attempt needs another roundView attachment 7227815View attachment 7227816
What was that paint? Did it lasted? I just got a new HMR and when putting the muzzle brake we were using a barrel clamp for the vise, they were aluminum and my friend said that 100% was not going to scratch my barrel. But it did. Now I am thinking about painting it.Don’t overthink it. Just tape what you don’t want paint on, (optic is the most important obviously) and spray. View attachment 6893582
Similar threads
- Replies
- 13
- Views
- 1K
- Replies
- 14
- Views
- 959
- Replies
- 3
- Views
- 611
