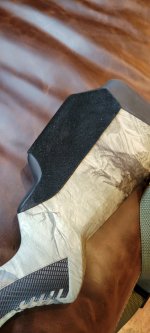
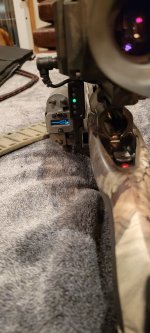
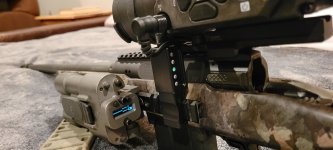
I modified the Boyd's rifle stock cheekpiece to get it a little higher. At first I asked the local gunsmith to use longer screws and sleeves to get the cheek piece higher. However, he had a better idea.
He installed several aluminum plates that screw into the cheek piece. The screws and the sleeves didn't need lengthened. That's not to say that the screws and sleeves couldn't be lengthened.
They could be but with the plates are a little stronger option and less likely to wobble. The eccentric sleeves were polished and corners rounded so they would go in the inserts a little easier before tightening.
Below are before and after photos. As you can see in the before photo, this was the highest I could get the cheek piece. You will note the angle of the plates in the after photo. That's because of the way Boyds drilled the holes in the stock.
Although this looks like an engineering project from a graduate of a Ubangi University its form and function outweigh any ascetics. I could have a pretty rifle or one that shoots well.
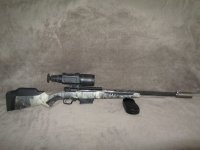
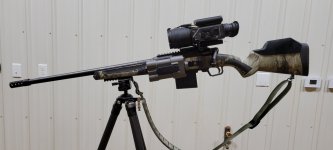
The reason that I needed to raise the cheek piece was because of mounting the scope in higher rings to accommodate a suppressor. As many of you know, a suppressor has a way of occluding the view trough the scope if it's mounted too low.
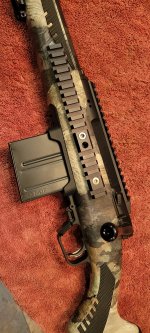
The suppressor I put on the rifle is the Savage AC30 B.O.B. Here's the manufacturer's information and a couple of videos.
The owner's manual says that you are supposed to use the included spanner wrench for assembling and disassembling the suppressor. However, when I went to pick up the suppressor from the dealer, the spanner wrench was missing. In fact, none of the AC30 B.O.B. cans had a spanner wrench.
I had already paid for the suppressor and the form 4 was approved, so I had no choice but to accept it. The dealer was not at fault; Savage was.
I have had several phone conversations with Savage. They told me that they partnered with another company to make the suppressor. That company is supposed to send me another spanner wrench but I haven't seen it. It's now been over a month since I got the suppressor.
Here's the link to the owner's manual so you can see the spanner wrench and how the suppressor goes together.
That's the bad news on the suppressor so let me tell you the good news.
I was able to get the suppressor apart with two big rubber strap wrenches and worked them in opposite directions to get it apart. The knurling on the tube helps to get the strap wrenches to grip the surface.
I use the same strap wrenches to tighten the halves of the suppressor together as well as mounting the device to the barrel. I goes without saying to use the strap wrench on the back portion of the tube when affixing it to the barrel.
You might be wondering if the strap wrench is strong enough to torque the suppressor together and onto the barrel. The answer is yes. All that's needed is 20 ft-lbs of torque and that can be accomplished with the strap wrench.
During my shooting session I didn't have any problems with the suppressor wanting to come unscrewed.
Below is a photo of the suppressor disassembled. That's as far as the manufacturer recommends that you disassemble it. If any further cleaning is needed they recommend you call Savage.
The white stuff that you see on the threads in the high temperature grease by HuxWurx.
As you can read in the manual, Savage discourages the use of any liquid ablative agents inside the suppressor. So I wanted to avoid getting any cleaning solvent inside the first-stage blast chamber which could cause an over pressure situation.
The solution was to plug the hole with a rubber plug that was in a set that I got from Midway USA. So I sprayed the monocore with Hoppes Elite cleaning solution and let it set over night.
I wanted to show everyone some photos of the groups that I shot but they were nothing to brag about.
However, I have a good excuse. The club that I belong to has the worst shooting benches you could imagine and it's almost impossible to get behind the rifle in a comfortable and stable position. I've always had problems with zeroing other rifles there as well.
Shooting prone at that club is a problem as well because the target frames are rather high and the rifle ends up pointed at an uncomfortably high angle.
So I just wait till I get to one of the other ranges that I shoot at to confirm the scope settings on a steel target. So far that practice has worked well for me.
The groups that I shot were about 1.5 inches at 100 yards. I have shot out to 1200 yards with this rifle unsuppressed in the past and scored hits on a 12" square steel plate at that distance. So it's an accurate rifle.
After I got it zeroed I wanted to play a little and shot from a bag on a plate mounted to the tripod from a standing position. Below are the hits that I got at 100 yards.
The small circular plate was the first target that I shot at. As you can see I was a little off-center and was still trying to acclimate myself to the setup. The second target was the head of the IPSC target. You can barely see it in the photo but the first hit on the head was in the upper right corner. I was still getting use to the bag-tripod combination.
The next shot on the IPSC target was dead-center of the head.
The last four shots were on the coyote which you can easily see in the photo.
I don't like aluminum monocore baffles in a suppressor but in this case I made an exception. First of all I'm not shooting a lot of ammunition in rapid fire sessions. With the scope, the cross hairs start to dance after about eight rounds anyway.
Note that I haven't had the chance to get a suppressor cover for this anyway. I don't think that I will because Savage recommends a rate of fire of up to one round per second for 20 rounds. Then let it cool. Being aluminum, I think a cover might be a bad Idea because of the cooling requirement.
The nice thing about aluminum and the back over the barrel design is that the weight isn't that noticeable and the rifle balances really well. The specs say the suppressor weighs 13.7 ounces. I confirmed this with my scales as well. The flash hider that I previously had on the muzzle weighed 4.8 ounces. That's a difference of 8.9 ounces and with the over-barrel design there isn't a balance problem.
In the photos below you can see how far the suppressor resides over the barrel. The bottom photo shows where the back of the suppressor would be when it's mounted on the barrel. That may not seem like much but believe me, I can discern very little difference in the balance point whether the suppressor is on or not.
I hate the Savage accutrigger. So I installed the Jard trigger on the rifle. It was a little finicky to install but got it on. At first the safety would not engage but the instructions were clear on how the adjust for that.
A function/safety check by slamming the bolt forward as hard as I could revealed that the sear engagement need adjustment. This took the trigger pull up from 1 lb. to 1.5 pounds before I was satisfied.
That's a little more than I like but I also have some peace of mind that the rifle is made as safe as possible.
While it does not rate up there with a Timney or Triggertech the Jard trigger is light years ahead of the accutrigger.