• Watch Out for Scammers!

    We've now added a color code for all accounts. Orange accounts are new members, Blue are full members, and Green are Supporters. If you get a message about a sale from an orange account, make sure you pay attention before sending any money!

Help Needed - Sticky Bolt CLOSE

I use the same decapping die. I works great.


Yup, a "rabbit hole" indeed . . . especially if you really get into precision reloading.


If you have a good caliper (not one of the cheap one's), it'll be a breeze.
Hornady digital caliper. Not the best but it’s quick enough to rezero switching back n forth from using the comparator set or not.

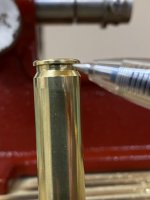
Will report back once I’ve measured shoulder bump (and probably resized), charged, and seated the single round pressure/ladder test.

Holy cow what a relief.
 
As someone said earlier.. What you get with the comparator is just a reference, try 5 comparators and you'll probably get 5 different readings. I had 2 sets of headspace and bullet ogive inserts. Man I went down a rabbit hole a few years back trying to figure out why I couldn't get a consistent reading. I now have them color coded to make sure I'm using the right one each time.

Moral of the story.. check your reloads compared to FGMM and other factory loads. They should be within a few thousandths (reloads being longer).
 
  • Like
Reactions: Holliday
I did it once loading some 308 ammo for an FAL a friend was trying to sell me. That beast just rammed them home anyway.

If you attached an FAL carrier to a stick, you have have a pretty formidable hammer.

You can see from the painted brass where it is sticking. It is just kind of confusing to look at, at first, because it should not be sticking on the outside diameter of the shoulder like that. I was corn-fused when there wasn't a ring around the base of the painted case. :ROFLMAO:
 
Last edited:
I did it once loading some 308 ammo for an FAL a friend was trying to sell me. That beast just rammed them home anyway.

If you attached an FAL carrier to a stick, you have have a pretty formidable hammer.

You can see from the painted brass where it is sticking. It just kind of confusing to look at, at first, because it should be sticking on the outside diameter of the shoulder like that. I was corn-fused when there wasn't a ring around the base of the painted case. :ROFLMAO:
Lol. I’m one of the few that failed art class.
 
Lol. I’m one of the few that failed art class.
Usually when there is a sticky case problem that isn't solved by shoulder bump, it is the case not getting sized enough at the base that causes the sticking. That is what meant about expecting to see a ring at the base of the case.
 
I did it once loading some 308 ammo for an FAL a friend was trying to sell me. That beast just rammed them home anyway.
I do phone tech support for my fuel solutions on motorcycles for mostly DIYers. The high art is to always be learning and to look for what you are NOT seeing.
 
  • Like
Reactions: roosterpig
Alright gang. Since not asking enough questions got me in this predicament, I’ll fire away now.

I’ve got ~90 pieces that are incorrectly sized (not charged). Am I free to rework that brass and compare it to once fired unsized brass once my headspace comparator arrives?

Any issue there?

Probably have to trim again.

Working under an abundance of caution now…
 
Yes, just run them through the now properly adjusted F/L sizing die again, no big deal. You do need to re-lube the cases. Although, it seems you major issue was squishing the shoulders when you seated the bullets on an improperly adjusted seating die. You had two things going on.

On a standard seating die like you have, when setting them up, I place a 5¢ coin on top of the shell holder. Raise the press ram all the way up and then screw the die in and just touch the coin and the set the lock ring. That usually gives you enough space between the die bottom and the shell holder and gives you a gap big enough to not get a crimp.
 
  • Like
Reactions: roosterpig
Yes, just run them through the now properly adjusted F/L sizing die again, no big deal. You do need to re-lube the cases. Although, it seems you major issue was squishing the shoulders when you seated the bullets on an improperly adjusted seating die. You had two things going on.

On a standard seating die like you have, when setting them up, I place a 5¢ coin on top of the shell holder. Raise the press ram all the way up and then screw the die in and just touch the coin and the set the lock ring. That usually gives you enough space between the die bottom and the shell holder and gives you a gap big enough to not get a crimp.
Thanks, flight!!

I did back off the seating die a full turn after touching brass. I like the 5¢ idea too.
 
Yes, just run them through the now properly adjusted F/L sizing die again, no big deal. You do need to re-lube the cases. Although, it seems you major issue was squishing the shoulders when you seated the bullets on an improperly adjusted seating die. You had two things going on.

On a standard seating die like you have, when setting them up, I place a 5¢ coin on top of the shell holder. Raise the press ram all the way up and then screw the die in and just touch the coin and the set the lock ring. That usually gives you enough space between the die bottom and the shell holder and gives you a gap big enough to not get a crimp.
I have my improperly sized pieces already primed (I know that was stupid)

Can I resize to proper shoulder bump with my decapping pin/expander ball backed up enough so the pin doesn’t touch the seated primer? That way I can still expand the mouth of the case back out. Any issue with this?

Don’t have a neck expander mandrel die…
Knock the primers out and reseat them after you properly resize.
 
  • Like
Reactions: roosterpig
Or if you can, take the whole decapper setup out of the die. That's what I do on my Redding dies. I decap and expand necks in a separate step.
 
Just take the pin out and leave everything else in the die. Resize them and put the pin back in when you are done.
No reason at all to remove the primers unless you just want to do unnecessary steps
 
Just take the pin out and leave everything else in the die. Resize them and put the pin back in when you are done.
No reason at all to remove the primers unless you just want to do unnecessary steps


O/P, do ^^this ^^, unscrew the sizing button. Take the pin out, screw the sizing button back onto the rod and re-install in the die. After you're done, reinstall the pin. You might have to lube the inside of the case necks since you're going back into a sized with the expanding button twice in this operation, once on the upstroke and once on the down stroke. Try it and see.
 
O/P, do ^^this ^^, unscrew the sizing button. Take the pin out, screw the sizing button back onto the rod and re-install in the die. After you're done, reinstall the pin.
Yeah I tried. It’s pretty well stuck on there. Going to drop some kind of penetrating lube in there to break up whatever’s making it a biotch to unscrew.
 
I have my improperly sized pieces already primed (I know that was stupid)

Can I resize to proper shoulder bump with my decapping pin/expander ball backed up enough so the pin doesn’t touch the seated primer? That way I can still expand the mouth of the case back out. Any issue with this?

Don’t have a neck expander mandrel die…

Yes ,most likely
 
  • Like
Reactions: roosterpig
Gosh dang this UPS mail innovations stuff is killing me. Headspace comparator will be here any day now…
 
The mentally disabled love-child of UPS and US Postal……
Should have been here yesterday. But the tracking said it went from Kansas City to Colombia and back to Kansas City lol.
 
One thing to remember about using calipers, you don't need to squeeze the shit out of them. Just a light touch. You can change the reading you get by squeezing too hard.

There is a joke in machining about just squeezing the calipers harder to get an oversize part in tolerance.

Happy reloading!
 
  • Like
Reactions: roosterpig
One thing to remember about using calipers, you don't need to squeeze the shit out of them. Just a light touch. You can change the reading you get by squeezing too hard.

There is a joke in machining about just squeezing the calipers harder to get an oversize part in tolerance.

Happy reloading!
Great advice. Thank you.

Witnessed this while trying to use that (probably imperfect) 9mm case as a headspace comparator.
 
  • Like
Reactions: JoshPutman
Alright. Took out the firing pin and ejector plunger after I resized all 200 pieces of brass. They’re probably closer to 3 thou neck bumped but not the end of the world I guess.

Anyhow the bolt closes nicely under no tension.

I don’t have the damn overall length gauge so I’ll prob just load some up to 2.800 again and test. Want to load to AICS mag length but can’t really verify that I’m not jamming the proj into the lands without measuring. Oh well. More to come this week.
 
Not sure if anyone recommended this video below.. basically, try to chamber your fired brass before you size it. If it closes with no resistance (with fire control group out) then you don't need to bump it back any more. Set your sizer to just hit the neck without changing headspace. Otherwise you want .001-.002" setback from what the fired brass is, then try to chamber that. Caveat: I'm just spouting what I've heard/read on the innernets..

 
Last edited:
  • Like
Reactions: roosterpig
Alright. Took out the firing pin and ejector plunger after I resized all 200 pieces of brass. They’re probably closer to 3 thou neck bumped but not the end of the world I guess.

Anyhow the bolt closes nicely under no tension.

I don’t have the damn overall length gauge so I’ll prob just load some up to 2.800 again and test. Want to load to AICS mag length but can’t really verify that I’m not jamming the proj into the lands without measuring. Oh well. More to come this week.
While the bolt is stripped load one cartridge at max mag length and if bolt drops with no resistance you are not in the lands.

I use this to find the lands it’s far more consistent for me than the Hornady OAL gauge.
 
While the bolt is stripped load one cartridge at max mag length and if bolt drops with no resistance you are not in the lands.

I use this to find the lands it’s far more consistent for me than the Hornady OAL gauge.
Already reassembled. Will take her back apart sometime this week.

I can’t go past 2.86 anyways. Might be wasting my time.
 
I agree that with a factory barrel w SAAMI free bore, you’ll hit max mag length well before reaching the lands.
I guess my next question would be… any benefit to loading an SMK at 2.860 instead of 2.800 initially?

Is there enough info out there to support starting at one place vs the other is better?
 
The click test works for finding max length too. With the bolt disassembled, seat a bullet looong. Then place the cartridge under the extractor and insert into the reciever. Try to close the bolt. Keep seating the bullet back a little at a time until the bolt drops closed with no force. This is just missing the lands.
 
I just googled jump for seirra match kings, .020 is a good place to start. You can email seirra too.
 
  • Like
Reactions: roosterpig
The click test works for finding max length too. With the bolt disassembled, seat a bullet looong. Then place the cartridge under the extractor and insert into the reciever. Try to close the bolt. Keep seating the bullet back a little at a time until the bolt drops closed with no force. This is just missing the lands.
Taking the ejector plunger out is just a bitch to do lol. The punches are so dang small I feel like I’m going to bend em.

The things we do.
 
I guess my next question would be… any benefit to loading an SMK at 2.860 instead of 2.800 initially?

Is there enough info out there to support starting at one place vs the other is better?

Assuming you're talking about 175 SMK's, 2.860 (fits in you mag) is as good as any place to start. I've loaded them as long as 2.817 in my gun (hand loading as they would not fit my my mag), which was ~.010 off the lands of an eroded throat. The benefit of loading long like that is it'll reduce pressure for a load that's being used at 2.800 or allows you to use more powder for more velocity . . . if that's what you want, and give you room to seat down in increments to find a good accuracy node.
 
  • Like
Reactions: roosterpig
Assuming you're talking about 175 SMK's, 2.860 (fits in you mag) is as good as any place to start. I've loaded them as long as 2.817 in my gun (hand loading as they would not fit my my mag), which was ~.010 off the lands of an eroded throat. The benefit of loading long like that is it'll reduce pressure for a load that's being used at 2.800 or allows you to use more powder for more velocity . . . if that's what you want.
Cmon who doesn’t like fast?!
 
  • Haha
Reactions: straightshooter1
Alright gents. Everything is resized. Finishing up checking trim length.

School me on these marks. Faint line near case head, what looks like an ejector plunger mark, and an extractor claw mark? What’s it all mean? Is FGMM brass as soft as I’ve read? Anything to worry about? Am I reaching max pressure on factory FGMM 175gr SMK factory loads?

**edit** these are not all pics of the same case.
 

Attachments

  • 651E57FC-5C86-40DD-BDB6-051C8F75C1D3.jpeg
    651E57FC-5C86-40DD-BDB6-051C8F75C1D3.jpeg
    360 KB · Views: 49
  • 0E81BA47-C506-45CB-812A-2149CA5B4275.jpeg
    0E81BA47-C506-45CB-812A-2149CA5B4275.jpeg
    372.5 KB · Views: 48
  • 36FBA246-C8C7-44ED-BC24-DB40CDDA3021.jpeg
    36FBA246-C8C7-44ED-BC24-DB40CDDA3021.jpeg
    366.7 KB · Views: 49
Last edited:
Cases look fine. The newer Federal GMM cases with the blue primer lacquer sealant is better brass than the much older GMM brass that had no primer sealant. I've shot it all. The old stuff is pretty soft.
 
  • Like
Reactions: roosterpig
Update:

Removed the firing pin and extractor plunger. Used the ?wheeler? method to find the lands. Took three pieces of resized brass and three projectiles. Seated them waaaay long. Started seating deeper little by little. First one had the bolt drop freely somewhere between 2.384” and 2.381” CBTO. Second one fell freely at 2.383”. Third at 2.3825”. Awesome test.

So with a 175gr SMK my CBTO just off the lands is 2.383”. That’s a COAL of roughly 2.965”. So if I load at mag length I’m still jumping .1” (ish)

I’m blown away. Awesome result though. I guess when people say factory Remingtons have a loooooong freebore, they aren’t lying. Wowza.

Never have to worry about jamming!
 
Interesting result today.

After heavy cleaning, sent 10 rounds of FGMM down the tube. Saw an average MV of 2528.25fps with those ten shots. Considered the barrel ready at this point.

Started ladder test with three shot groups starting at 42gr of Varget. 42.0 and 42.3 went well with roughly half inch groups. Only got to 42.6gr of Varget before bolt lift got heavy and ejector was swiping the case heads. At 42.6gr was seeing avg of exactly 2500fps with an SD of 7.2. There was also what looked like some unburnt powder in my can when I took it off and put it on another rig for cycling testing.

Thinking now I will work in .2gr increments down from 42.5gr charge weight and see what we find in a few weeks. 5 shot groups this time too.

Going to have to seat a touch deeper. Had to hand feed some of the cartridges. Should have checked this before I left the house. You live and you learn.

Looking like we will end up in the higher 24XX fps zone using Varget as a propellant. Not ideal. But it’s a result. Am I losing MV by seating at mag length instead of 2.800?

I’m interested in what the FGMM recipe is that achieves 2525ish fps from my 18” canned barrel.

I guess higher end brass would help get some more velocity and get to that “43.5” node that everyone talks about.

The ideal outcome hasn’t been reached. But I’m just getting started and stoked to have some results.