• Watch Out for Scammers!

    We've now added a color code for all accounts. Orange accounts are new members, Blue are full members, and Green are Supporters. If you get a message about a sale from an orange account, make sure you pay attention before sending any money!

Help Needed - Sticky Bolt CLOSE

roosterpig

Sergeant of the Hide
Full Member
Minuteman
Aug 29, 2011
389
76
USA
Alright fellas. Just getting into reloading so I’m hoping that this is an easy fix that’s staring me right in the face, I just haven’t discovered it yet.

Background:

Components - R700 .308 win. 175gr SMK. Varget propellant. CCI 200 primers. Once fired FGMM brass.

Steps taken: decapped using Lee universal decapping pin. Tumbled in corn cob media. Lubed using RCBS case slick. FL resized using an old set of my dads RCBS dies (that I’ve cleaned out with carb cleaner). Set up that resizing die by raising the shell holder all the way up then lowering the die until it touches. Everything felt normal. Retumbled in media to remove lube. Trimmed to as close to 2.005 as possible with cam lock trimmer. Chamfered and deburred. Charged and seated.

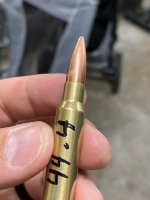
I loaded up an 11 round ladder test from 42gr to 45gr of Varget to assess pressure before starting OCW testing. Also to make sure I’m not a complete dummy. Turns out I am.

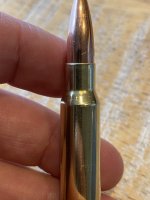
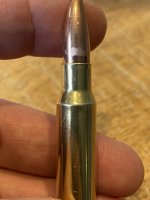
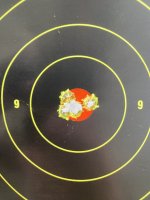
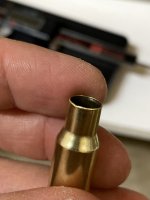
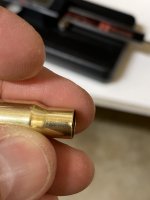
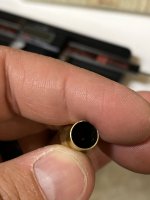
Shot a 5 rd group with FGMM. Everything fine. Let it cool. Went to chamber the 42.0 gr load and it was hanging trouble chambering. Sticky. I could force it but it was definitely too much force. Tried the next two rounds (42.3 and 42.6) and same thing. Sticky to chamber. Some markings on one side of the projectile that I noticed. Nothing out of the ordinary on the brass.

Do I have misaligned projectiles in the mouths of the cases? Do I need to get a headspace gauge to ensure this isn’t a sizing thing? Am I even on the right path to figuring out wtf is going on?

Luckily only have to pull 11 projectiles. Unfortunately probably need to decap 100 unspent primers.

Appreciate all the help.
 
  • Like
Reactions: 338dude
You probably didn’t bump the shoulders back enough. Don’t follow the procedure you did for fl die set up as it rarely results in a correct setting for your rifle. Measure your fired cases casehead to shoulder datum, record the measurement then size a piece if brass. Measure the sized brass. If it’s greater than or equal to your fired brass, screw the die down by about 5 degrees ans try again. Keep adjusting until you have .002” shoulder bump. (Ie where your sized brass case head to shoulder datum is .002 less than your fired cases).

The hash marks in the pic below represent roughly .002 of adjustment of the die on the right.
21A8488A-A005-4F7F-AF43-38184C6783B4.jpeg
 
You probably didn’t bump the shoulders back enough. Don’t follow the procedure you did for fl die set up as it rarely results in a correct setting for your rifle. Measure your fired cases casehead to shoulder datum, record the measurement then size a piece if brass. Measure the sized brass. If it’s greater than or equal to your fired brass, screw the die down by about 5 degrees ans try again. Keep adjusting until you have .002” shoulder bump. (Ie where your sized brass case head to shoulder datum is .002 less than your fired cases).

The hash marks in the pic below represent roughly .002 of adjustment of the die on the right.
View attachment 8094773
Thanks a million for the quick response.

Leads me to my next dumb question. Is there a tool for measuring base to shoulder?
 
95E6C04B-A567-4DBB-890A-75B1552E6657.jpeg
 

Attachments

  • B10B3F50-88E7-4D7C-91E2-9FCBE573CAA7.jpeg
    B10B3F50-88E7-4D7C-91E2-9FCBE573CAA7.jpeg
    385.3 KB · Views: 84
  • E94D389D-556C-4404-9C84-5FA48954F5D4.jpeg
    E94D389D-556C-4404-9C84-5FA48954F5D4.jpeg
    373 KB · Views: 88
Thanks a million for the quick response.

Leads me to my next dumb question. Is there a tool for measuring base to shoulder?
You’re welcome. Here’s the tool being used:
727764B7-FDE7-492A-853C-2857245EF6A9.jpeg

Note - this does NOT measure actual headspace. Its a relative reference gauge intended to help you set up your die based on measurement value differences between your fired and sized brass.
 
I’ve already got the CBTO measurement tool with the base so I guess I need the headspace comparator gauge insert AND a headspace gauge. Drop in kind that is easy to tell if I’m within SAAMI.

Thanks a million fellas. Huge help.
 
Another question. The marks on one side of the projectile. From the pic I sent. Anything to worry about there?
 
It looks like you might jamming the bullet into the lands. How did you choose your bullet seating depth?
View attachment 8094866
Just went with 2.800 to avoid any wild stuff happening. This was the maiden voyage to make sure I’m not completely off base.

Just based on the variance in SMKs some floated up to around 2.806 or 7. Nothing wild though. Not even close to mag length.
 
You probably didn’t bump the shoulders back enough. Don’t follow the procedure you did for fl die set up as it rarely results in a correct setting for your rifle. Measure your fired cases casehead to shoulder datum, record the measurement then size a piece if brass. Measure the sized brass. If it’s greater than or equal to your fired brass, screw the die down by about 5 degrees ans try again. Keep adjusting until you have .002” shoulder bump. (Ie where your sized brass case head to shoulder datum is .002 less than your fired cases).

The hash marks in the pic below represent roughly .002 of adjustment of the die on the right.
View attachment 8094773
O/P as stated by others, you probably didn't bump your case shoulders back enough. The Hornady tool works great to measure the shoulder to case base. As also said, it's not a headspace gauge, it is a comparator that does give you numbers to work with. As shown by nn8734 in his 2 photos, the numbers shown on the calipers- 1.626" on the fired case. You would then set your F/L die to size the case to about 1.624" and then check it in your rifle to see if it easily chambers. If it works, you will size to that length.

If you want to check before getting a comparator tool, you can use your Rifle's chamber to check. In the above ^^ photo by nn8734, he's(Him, Them,They, It ) marked the die where it's currently adjusted. Take a fine point marker like he did and mark a reference point on the die body and onto the lock ring. Mark a couple more hash marks to the left of that mark about 1/8" apart. Turn your die into the first mark, lock it and then resize a case. Check to see if the case will chamber. Repeat if necessary to the next reference mark and check again. You should get a case that will chamber easily.

Using a comparator makes it real easy to set the die properly since you get numbers actually to see instead of just guessing.

Of course it is possible you to have set the seating depth too far out hitting the lands, but Remingtons have a very long throat. Load a dummy to 2.800". and try.

What is your COAL measurement?
 
  • Like
Reactions: roosterpig
O/P as stated by others, you probably didn't bump your case shoulders back enough. The Hornady tool works great to measure the shoulder to case base. As also said, it's not a headspace gauge, it is a comparator that does give you numbers to work with. As shown by nn8734 in his 2 photos, the numbers shown on the calipers- 1.626" on the fired case. You would then set your F/L die to size the case to about 1.624" and then check it in your rifle to see if it easily chambers. If it works, you will size to that length.

If you want to check before getting a comparator tool, you can use your Rifle's chamber to check. In the above ^^ photo by nn8734, he's(Him, Them,They, It ) marked the die where it's currently adjusted. Take a fine point marker like he did and mark a reference point on the die body and onto the lock ring. Mark a couple more hash marks to the left of that mark about 1/8" apart. Turn your die into the first mark, lock it and then resize a case. Check to see if the case will chamber. Repeat if necessary to the next reference mark and check again. You should get a case that will chamber easily.

Using a comparator makes it real easy to set the die properly since you get numbers actually to see instead of just guessing.
Thanks, Flight!

More experimenting is in my future. Learn something new every day.
 
Also, quick plug… your suppressor covers are legit. Received one from you in December and she’s served me well this year.
Thanks brother we appreciate it!

If the mark on the bullet wasn’t there before you chambered and it was there after a hard bolt close, I’d say there’s a good chance that’s where the problem is. Too much headspace is possible but that mark got there somehow. Take a piece of your prepped brass and see if the bolt closes on it easily. That will quickly tell you if it’s the brass.
 
Alright. After taking in all the comments (thank you for all the input), I took a once fired (from the same rifle), unsized piece of the same brand of brass. Stuck it in the chamber, closed the bolt. No prob. Took a once fired resized and trimmed piece (no powder or projectile) and dropped it in the chamber. Maybe a little sticky but no real issue. I took a different load from my pressure test earlier today and tried to drop it in the chamber. Super sticky just like the load I started this thread for.

In theory the resized piece and the charged load should have the same shoulder dims etc. right? Except for the projectile expanding the neck a touch.

I’m still going to order headspace and comparator gauges etc from Midway. But now I’m even more perplexed.

Attached pic of markings on the other projectile that I just tried
 

Attachments

  • image.jpg
    image.jpg
    361 KB · Views: 69
Clean your barrel recently?
You can use an empty 9mm or 40 case as a makeshift headspace comparator until the tool arrives.
 
  • Like
Reactions: Dot3
Clean your barrel recently?
You can use an empty 9mm or 40 case as a makeshift headspace comparator until the tool arrives.
I didn’t clean before. I actually shot a little bit of FGMM prior to chambering the reloads. And it was working lol
 

Attachments

  • 55CB70B5-65DC-4D56-AE96-65653C5E8110.jpeg
    55CB70B5-65DC-4D56-AE96-65653C5E8110.jpeg
    401.8 KB · Views: 26
After my son goes to bed I’m going to size a piece by trying to bump the shoulder down a touch more and seating a fresh projo. No primer no powder.

Will see if it seats then we will be in business. Or back to the drawing board.
 
Set up that resizing die by raising the shell holder all the way up then lowering the die until it touches. Everything felt normal.
That is NOT the way to setup a sizing die. Even the RCBS instructions say to raise the ram, touch the die, lower the ram and then turn the die in another 1/4 turn. You need a little cam over to take the slop out of the presses linkage.

I still say you're not bumping the shoulder back. Turn your die in another 1/8-1/12 turn. Size a piece of brass. Seat a bullet in the case with no primer or powder. See if it chambers. If it doesn't, turn the die in another 1/8, but I'll bet it chambers.

I believe you will find the spot where the LOADED cases will chamber. You can do this before getting the comparator tool.

**EDIT** I see you posted your last response while I was typing mine.
 
  • Like
Reactions: roosterpig
That is NOT the way to setup a sizing die. Even the RCBS instructions say to raise the ram, touch the die, lower the ram and then turn the die in another 1/4 turn. You need a little cam over to take the slop out of the presses linkage.

I still say you're not bumping the shoulder back. Turn your die in another 1/8-1/12 turn. Size a piece of brass. Seat a bullet in the case with no primer or powder. See if it chambers. If it doesn't, turn the die in another 1/8, but I'll bet it chambers.

I believe you will find the spot where the LOADED cases will chamber. You can do this before getting the comparator tool.

**EDIT** I see you posted your last response while I was typing mine.
Thanks, Flight.

Live and learn, I reckon. Will report back later.
 
Added about a quarter turn to the sizing die. Took the shoulder down about 7 thousandths (using a spent 9mm case so who knows how true this actually was. Trimmed to 2.005. COAL 2.801.

Still sticky but not as sticky.

Going to pull the bullet. Add another half turn to the resizing die. Reseat. See how it feels.
 
Brass will get longer in the sizing die until the shoulder is pushed back. IOW, you’re squeezing the base down first, and that brass has to go somewhere. It may seem strange, when you’re first setting up your sizing die, to run a piece of brass through it, and find that the base to shoulder measurement GREW by a couple thousandths, but that’s what happens. So like everyone has said, turn your die in some more and keep checking.

I might also look into whether you’re dealing with a carbon ring. At 2.800 OAL, you should be a long ways from the lands. That radial mark on the bullet looks more like a carbon ring to me that engraving from the rifling. So it’s very possible that you have two “issues” going on at once: brass that’s actually growing slightly as you run it through the die and/or a carbon ring.

Is the factory FGMM loaded at 2.800 OAL? Can you measure base to ogive on the factory stuff and compare base to ogive on your reloaded stuff?
 
Added about a quarter turn to the sizing die. Took the shoulder down about 7 thousandths (using a spent 9mm case so who knows how true this actually was. Trimmed to 2.005. COAL 2.801.

Still sticky but not as sticky.

Going to pull the bullet. Add another half turn to the resizing die. Reseat. See how it feels.
You don’t want to have to move the shoulder anymore than .002-.003. That much should give you all the clearance you need…at the shoulder. From there (on an empty, resized piece of brass) the issue is somewhere other than the shoulder
 
One can hope lol. The bummer is knocking out 100 primers.

Other than the primers, great learning experience.

No need to remove primers. Make sure the decapping rod is out of your die…. Then resize. Safety glasses, ear plugs, and gloves required.
Yep, just use extra care like J.J. said. Keep lube away from the primers so as not to contaminate them.
 
Brass will get longer in the sizing die until the shoulder is pushed back. IOW, you’re squeezing the base down first, and that brass has to go somewhere. It may seem strange, when you’re first setting up your sizing die, to run a piece of brass through it, and find that the base to shoulder measurement GREW by a couple thousandths, but that’s what happens. So like everyone has said, turn your die in some more and keep checking.

I might also look into whether you’re dealing with a carbon ring. At 2.800 OAL, you should be a long ways from the lands. That radial mark on the bullet looks more like a carbon ring to me that engraving from the rifling. So it’s very possible that you have two “issues” going on at once: brass that’s actually growing slightly as you run it through the die and/or a carbon ring.

Is the factory FGMM loaded at 2.800 OAL? Can you measure base to ogive on the factory stuff and compare base to ogive on your reloaded stuff?
FGMM 2.209 CBTO 2.801 OAL
dummy load 2.216 CBTO 2.7995 OAL
 
Knocked the shoulder back another 7 thou. Full half turn of the die.

Still difficult to chamber. Not as difficult as it originally was. But not smooth like a factory load.

I’m beginning to wonder if these old RCBS dies from my dad are old/worn/rusted and cleaned enough to be out of spec. I guess the headspace gauge will help with that.
 
  • Like
Reactions: Holliday
I did notice an odd knick in this piece of brass that I’ve been reworking after ejecting. Oh boy.
 

Attachments

  • image.jpg
    image.jpg
    390.6 KB · Views: 67
  • image.jpg
    image.jpg
    375.1 KB · Views: 69
  • image.jpg
    image.jpg
    334.8 KB · Views: 63
  • image.jpg
    image.jpg
    351.8 KB · Views: 63
You don’t want to have to move the shoulder anymore than .002-.003. That much should give you all the clearance you need…at the shoulder. From there (on an empty, resized piece of brass) the issue is somewhere other than the shoulder
Thanks DOT. In order to verify, I bumped another 7 thou (according to my home made gauge… spent 9mm casing) and still sticky.

I just don’t see why it would be sticky with these reloads but NOT with FGMM. Beyond me.
 
Brass will get longer in the sizing die until the shoulder is pushed back. IOW, you’re squeezing the base down first, and that brass has to go somewhere. It may seem strange, when you’re first setting up your sizing die, to run a piece of brass through it, and find that the base to shoulder measurement GREW by a couple thousandths, but that’s what happens. So like everyone has said, turn your die in some more and keep checking.

I might also look into whether you’re dealing with a carbon ring. At 2.800 OAL, you should be a long ways from the lands. That radial mark on the bullet looks more like a carbon ring to me that engraving from the rifling. So it’s very possible that you have two “issues” going on at once: brass that’s actually growing slightly as you run it through the die and/or a carbon ring.

Is the factory FGMM loaded at 2.800 OAL? Can you measure base to ogive on the factory stuff and compare base to ogive on your reloaded stuff?
Tell me more about this carbon ring stuff.