• Winner! Quick Shot Challenge: What’s the dumbest shooting myth you’ve heard?

    View thread

Is bedding the AR barrel a myth? What's the best way?

Looking on triggershims but cannot find the assortment pack you bought, can you post a link? Thanks
Their site is a bit of a mess but nice people to deal with.

ETA:
use the drop down and select the DIY combo then note what sizes you want
 
When I did mine I had the second recoil lug dovetailed into the barrel after I had bedded the barrel into the forestock. I smoked the barrel down on to the wood then double tapped it from the front of where the second recoil lug was marked to go forward to the muzzle and smoked that down to give me the light float then cut in for the recoil lug and glass bedded the lug with the all faces taped except for the rear face. I always bed on wood and the smoker is the best accessory for doing that.
 
When I did mine I had the second recoil lug dovetailed into the barrel after I had bedded the barrel into the forestock. I smoked the barrel down on to the wood then double tapped it from the front of where the second recoil lug was marked to go forward to the muzzle and smoked that down to give me the light float then cut in for the recoil lug and glass bedded the lug with the all faces taped except for the rear face. I always bed on wood and the smoker is the best accessory for doing that.
Uhhh, what?
 
Where does the 'normal' upper flex?
AR-Barrel-Support.jpg
 
I true em and glue em,... did enough testing in the beginning before and after, there was always improvement, sometimes a farly drastic improvement...I just do it for all..also centering the bolt carrier can be beneficial.
Ok talk to me about centering the bolt carrier. I'm rebuilding my Grendel which is not giving impressive groups, and I'm planning on loctiting it, but I'm curious about how you go about centering a bolt?
 
Ok talk to me about centering the bolt carrier. I'm rebuilding my Grendel which is not giving impressive groups, and I'm planning on loctiting it, but I'm curious about how you go about centering a bolt?
It's centering the bolt carrier, along with a good to top quality barrel, plus all the other procedures one can have a very accurate AR style rifle.
This takes machine tools and precision measuring equipment...not for the average builder.
For those curious, there are videos from AR Armors to help one with understanding the steps, in accurasizing...it's where I learned, buying books, and videos, plus being a machinist with a home machine shop. An advantage most do not have...but one can learn.
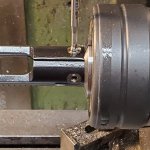
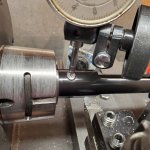
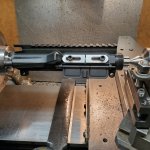
If you have access machine tools, and do fixturing, or have a machinist friend show you. It looks something like this.
 

Attachments

  • 20201228_205709.jpg
    20201228_205709.jpg
    511.5 KB · Views: 118
  • 20201228_212650.jpg
    20201228_212650.jpg
    517.1 KB · Views: 111
  • 20210102_195720.jpg
    20210102_195720.jpg
    682.2 KB · Views: 109
About 15 years ago, I ran into a gunsmith at a local shooting range who had squared and trued-up everything he could think of for a Grendel build.

He squared the barrel extension, the receiver/extension/barrel nut faces and bearing surfaces, trued-up/cut the threads himself, and de-edged/blended/polished his feed ramps.

He was shooting .5” groups out of the gate with it. I think he had a 22” barrel of one of the pedigreed barrel shops, maybe a Shilen.

He’s where I got the idea for the barrel extension work I do for reliability/feeding/babying brass.

As to the question about bolt carriers, most people don’t realize the bolt carrier actually rides high inside the raceway due to cartridge stack upward pressure from the magazine spring. The rails-in-contact are the top rails on the carrier, while the bottom rails kinda bounce off the inner lower raceway track. The initial contact area for the bottom of the carrier is the center spine at 6 o’clock that rides on top of the cartridge in pre-presentation.

Once the carrier clears the cartridge stack, the bottom rails are free to fall into-position with gravity, then they lift above again once the bottom spine rides over the next cartridge in the magazine and the stack lifts the carrier back up into tension against the inner top of the raceway.

What 45-90 is doing with the 4 hemisphere bolts on the carrier tail is controlling some of that banging around that happens normally with AR-15s, centering the carrier tail throughout its travel inside the RET, if I’m interpreting his placement of those bolts correctly ( I might be totally off my rocker as well.)
Basically one follows in the footsteps of those armorers willing to discuss, in print or video, the things they do to make match winning ARs.
Then one adds, subtracts, and mixes their findings into what is learned.
It's a never ending endevor, always learning.

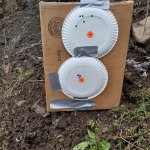
Here is a visual difference...Same match ammo, same day...2 rifles
the top group is a factory Areo Precision upper fully assembled by them...
Bottom is first 5 shots fired out of a new Proof barrel assembled in an upper with all the gunsmith accuracy enhancements listed.. with 5 into half inch right out of the gate, and is to be expected.
This is normal accuracy, with the full process, and a quality barrel...5 shots will hit .25" to .6" with a variety of ammo...and sometimes LC brass with cheap varmint bullets will shoot .3" & .4" 5 shot groups...so it doesn't always take match ammo to be accurate.

Yes, it all makes a difference. Unfortunately some of it requires machine tools, and specialized equipment, but do everything you can with hand tools and glue in or shims to improve accuracy.
There are other things never discussed but were taught, that do not require machine tools to improve accuracy.
I do not use them in my build/ assembly, but others might. ARs are accurate.
 

Attachments

  • 20201229_144508.jpg
    20201229_144508.jpg
    937.7 KB · Views: 85
The barrel extension spigot


Odds are that even after truing the face the bore is conical. It's pretty unlikely the face looks like that and the bore is strait.
The bore is straight... a precision ground rod passes through, and is used to make the face perpendicular to the bore...a .001" finish cut is made to clean up all around.
It was stopped and photographed to show the that CNC machining is not perfection in much of today's production...
This is an example of bad programming, and untrained operators running them.
And depending on deburring machines to cover up slight imperfections, so the average guy doesn't know, as the anodized finish looks pretty good to the untrained eye.
 
My method is a bit odd to most, but I have achieved very good results while maintaining serviceability.
The point of the effort is to help reduce creep when it heats. This means making sure the nose of receiver is flat, and, the barrel extension is tight in the bore. We cannot really achieve a perfect fit, thus use a goop to fill in the micro gaps and hold tight.
The green 680 is ok, need to watch temps, and, pita to undo. I use a hi-temp red silicone product for general rifle stuff, it lives well with the temps and it doesn't really squeeze all that much, so it holds barrel tight when heat starts to cause expansion of the metals. I basically just apply a light smear to ID of the receiver, OD of the extension, light twisting as barrel gets installed, wipe/mop/qtip/clean residual goop from barrel and from inside receiver, I then set barrel nut to approx 50% of torque (lube the thread), let that set for 24hrs, come back and finish torque on nut. When thin layer of silicone cures, it's still fairly difficult to pull apart, but much easier than any hard set stuff.

All out precision/accuracy, something better than a hi-temp silicone is needed, but I am not convinced a super hard-set is the answer. I know BCM undercuts the barrel extension so you need to heat the receiver and cool the barrel, it's just tricky to install and lock up the nut before the interference fit grabs tight, kinda need a helping hand to do it quickly. I don't like interference fitment here because it can cause non-desired stresses, granted the aluminum will expand faster than the steel as temps go up, but that also means it's possible for the interference fit to become non-interference fitment.
 
  • Like
Reactions: WeR0206
My method is a bit odd to most, but I have achieved very good results while maintaining serviceability.
The point of the effort is to help reduce creep when it heats. This means making sure the nose of receiver is flat, and, the barrel extension is tight in the bore. We cannot really achieve a perfect fit, thus use a goop to fill in the micro gaps and hold tight.
The green 680 is ok, need to watch temps, and, pita to undo. I use a hi-temp red silicone product for general rifle stuff, it lives well with the temps and it doesn't really squeeze all that much, so it holds barrel tight when heat starts to cause expansion of the metals. I basically just apply a light smear to ID of the receiver, OD of the extension, light twisting as barrel gets installed, wipe/mop/qtip/clean residual goop from barrel and from inside receiver, I then set barrel nut to approx 50% of torque (lube the thread), let that set for 24hrs, come back and finish torque on nut. When thin layer of silicone cures, it's still fairly difficult to pull apart, but much easier than any hard set stuff.

All out precision/accuracy, something better than a hi-temp silicone is needed, but I am not convinced a super hard-set is the answer. I know BCM undercuts the barrel extension so you need to heat the receiver and cool the barrel, it's just tricky to install and lock up the nut before the interference fit grabs tight, kinda need a helping hand to do it quickly. I don't like interference fitment here because it can cause non-desired stresses, granted the aluminum will expand faster than the steel as temps go up, but that also means it's possible for the interference fit to become non-interference fitment.
Do you happen to have a link for the silicone product you use?

Something like this?

or this?
 
Last edited:
  • Like
Reactions: Potsy
Do you happen to have a link for the silicone product you use?
JB Weld Red Hi Temp --> https://www.jbweld.com/product/hi-temp-red-silicone
I did forget to mention, after the smear it's good to lightly spritz (mist is probably a better word) the barrel end with water because the H2O helps cure the silicone in the tight space. Without the spritz it's almost like transferring silicone from one container to another and it may never fully cure.

There are automotive silicone products too that cure a bit stiffer, but they don't have the needed hi temp rating.
 
Last edited:
  • Like
Reactions: WeR0206
JB Weld Red Hi Temp --> https://www.jbweld.com/product/hi-temp-red-silicone
I did forget to mention, after the smear it's good to lightly spritz (mist is probably a better word) the barrel end with water because the H2O helps cure the silicone in the tight space. Without the spritz it's almost like transferring silicone from one container to another and it may never fully cure.

There are automotive silicone products too that cure a bit stiffer, but they don't have the needed hi temp rating.
Thanks! Ill add it to the inventory.
 
  • Like
Reactions: 610yd
JB Weld Red Hi Temp --> https://www.jbweld.com/product/hi-temp-red-silicone
I did forget to mention, after the smear it's good to lightly spritz (mist is probably a better word) the barrel end with water because the H2O helps cure the silicone in the tight space. Without the spritz it's almost like transferring silicone from one container to another and it may never fully cure.

There are automotive silicone products too that cure a bit stiffer, but they don't have the needed hi temp rating.
I have never tried that. Thanks for tip. Been using the Loctite bearing mount
 
  • Like
Reactions: 610yd
You can do all of that stuff if it gives you more confidence in your build but if you're test-fitting your barrel into your upper and it's rattling around (and assuming that your barrel extension is not somehow undersized), I'd be looking for a better quality upper receiver.
It isn't always a low quality upper receiver. I can just be tolerence stacking between the receiver and the barrel. If I am making a 1000 ARs I can try multiple barrel / receiver combinations to get the best fit. Building one, I cannot, thus I shim and I send to a machine shop to lap.
 
  • Like
Reactions: 610yd
JB Weld Red Hi Temp --> https://www.jbweld.com/product/hi-temp-red-silicone
I did forget to mention, after the smear it's good to lightly spritz (mist is probably a better word) the barrel end with water because the H2O helps cure the silicone in the tight space. Without the spritz it's almost like transferring silicone from one container to another and it may never fully cure.

There are automotive silicone products too that cure a bit stiffer, but they don't have the needed hi temp rating.
Do you apply any kind of release wax/agent on the inside of the upper receiver before getting any JB on it?
 
  • Like
Reactions: PappyM3 and 45-90
Do you apply any kind of release wax/agent on the inside of the upper receiver before getting any JB on it?
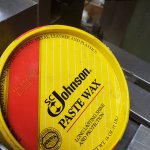
I use Johnsons paste wax to the upper's bore, where the barrel extension fits into, and buff ...leaves a slick finish for disassemblely.

To remove:
Get an oak dowel from home depot to make the high temperature bering sleeve loctite easy to remove.
Turn down or sand the front of the dowel to hit the back of the barrel extension.
Leave it about 18" long or a bit more.
Slide the dowel up the carrier raceway against the back of the barrel extension...and smack the back of the dowel fairly hard on the concrete floor...hang on to the barrel! Notice as it seperates tap lighter.
Barrel is out in a few seconds.
 
  • Like
Reactions: WeR0206
Do you apply any kind of release wax/agent on the inside of the upper receiver before getting any JB on it?
Just for clarity, it's JB Silicone, not any epoxy stuff.

Using a Silicone product, no release of any kind. I clean the surfaces with rubbing alcohol. You want the Silicone to latch on (stick), which helps reduce movement. The thin layer of Silicone will still shear loose when you pull barrel out, but it requires a good pull (no heating or anything), but nothing like using a 680. Think of Silicone like head gaskets that have a silicone layer on them, the thin layer compresses just a smidge, but it also starts to act like a incompressible fluid when it cannot squish out.

And yep, when you remove the barrel you'll have some cleanup work to do, but it's very thin and can be buffed off rather easily.
Ah yes good point. I do think some folks bed with the epoxy stuff but I don't want to mess with that. As you noted silicon is much easier to work with/remove/etc. Thanks again for all the tips!
 
Just for clarity, it's JB Silicone, not any epoxy stuff.

Using a Silicone product, no release of any kind. I clean the surfaces with rubbing alcohol. You want the Silicone to latch on (stick), which helps reduce movement. The thin layer of Silicone will still shear loose when you pull barrel out, but it requires a good pull (no heating or anything), but nothing like using a 680. Think of Silicone like head gaskets that have a silicone layer on them, the thin layer compresses just a smidge, but it also starts to act like a incompressible fluid when it cannot squish out.

And yep, when you remove the barrel you'll have some cleanup work to do, but it's very thin and can be buffed off rather easily.
Head gaskets with a silicone layer on them???🤔😶
 
Going back to a comment I made earlier, Indian Head shellac works really well. 99% alcohol disolves it and it's easy to work with. There's no need to reinvent the wheel.
Thanks for the reminder. I have some loctite 620 on hand but I think if I need to bed a barrel in the future I will use one of the easier to remove substances like high temp silicone sealant or Indian Head Gasket Shellac (removable with iso alcohol). This thread is a wealth of knowledge!
 
Head gaskets with a silicone layer on them???🤔😶
Not putting silicone on them, they are made with a silcone layer, etc.


Thanks for the reminder. I have some loctite 620 on hand but I think if I need to bed a barrel in the future I will use one of the easier to remove substances like high temp silicone sealant or Indian Head Gasket Shellac (removable with iso alcohol). This thread is a wealth of knowledge!
Experiment with that Permatex before use, that stuff shrinks up quite a bit, and, if the ends seal up good from air contact it's possible you formed another container and the middle section can't cure out. It's rated 350F. Dab a blob on piece of glass, take pic, let it out-gas for 24hr, then look at it and compare.

Also look at Permatex Aviation Form-a-Gasket, seems to have rating of 400F. The Aviation and Indian stuff is similar when looking at their datasheets. The dried goop never really hardens hard.

Using an epoxy is also difficult to use because of their low service temps.

The JB Red is rated much higher. Temp was the hardest thing to find in usable goop.
 
Last edited:
  • Like
Reactions: WeR0206
Not putting silicone on them, they are made with a silcone layer, etc.


Experiment with that Permatex before use, that stuff shrinks up quite a bit, and, if the ends seal up good from air contact it's possible you formed another container and the middle section can't cure out. It's rated 350F. Dab a blob on piece of glass, take pic, let it out-gas for 24hr, then look at it and compare.

Also look at Permatex Aviation Form-a-Gasket, seems to have rating of 400F. The Aviation and Indian stuff is similar when looking at their datasheets. The dried goop never really hardens hard.

Using an epoxy is also difficult to use because of their low service temps.

The JB Red is rated much higher. Temp was the hardest thing to find in usable goop.
I think JB red high temp will be my go to for bedding going fwd. I will do the air test on the shellac you mentioned out of curiosity though. The directions on the shellac say to wait for it to air cure on the object for a few seconds first before assembling…probably to avoid the situation you described of it not curing due to being sealed from air.

Im curious if that high temp silicone would work well for sealing gas keys to carriers in lieu of loctite 620 or the permatex mil spec stuff?
 
Waiting for the shellac to dry before fitment may leave that loose-dry fitment with some voids. Dry shellac is also super sticky, kinda a pita to drag one surface against another where both have shellac, that goop is best for parts that come together like "clam-shell" (water pump, head gaskets, flange gaskets, etc). I assume you would coat ID and OD before install?

The choice of goop should be something that you can apply thick (I mention "thin layer", but that is thick relative to the small space between ID and OD of the fitment). The goop should be applied ID and OD, and it should ooze some requiring some cleanup (rubbing alcohol does clean-up silicone, I use the 90% alcohol), this "guarantees" the bedding is complete with no voids. Silicone is a good choice to do that, as are some other products, but it's the service temp of the product where we start to see limitations of choice. The actual use of the rifle matters. If your goal is to pop off one round every 30min for an intense 1000yd shot, then the lower temp goop stuff is probably ok. High rate semi-auto 16" 556 308, then you'll need something that's more hi-temp. Serviceability is also a build factor. If Low Temp and Low Serviceability are desired (likely yielding better accuracy and precision), then an epoxy is a good choice. In my small book of notes in bedding section, Temp and Serviceability are the two main factors.

Using JB Red for gas key sealing? Should work and seal ok. The thing to watch for is how using the goop changes final dimensions. You are basically wedging the goop between two mating parts, and that goop layer after bolting the two pieces together changes the location of the key (just a smidge). Think of it like adding anodize to bare aluminum, you change final dimensions. Silicone for gas key should be ok. You can also thin-down silicone as needed, and, there are many forms of silicone to be had, from toothpaste to very fluid viscosity.

For all out data, you can get some empirical data by clamping goop between two flange plates, apply a Torque to the lubricated bolts, let it cure, then mic the thickness of the sandwich at some defined location. Repeat with various goop. High solids goop end up thicker, etc.
 
Last edited:
  • Like
Reactions: WeR0206