• Watch Out for Scammers!

    We've now added a color code for all accounts. Orange accounts are new members, Blue are full members, and Green are Supporters. If you get a message about a sale from an orange account, make sure you pay attention before sending any money!

Gunsmithing Bedded my scope base! Step by step and Pics inside

USMCj

Gunny Sergeant
Full Member
Minuteman
May 1, 2008
4,053
12
44
Nazzifornia
Let me start off by saying that I do not have a lot of experience when it comes to bedding, I learned how to bed a rifle by looking at Randys (HateCA) DIY page and by asking him a billion questions via e-mail (which he was more than willing to answer) I have since bedded 3 rifles, 2 bottom metals and now 1 scope base. Lets get to it.


I knew I needed to bed my scope base when I first installed it. When I torqued down the rear 2 screws the from of my NF steel bade was riding on air. I put it off because I figured it would not come out well and I didnt want to fuck anything up, but after the success I had will all the other bedding jobs that I did for friends and myself, I figured whats a scope base if I bedded 3 rifles?

so I finally got around to it today.


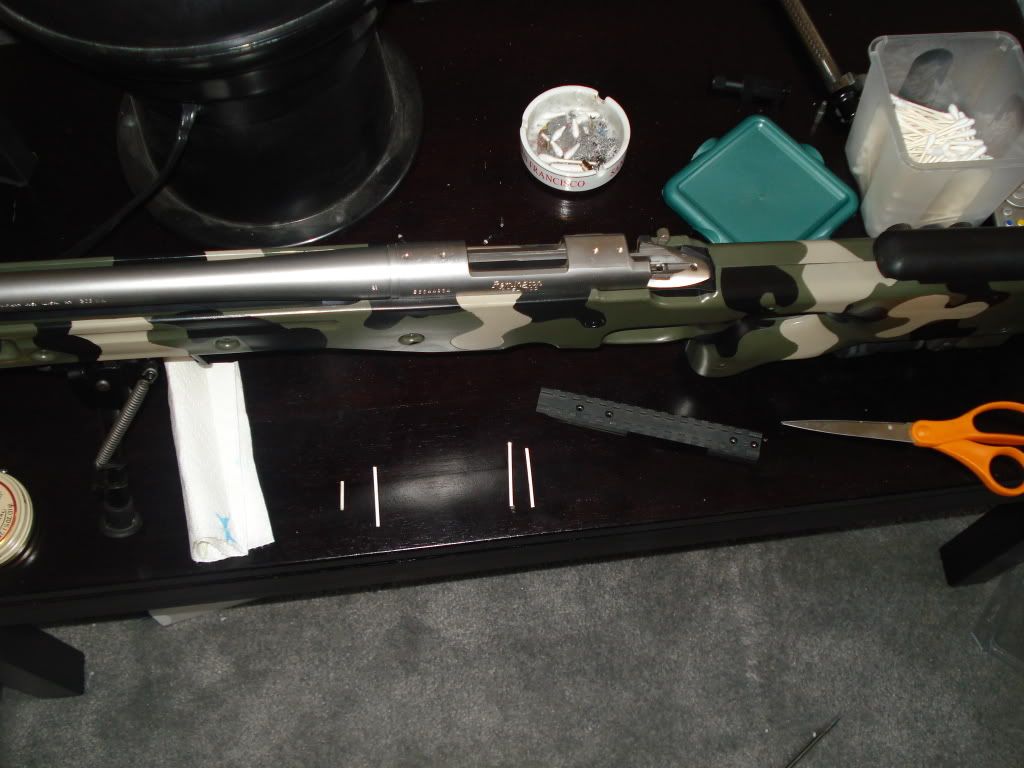
first step, MADE SURE RIFLE WAS UNLOADED!!!! then I removed the bolt and mag from rifle.

I then removed the base from my rifle and cleaned both surfaces with rubbing alcohol.

DSC02970.jpg


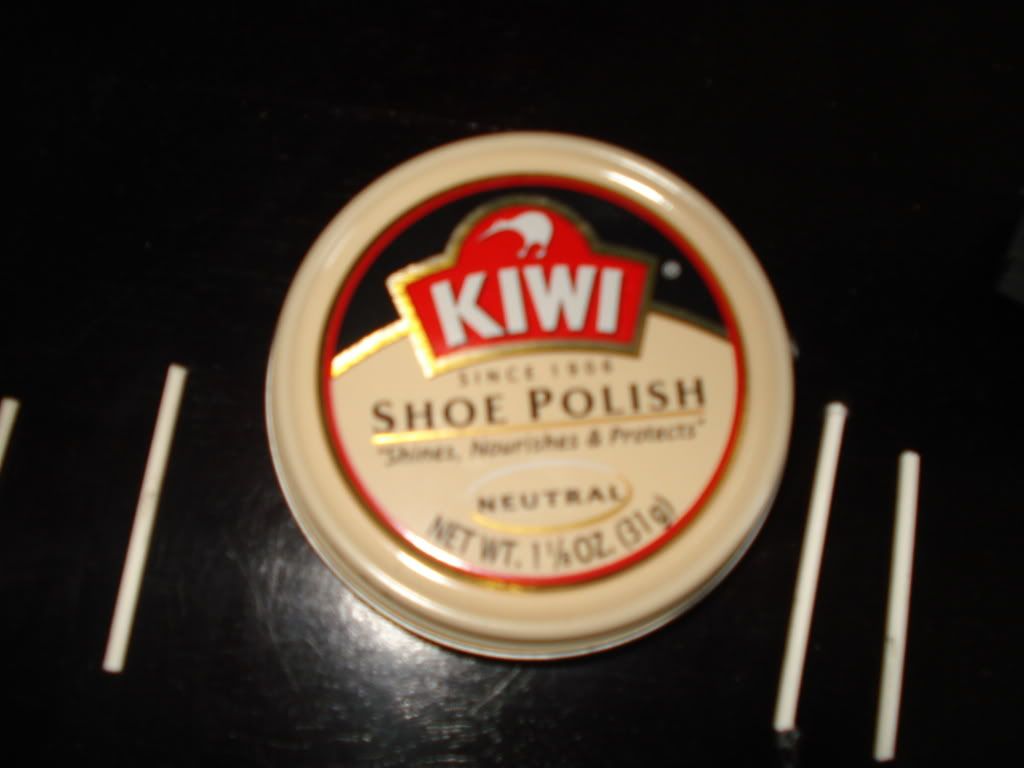
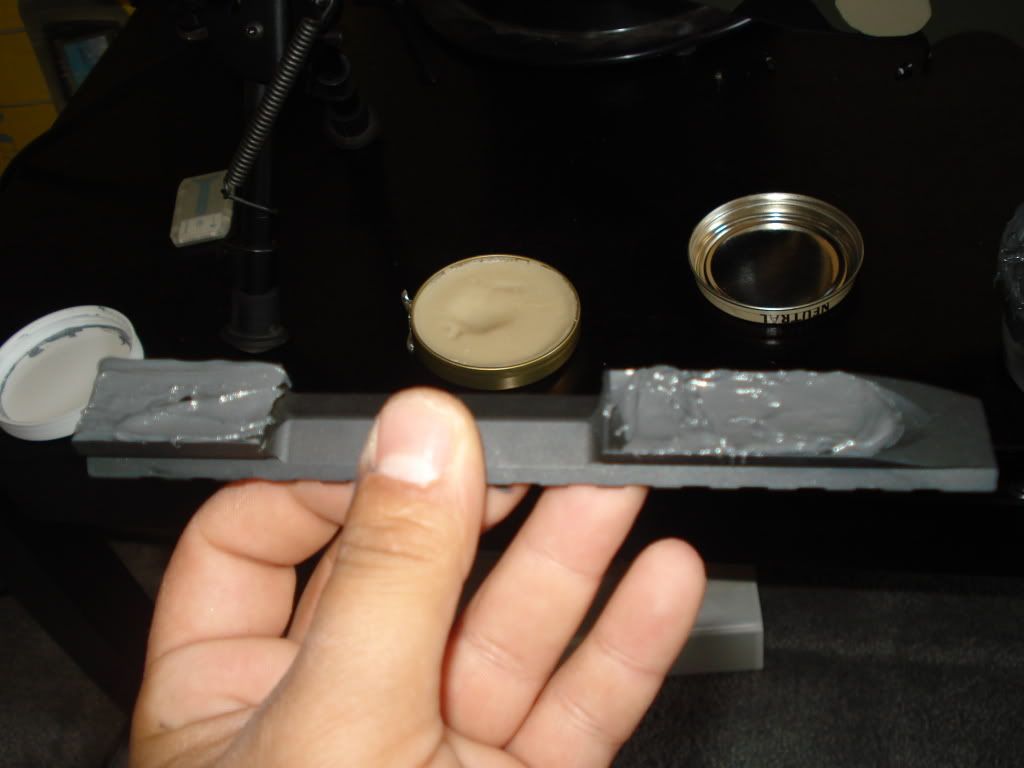
I applied Kiwi neutral shoe polish as the release agent to both the rifle and the scope base (I may want to undo this one day you know) and buffed it with a sheet of paper towel

DSC02973.jpg


DSC02971.jpg


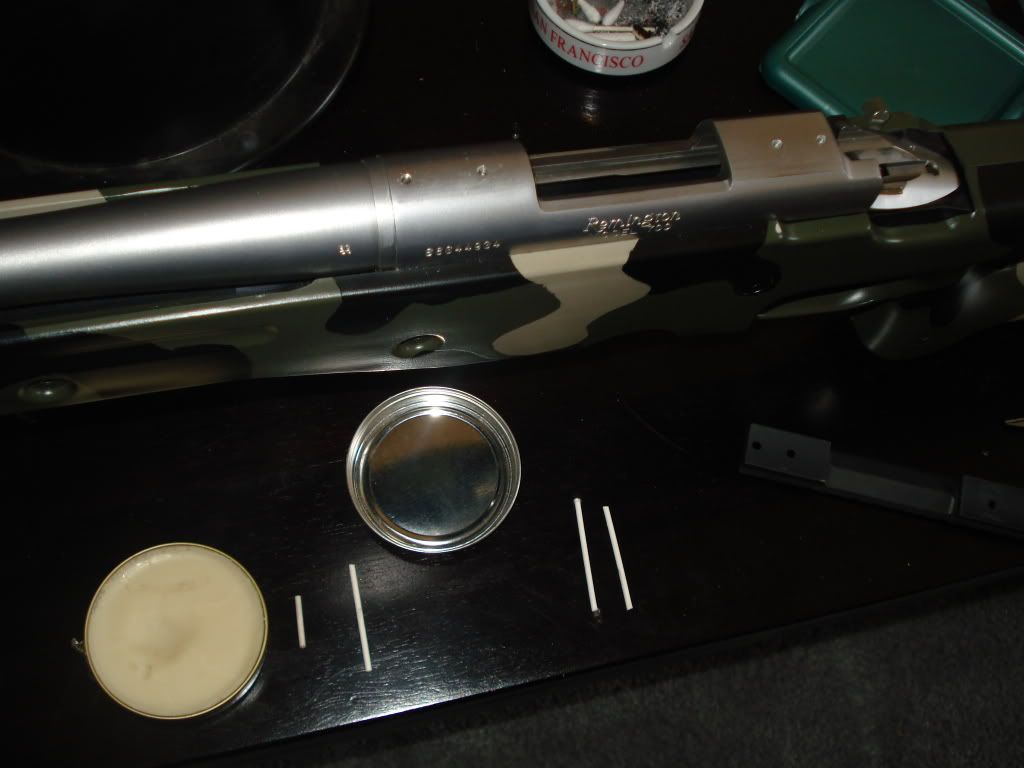
I cut the ends off of some Q-tips and stuck them into the receiver so no bedding compound gets into the holes, this served a double purpose, it also helped me align the holes later when I put the base on the rifle.

DSC02974.jpg


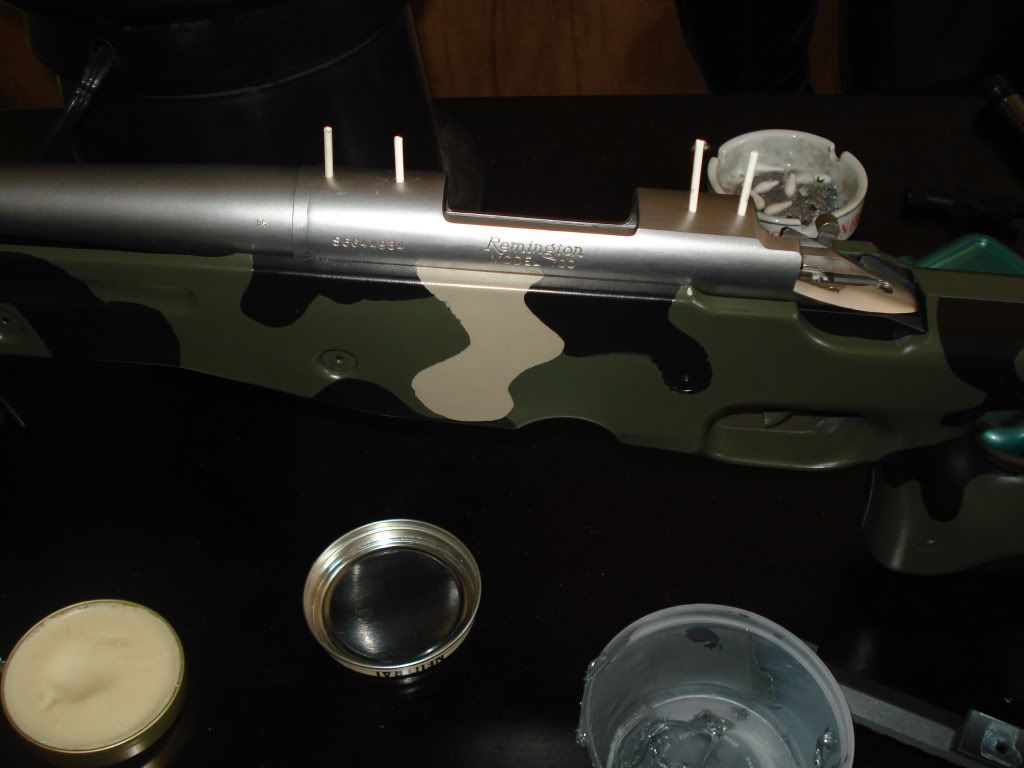
I mixed up some Brownells Steel Bed and went to work.

DSC02972.jpg


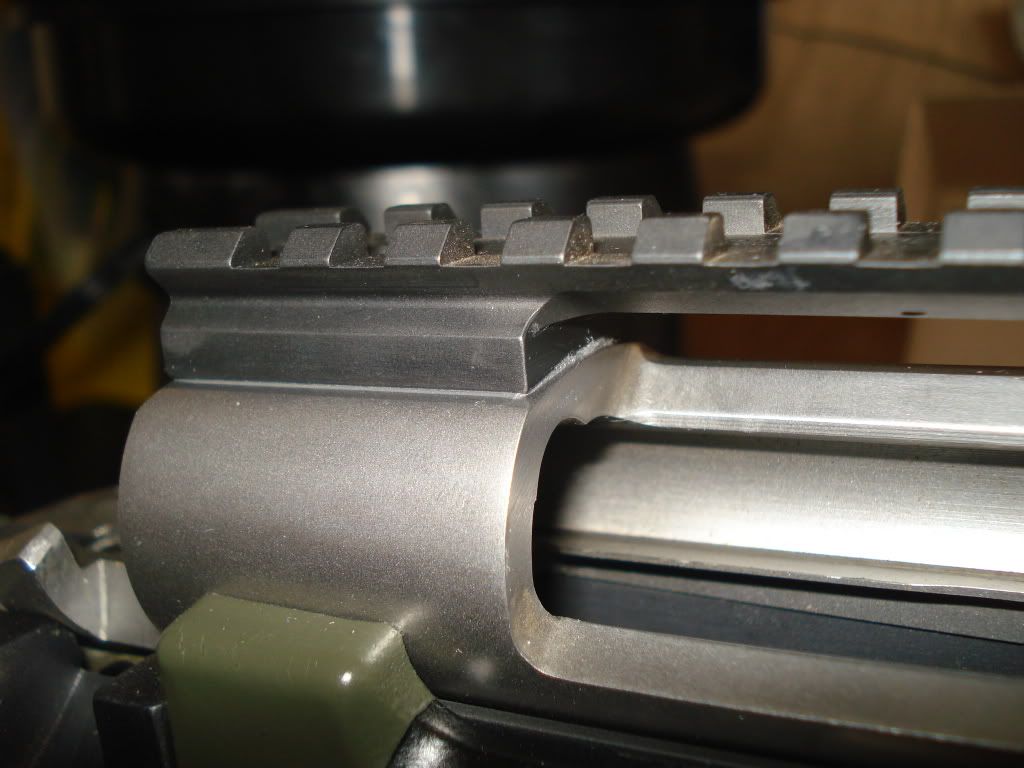
I applied the Steel Bed to the scope base and installed the base on the action.

DSC02975.jpg


I hand tightened the inner 2 screws of the base (inner front and inner back) until it stopped, I made sure not to torque then too much, just until there was metal to metal contact (scope base to action)

DSC02976.jpg


Now you may be asking why I chose to tighten the inner 2 screws instead of just the back 2 and let the front ride on the bedding compound. The reason is that I wanted to have metal to metal contact on the front and back of the base to the action, I did not want the front riding on just the bedding compound and I did not want to loose any of the 20 moa forward cant the base was giving me. (hope that made sense because I think I just confused myself ;D )

I then cleaned the excess bedding compound with Q-tips and paper towel sheets, and that was it.

DSC02977.jpg


Hope this helps some of you out.

USMCj
 
Re: Bedded my scope base! Step by step and Pics inside

Qtips thats a good idea, I'll have to try and remember that, I don't use any release agent when I have done mine, I also torque to spec the front two screws, then let the bedding dry, then the rear two screws, this to me does two things, ensures the rail is straight, and ensures 20moa of cant. DIY is fun is'nt it, now bed that action into the stock.
 
Re: Bedded my scope base! Step by step and Pics inside

<div class="ubbcode-block"><div class="ubbcode-header">Originally Posted By: 427Cobra</div><div class="ubbcode-body">Qtips thats a good idea, I'll have to try and remember that, I don't use any release agent when I have done mine, I also torque to spec the front two screws, then let the bedding dry, then the rear two screws, this to me does two things, ensures the rail is straight, and ensures 20moa of cant. DIY is fun is'nt it, now bed that action into the stock. </div></div>

I wanted metal to metal contact in the front and back of the base, thats why I chose to do the 2 inner screws. A BIG +1 on DIY being fun! very addictive too!

As for bedding the action to the stock, Im going to wait until I burn this barrel out and get the action blueprinted and a new barrel installed. The stock is going to need milling for the larger recoil lug anyway so Ill just wait until all of that is complete, then Ill bed it.
 
Re: Bedded my scope base! Step by step and Pics inside

When I did mine I put electrical tape around the perimter of the scope base prior to removing for beddding. Removed the base, applied the Devcon, yadda, yadda.

When the Devcon had cured enough I just pulled the tape off along with all the excess material. A tiny bit of touch up and voila!

Saved alot of cleanup and wiping.

-John
 
Re: Bedded my scope base! Step by step and Pics inside

How did you keep the steel bed off the screws?
 
Re: Bedded my scope base! Step by step and Pics inside

Im a bit curious since I bed my bases as well. If you had the front floating in air on a dry run and then torqued it down didnt you just bend the base to match the receiver, creating the torque you intended to eliminate? Considering the compression strength of a steel based epoxy it would be no problem running it without the base actually touching the receiver at one end.
 
Re: Bedded my scope base! Step by step and Pics inside

The best idea would be to not torque anything down while the epoxy is still wet, just enough tension on the screws to let the base contact the receiver and push out the excess bedding material using just one screw at the front and rear. The goal is to eliminate any stresses on the receiver or base.

I'd pick a metal to metal contact point at the front and rear, but a trial fit might give a better indication of the best two screws to pick. You can put release agent on all the screws and in the holes and install them all to just bring them into contact, just not tight.

After the epoxy is fully cured...maybe 4-5 days depending on temperature, then torque all the screws down evenly in several steps, like torquing a head gasket.

Trial fitting is a good idea, and with some careful bore sighting during the fitting stage, any windage issues can be corrected as well.

TC
 
Re: Bedded my scope base! Step by step and Pics inside

REELDOC: I used the Q-tip sticks so no bedding compound got in the holes in the first place.

Norcal Phoenix: I did not torque the screws, I hand tightened the inner 2 screws just until there was base to action contact both up front and in the back. does that make sense?

Top Cat, read above, the method I used to tighten the screws seems to be the same as yours, just enough to have base to receiver contact, no stress.
 
Re: Bedded my scope base! Step by step and Pics inside

Excellent pictures and one nice looking rifle! Thanks for the step by step how-to guide!
 
Re: Bedded my scope base! Step by step and Pics inside

Thanks much for this info and the pics. I'll take this sort of post over a billion posts asking the same old f'ing newbie questions, that some of youse should stop answering, so these wankers learn to use the SEARCH function.

Back to your post, it seems like what you've made is a very precisely fitted gasket, to eliminate torquing of the base and/or action as a result of these two components being joined. It differs from a typical bedding job because the bedding won't adhere -- I presume -- to either component. If you were to remove the base, I guess your "gasket" would pop right off the base or the action if it didn't just slip right off.
smile.gif


Cool idea, and thanks again for the informational post!
 
Re: Bedded my scope base! Step by step and Pics inside

Damn, guess I was the worst one. All I did was buff both parts with a green pad, mixed up some JB Weld, then screwed teh sucker down and torqued it to 20"# and wiped the excess off and cleaned it up with denatured alcahol. No issues yet. Must be beginner's luck from when I did it. Rifle shoots good too
grin.gif
 
Re: Bedded my scope base! Step by step and Pics inside

Maybe you can call Randy and he can fix this for you. Probably not the end of the world but not right either.

 
Re: Bedded my scope base! Step by step and Pics inside

<div class="ubbcode-block"><div class="ubbcode-header">Originally Posted By: 858</div><div class="ubbcode-body">Maybe you can call Randy and he can fix this for you. Probably not the end of the world but not right either.

</div></div>

huh? fix what?
 
Re: Bedded my scope base! Step by step and Pics in

<div class="ubbcode-block"><div class="ubbcode-header">Originally Posted By: USMCj</div><div class="ubbcode-body"><div class="ubbcode-block"><div class="ubbcode-header">Originally Posted By: 858</div><div class="ubbcode-body">Maybe you can call Randy and he can fix this for you. Probably not the end of the world but not right either.

</div></div>

huh? fix what? </div></div>

Your incorrectly bedded scope base.

 
Re: Bedded my scope base! Step by step and Pics in

<div class="ubbcode-block"><div class="ubbcode-header">Originally Posted By: USMCj</div><div class="ubbcode-body">And why is it incorrect? </div></div>
<div class="ubbcode-block"><div class="ubbcode-header">Originally Posted By: USMCj</div><div class="ubbcode-body">
I wanted metal to metal contact in the front and back of the base, thats why I chose to do the 2 inner screws.</div></div>

Whats the point of bedding your scope rail if you're just going to bend into shape during the bedding process?

 
Re: Bedded my scope base! Step by step and Pics in

<div class="ubbcode-block"><div class="ubbcode-header">Originally Posted By: 858</div><div class="ubbcode-body"><div class="ubbcode-block"><div class="ubbcode-header">Originally Posted By: USMCj</div><div class="ubbcode-body">And why is it incorrect? </div></div>
<div class="ubbcode-block"><div class="ubbcode-header">Originally Posted By: USMCj</div><div class="ubbcode-body">
I wanted metal to metal contact in the front and back of the base, thats why I chose to do the 2 inner screws.</div></div>

Whats the point of bedding your scope rail if you're just going to bend into shape during the bedding process?

</div></div>


You know, if you took the time to read my post without jumping the gun and saying "oh he fucked up" you would see that I did not bend it into shape. I hand tightened the screws just enough to squeeze the excess bedding compound out and just enough that there was base to action contact, I backed the screw out and retightened it a few times to make sure I was not overtightening it and creating stress or bending it as you call it.

But like I said, if you took the time to read my post, you would have realized I did it right.
 
Re: Bedded my scope base! Step by step and Pics in

I think there is a communication problem here. Maybe Im not explaining it right, or maybe you just have a hard time picturing the way I did it. But let me try again.


Like I said before, when I did a dry run with only the 2 rear screws the front was floating on air.

now keep that in mind and imagine this, if you took that base and laid it flat on the action without any screws, you would have contact at the front and at the rear of the base to the action, while the base is perfectly straight right? not too much contact because the surface contour of the action and base are not 100% perfect.

now imagine bedding compound filling all of the other spots where there is no metal to metal contact, wouldnt that still leave the base straight and mate the base to the action perfectley both up front and in the rear?

think of it as skim bedding a rifle to a stock that has a aluminum block, you just fill the areas where the action does not touch the aluminum without introducing stress.

I cant exlplain it better than this.
 
Re: Bedded my scope base! Step by step and Pics in

USMCj if i may suggest you try this next time. When prepping your rifle use good levels and level the rifle length ways and off of the lug ways and or scope holes. Then when you put you base down make sure its level when you draw it close to the action with the mounting screw. That will insure you have done your job correctly. This works great for bedding also. I would suggest the tipon vise. It works the best.
 
Re: Bedded my scope base! Step by step and Pics in

<div class="ubbcode-block"><div class="ubbcode-header">Originally Posted By: USMCj</div><div class="ubbcode-body">I think there is a communication problem here. Maybe Im not explaining it right, or maybe you just have a hard time picturing the way I did it. But let me try again.


Like I said before, when I did a dry run with only the 2 rear screws the front was floating on air.

now keep that in mind and imagine this, if you took that base and laid it flat on the action without any screws, you would have contact at the front and at the rear of the base to the action, while the base is perfectly straight right? not too much contact because the surface contour of the action and base are not 100% perfect.

now imagine bedding compound filling all of the other spots where there is no metal to metal contact, wouldnt that still leave the base straight and mate the base to the action perfectley both up front and in the rear?

think of it as skim bedding a rifle to a stock that has a aluminum block, you just fill the areas where the action does not touch the aluminum without introducing stress.

I cant exlplain it better than this. </div></div>

So you are trusting that the two points where the base meets the front and rear edge of the action port are the two spots where the receiver is dimensionally true to the bore?
By picking these points you are making a big assumption and betting your 20moa on it. And no, I'm not missing anything in your explanation.

I'm with the using the front as your contact point and letting the bedding support the rear, that way the minimum cant you can have is 20moa.

Can you point out the interesting method to your madness of having the bedding compund stick to nothing in this process, essentially making a fitted washer for the stresses of recoil to actually have leverage against the base screws (providing two surfaces that can move rather than just the base to action without your "released" bedding"?

And I agree, if you have the material and comfort level, bed that rifle, at least up to the rear surface of the lug. Unless you are going to have the exterior of the action contoured that isn't going to change if you have the action trued when you rebarrel. I'm assuming that's a 308, 260 or 223-any of which shouldn't "shoot out" anytime soon.


While the time to post what you did with explanation and pictures is appreciated, you don't need to be a prick and get all puffy chested to folks that point out where your assumptions may be flawed. By your admittance you are new to this and might be talking to a few folks that have done this once or twice.


Re: Bedded my scope base! Step by step and Pics in

At what point was I being a prick? I was just trying to explain that I did not stress the base to take the contour of the action which is what he was saying.

As far as bedding the action goes, Im going to wait until the work on my rifle is done. I do not want to bed the action now because when the the receiver face is trued it will be shorter than it is now, and it will also have a new lug that will not match up with the surface of the factory lug.

The whole thing about me using the release agent is being blown out of proportion. I dont know if you have ever used this stuff, but it is not oily, and the bedding compound still sticks to the metal pretty well, just not as permanent as with no release agent.

And the bit about the true to the bore stuff, I cant even be sure that the holes Remington drilled are true to the bore, so ???????

My methos might be different than yours, but that does not make it wrong.
 
Re: Bedded my scope base! Step by step and Pics in

Was talking about the top of the base for the forward and backwards of the gun. The holes can be used to level it left to right and keep everything right on. Its how i bed the stock and put the scope on. Just a handy way of doing it.
 
Re: Bedded my scope base! Step by step and Pics in

The base had damn near zero room for left to right adjustment once the screws were in. But I do get what you are saying.
 
Re: Bedded my scope base! Step by step and Pics in

Thanks for the pics.
Actually I wasn't looking at the overall pic of the stock, if that's an AICS I wouldn't worry about it.
 
Re: Bedded my scope base! Step by step and Pics in

I had thought it was okay to bed it around the two inner screws; it seems like the only mistake would've been if you did it the other way, because you spoke about doing this way instead of tightening the two rear screws. I think with that method you're supposed to tighten the two front screws, with the back floating, preventing the loss of the 20 MOA. But don't some say that torquing the two inners is the other acceptable way? Still, the 2 fronts for me though. BTW, I for one appreciated the write-up and pics you took the time to post. It's not necessarily dangerous coming from someone new at it because even if there was any mis-information it would be quickly corrected by those in the know, leaving a descriptive lesson. And I'm not saying there was any mistake, I honestly don't know. So yeah, thanks for the effort sharing your project.
 
Re: Bedded my scope base! Step by step and Pics in

I've done it both ways and had good luck with both, either doing the trial/error method finding one single screw and bedding using only that screw, and the way USMCj did it. The key in any bedding be it a scope base or action is to not crank the bolts down, use them for guides and not tighten them to the point of twisting an action or base which was correctly done by USMCj. *IF* you crank the screws down hard you can bend things, but frankly that can happen even if you only use 1 screw as well. Especially if you don't take the time to figure out what screw leaves the rest of the base high off the action.

Hypothetically I prefer to do a single screw and install the other 3 only to align the base and keep epoxy out, but I've done the two inner screws before as well as long as you only finger tighten them to get the base down, you actually have to put a good bit of torque on the screws to squeeze out ever spec of epoxy. Great idea on the Qtips for the screw holes though to keep epoxy out, I have to remember that one.

I've found tightening them down and backing them out to be hit and miss, in some cases I think it introduces air pockets, so I like to try and just finger tight things once and leave it.

IIRC I believe the method USMCj used is the same or similar to the method recommended by Ken Farrell to bed his bases, so it's not exactly just being recommended by a guy new to the process.
 
Re: Bedded my scope base! Step by step and Pics in

The trial fitting aspect of the process is an important step...you need to determine where you want to go with the project. That is the first step and is more important than following an arbitrary rule.

With a Remy or any action with the lower rear receiver ring, there is a greater possibility for the rear ring to be out of alignment with the base...the base is more likely to be straight.

In that case, check the alignment by using the the two screws in the front ring. The base may be raised a little bit above the rear ring and there will be a visible gap there, but that is fine. Use all the screws, but let the rear float in the epoxy without any tension while the bedding compound sets up.

Alternatively...If you were to just torque down a base with that issue to a receiver without bedding it first something would be bent...wouldn't it?

Again... just tighten the two front screws enough to bring the front of the base into into contact with the receiver to align the base, then torque them all down after the epoxy is hard.

If you need more elevation or windage adjustment during this process, some shims can be added as well.

There is something about a base that is glued to a receiver that generates a feeling of confidence...

TC
 
Re: Bedded my scope base! Step by step and Pics in

How would you go about gaining a few more moa of cant? Obviously youd only want to tighten either one or lightly both the front screws. Then would you insert a shim in the rear compound or just only tighten the front enough to compress the rear slightly leaving a few hundreths of compound in the rear?
 
Re: Bedded my scope base! Step by step and Pics in

As long as the base is dead FLAT (when finally torqued) it will be fine.

I actually use a straightedge (caliper beam) on the top of the base to check flatness. Put a light behind it and you can see any warpage.

I had a cheaper mount that was bowed high in the center and flattened it out by slightly snugging the 2 center screws.

I also use no release agent. If you ever want it off, a little heat and a smack with a plastic mallet and it will pop off.
 
When I prepare to bed a scope base, I install it with just the two FRONT screws tightened to spec and check the rear for contact and then, if needed, bed only the REAR of the base.

If there was a gap when you checked it and you now have metal to metal contact front AND rear, the bedding has little or no benefit.

Not trying to be confrontational, it was a good post, just done incorrectly IMO.

Matt
 
After reading this thread it appears to me that there are six or eight different "correct" ways to bed a scope base. Fortunately I didn't see this article before I bedded all of my bases; imagine having seven of you nice polite guys on my ass for doing it wrong. I'm thinking that if the gun didn't shoot before bedding the base and it does shoot after bedding the base then I did it right. There were several good ideas in this thread, thanks to everyone for expressing your opinions.