I know vudoo owners with the same issues and same solutions as listed here. Ultimately these are challenges when using a magazine system not designed for rimfire.
Join the Hide community
Get access to live stream, lessons, the post exchange, and chat with other snipers.
Register
Download Gravity Ballistics
Get help to accurately calculate and scope your sniper rifle using real shooting data.

Install the app
How to install the app on iOS
Follow along with the video below to see how to install our site as a web app on your home screen.
Note: This feature may not be available in some browsers.
You are using an out of date browser. It may not display this or other websites correctly.
You should upgrade or use an alternative browser.
You should upgrade or use an alternative browser.
Bergara B14R Issues & Solutions
- Thread starter 357Max
- Start date
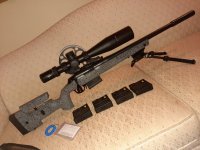
I bought a complete rifle and it functions perfectly in the HMR stock. However, I tried mine in a MPA BA comp chassis for about 3 weeks without issue - zero problems with mag lock up, feed, extraction etc. What I did learn in those 3 weeks shooting a chassis - is no matter how cool a chassis looks, how practical, functional, adjustable, etc - I do not mesh well with a chassis and they are not for me.I guess I missed the fine print in Bergara's advertising. They shouldn't be selling these as barreled actions only if they only work in their stocks. If I would have known that I would have just bought a complete rifle.
Anything “aftermarket” can require tuning for 100% reliable function…true of stocks, chassis, triggers, etc.
I had a feeding issue with mine which is a HMR stock. I tinkered with the mag and that solved it.Not really a fair comparison then. The issues with the Bergara and feeding are almost all to do with aftermarket stocks and chassis. If you want to fix your feeding issues without doing any custom work, buy an HMR stock and give it a go.
Well, I've learned my lesson, seen the light, I have. I shall use snap caps or at least old cases for dry fire hence forth. Went to he range this morning and nothing...crickets.... no pew, pew.
Got home and used @acesandeights YouTube video to see how to disassemble the bolt and found a broken firing pin. Called Bergara repair and they are sending one out.
Thank you @acesandeights for the video - very helpful.

Got home and used @acesandeights YouTube video to see how to disassemble the bolt and found a broken firing pin. Called Bergara repair and they are sending one out.
Thank you @acesandeights for the video - very helpful.
Thought I'd add to the collection of hacks and tips related to the magazine issue with aftermarket stocks. I'm running a KRG Bravo.
Inspiration came from another poster using a soldering iron to stipple their magazines. I cut a small 1" square of grip tape I had laying around and put it on my magazine. Was doing ammo testing at the club yesterday and ran about a dozen magazine changes (same mag) through my B14r and only had one hiccup. I had to play with the length and location a few times with the tape to get it pretty close, but otherwise I'm happy with it and will continue to test it out. I have another extended mag catch from KRG, but haven't gotten around to trying to make that work.

Inspiration came from another poster using a soldering iron to stipple their magazines. I cut a small 1" square of grip tape I had laying around and put it on my magazine. Was doing ammo testing at the club yesterday and ran about a dozen magazine changes (same mag) through my B14r and only had one hiccup. I had to play with the length and location a few times with the tape to get it pretty close, but otherwise I'm happy with it and will continue to test it out. I have another extended mag catch from KRG, but haven't gotten around to trying to make that work.
UPDATE: I got the new firing pin today - 11 days since they sent it. It was any easy install and I went to the range to check functioning - all was OK. I'm now dry firing on spent cases - I don't have any commercial dummy rounds and this seems to work well.Well, I've learned my lesson, seen the light, I have. I shall use snap caps or at least old cases for dry fire hence forth. Went to he range this morning and nothing...crickets.... no pew, pew.
Got home and used @acesandeights YouTube video to see how to disassemble the bolt and found a broken firing pin. Called Bergara repair and they are sending one out.
Thank you @acesandeights for the video - very helpful.
View attachment 7664170
Any one else have a firing pin break related possibly to dry fries? I didn't dry fire excessively - I didn't think I did anyway.
I saw one other person post on here that they broke a firing pin from dry fire. Cant remember which thread.UPDATE: I got the new firing pin today - 11 days since they sent it. It was any easy install and I went to the range to check functioning - all was OK. I'm now dry firing on spent cases - I don't have any commercial dummy rounds and this seems to work well.
Any one else have a firing pin break related possibly to dry fries? I didn't dry fire excessively - I didn't think I did anyway.
For what it's worth I just past 2000 rounds since the mods I outlined on here with not a single failure.
Been feeding it RWS 50, Center X, SK match, SK long range, Eley 10x, Norma Tac, & occasionally Velociters when I'm screwing around at 400 on steel.
Just got a form 1 Quiet Bore titanium kit, so that's my next project on the B14r.
I broke my firing pin after about 1500 live rounds and probably close to 5000 dry fires. I was aware it may happen and it did. Bergara had a new pin to me in 3 days.I saw one other person post on here that they broke a firing pin from dry fire. Cant remember which thread.
For what it's worth I just past 2000 rounds since the mods I outlined on here with not a single failure.
Been feeding it RWS 50, Center X, SK match, SK long range, Eley 10x, Norma Tac, & occasionally Velociters when I'm screwing around at 400 on steel.
Just got a form 1 Quiet Bore titanium kit, so that's my next project on the B14r.

I may have been spoiled by my CZ 457 that probably has close to 10,000 dry snaps on it without incident.
Your barking up the wrong tree.On another issue. The heavy firing pen spring causing heavy trigger pull weight. Could a slightly lighter spring help provide better trigger pull without greatly reduced reliability? If so, where might one get such a spring?
Adjust the stock trigger all the way down or change the trigger to any rem 700 style that floats your boat.
First thing I did was remove the stock trigger & put in a Huber 1.5# 2 stage. Perfect for me.
Not looking for a 1.5lb trigger. Looking for a lighter pull. The rifle basix trigger out of my 700 ran 10oz in the Remington, will not go under 1.5 in the b14r. Also will not adjust as crisp in the B14r. Really want that 1# or less crisp trigger. Seems to be a crapshoot with the heavy firing pen spring.Your barking up the wrong tree.
Adjust the stock trigger all the way down or change the trigger to any rem 700 style that floats your boat.
First thing I did was remove the stock trigger & put in a Huber 1.5# 2 stage. Perfect for me.
TT Diamond should get you there. Can't speak from experience to confirm though.Not looking for a 1.5lb trigger. Looking for a lighter pull. The rifle basix trigger out of my 700 ran 10oz in the Remington, will not go under 1.5 in the b14r. Also will not adjust as crisp in the B14r. Really want that 1# or less crisp trigger. Seems to be a crapshoot with the heavy firing pen spring.
I just think trying to lighten striker spring would cause nothing but problems.
Put a TT Diamond 2-stage in mine and it will get down to 16oz but that's all she wrote. Not sure if it's the sear height issue as addressed by the Bix and Andy unit or the strength of the striker spring but I just run it at 20oz (so I don't have the second stage maxed out on clicks) and roll with it. I will say that the firing pin damn near mashes the rim flat on my rifle and a little less "oomph" wouldn't be a bad thing for the sake of a lighter trigger pull but that is just my opinion. Maybe a reduced power striker spring will appear on the aftermarket someday...TT Diamond should get you there. Can't speak from experience to confirm though.
I just think trying to lighten striker spring would cause nothing but problems.
P.S. Full disclosure. With the TT about 500 rounds in I have yet to have a slam fire, hang fire, or FTF so I can't bitch too much!
")
The firing pin spring is stout, but it's really a firing rod spring. The striker is heavy as hell.
My Huber is delivering 1.5# total pull as it should.
I did polish the sear surface after cutting it & that may have made a difference.
Zero FTF's in 2500 rounds & since reliability improvement was really the topic of the thread. I should leave it there.
Since it's my thread I'll veer off track a little.
My gun is shooting very well. I just put a G2 Razor on with a combined 40moa mount + rail & started playing at 500Y (22.9 mils with SK HV match). I've got 28 mils elevation available. I'm going to try my hand at a 22 ELR comp next month that goes to 510y
Been playing with tuners of my own design & version #2 is showing some real promise. Next time at range I'm going to try to get some data on the tuner @200 & 300y.
If I get bored this winter I'll wack the valve stem off a titanium valve and make an ultra light striker assembly out of my spare.
I'm perfectly happy with the 1.5# Huber & I doubt the juice is worth the squeeze, but there's only one way to find out.
Obviously I like tinkering but modding the striker assembly is pretty low on my priority list.
I've said it before, but as reminder Bergara doesn't sell parts. Remember that before you start modding parts that can't be replaced.
A reduced power spring can be sourced, but first it will require an accurate measurement of the stock spring rate, seat pressure, open pressure, free length, stack length, od, id, & wire diameter.
I recently solved all my issues with my B14R in one go after months and hours getting nowhere. Triggertech hangfires, extraction issues, the lot.
I'll share my super secret recipe for success just this once.
Sell the fucking thing.
The guns now someone else's problem.
Goodluck everyone.
I'll share my super secret recipe for success just this once.
Sell the fucking thing.
The guns now someone else's problem.
Goodluck everyone.
So, new to the B-14r. I dropped it into a MPA BA Comp. I had an extra TT diamond laying about, so I decided to try it in the rifle. It is so darn hard to close the bolt with the TT. I couldn't believe it.
I am wondering if an adjustable jewel trigger might be the answer. To my knowledge they are the most adjustable "out of the box" on the market. Has anyone tried the jewel?
I have experianced the occasional Failure to extract the spent case. Three times or so. I will investigate the left side extractor and add a spring if necessary.
To date, I have not experianced any sort of feeding issue.
Jewell works flawless in my B14R Steel! Bolt is just as easy & smooth to operate as with the stock trigger. And goes down to 1.5oz. It's the basic trigger without safety.
I just finished the last match for my local PRS centerfire rifle so I took out my barreled action and dropped in my B14R into my ACC chassis and threw on my TT Diamond single stage. So far everything is smooth except the barrel is a little short and my magazine with the MK extension will not seat because it hits the mag latch. I have another factory mag coming this week that I can try and see how it feeds.

How did this end up working out? I am having slight mag tilt from the front and need a good fix!Thought I'd add to the collection of hacks and tips related to the magazine issue with aftermarket stocks. I'm running a KRG Bravo.
Inspiration came from another poster using a soldering iron to stipple their magazines. I cut a small 1" square of grip tape I had laying around and put it on my magazine. Was doing ammo testing at the club yesterday and ran about a dozen magazine changes (same mag) through my B14r and only had one hiccup. I had to play with the length and location a few times with the tape to get it pretty close, but otherwise I'm happy with it and will continue to test it out. I have another extended mag catch from KRG, but haven't gotten around to trying to make that work. View attachment 7666479
Nemsis,
I saw a great fix for that though. I have seen a lot of guys chop one or two window sections off its length
to balance it out visually. I bought LSS gen 2 for my V22 with a 22" bbl because I had not seen that mod at the time.
At some point I put my B14R in my LSS and TTD trigger and she worked great.
Ok I’ve put about 150 rds through the Begara in the ACC chassis and with the TT Diamond trigger with zero issues. Looks a little weird with the barrel being shorter than the forend but it shoots good.
View attachment 7730269
Attachments
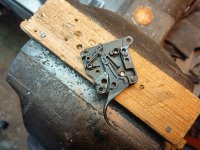
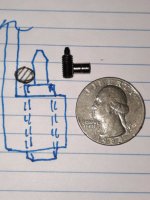
After $20.00 for the tap and spring plunger, my factory Bergara trigger has an adjustable sear engagement and an 11 oz. weight.I'm at 1.75 oz with a Jewell... Everything else is completely stock. I tried some stuff with the stock trigger, but could not get below 2 lbs without taking it apart.
The photo is not my trigger. The work can be done without taking the trigger apart. Since I had the stuff, I also added an over travel
screw as well.
Attachments
357MAX,The firing pin spring is stout, but it's really a firing rod spring. The striker is heavy as hell.
My Huber is delivering 1.5# total pull as it should.
I did polish the sear surface after cutting it & that may have made a difference.
Zero FTF's in 2500 rounds & since reliability improvement was really the topic of the thread. I should leave it there.
Since it's my thread I'll veer off track a little.
My gun is shooting very well. I just put a G2 Razor on with a combined 40moa mount + rail & started playing at 500Y (22.9 mils with SK HV match). I've got 28 mils elevation available. I'm going to try my hand at a 22 ELR comp next month that goes to 510y
Been playing with tuners of my own design & version #2 is showing some real promise. Next time at range I'm going to try to get some data on the tuner @200 & 300y.
If I get bored this winter I'll wack the valve stem off a titanium valve and make an ultra light striker assembly out of my spare.
I'm perfectly happy with the 1.5# Huber & I doubt the juice is worth the squeeze, but there's only one way to find out.
Obviously I like tinkering but modding the striker assembly is pretty low on my priority list.
I've said it before, but as reminder Bergara doesn't sell parts. Remember that before you start modding parts that can't be replaced.
A reduced power spring can be sourced, but first it will require an accurate measurement of the stock spring rate, seat pressure, open pressure, free length, stack length, od, id, & wire diameter.
View attachment 7695038
Why do you need any more than the OAL, OD and wire diameter to order a spring?? Even If my spring were to break, I would order one from McMaster Carr. If you wanted to reduce your power, your simply going to change the wire diameter or pre-load.
The factory spring is likely MW and if you want to change the rate but keep the exact same size spring you can change matl. to SS
and the rate will drop to 83% of the MW spring.
Just me I suppose......
Is there more info on this mod here? I would love to try duplicate your 11 ounce trigger pull.After $20.00 for the tap and spring plunger, my factory Bergara trigger has an adjustable sear engagement and an 11 oz. weight.
The photo is not my trigger. The work can be done without taking the trigger apart. Since I had the stuff, I also added an over travel
screw as well.
Hey MilSpec,
If you know how to work with metal the instructions are.....
Drill
Tap
Install
Adjust...
The premise is that the spring plunger nullifies some of the trigger torsion spring load and the body of the spring plunger
acts as the adjustable sear stop.
The factory trigger has pilot holes already in place. Be aware the rear hole is about .10" and necks down about .010 about half way in.
Your going to want to chase that hole out to a diameter of .109" to .117" It can have such a large range because your going
to have over three times diameter engagement with your long nose spring plunger. Refer to machinist handbook. The front hole shown in
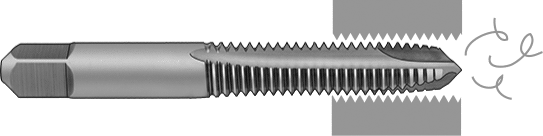
the second photo is for the over travel. You can use any 6-32 tap but be aware that most tend to push the chips into the hole
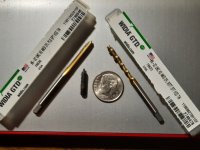
or into the trigger in this case. I would recommend you use a spiral flute tap like #26255A52 ( $14.80 ) If you want to go cheap
all you need do is tap with the trigger inverted and clear the chips often.
I went to McMaster Carr and bought:
#8495A11 Hex drive long nose spring plunger with locking element ($4.56) Be sure to check the plunger with the locking element.
If you click on the thread locker option in the line item it will happen automatically.
#26255A52 Chip clearing tap with bottom chamfer TIN coated. ( $14.80)
#91385A148 6-32 x 1/2" socket set screw with locking element. (qty. 10/$8.00) From 1/4" to 1/2" will work.
Take your trigger off.
Invert the trigger holes and tap. **Rear hole, Push the trigger blade forward gently and you will feel when the tap contacts it.
**Front hole, Pull the trigger blade rearward and you will feel when the tap contacts it.
Put the spring plunger into the rear hole until the firing pin falls on a snap cap.
Back out plunger to get the sear engagement you want.
Install over travel set screw to your liking.
The diameter of the 6-32 is .138" The width between the two side plates of the trigger is .176"
I have found that when using back to back set screws that the second set screw moves the first by some small amount.
I highly recommend fasteners with locking elements.
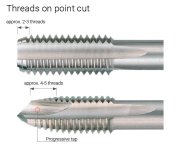
In the last photo you will note the lead threads of the tap are incomplete. That will prevent the plunger or set screw from
proceeding into the hole. You can see in the first photo that the plunger needs to get pretty close to the trigger blade
in order to function.
[email protected]
Feel free to call.....
If you know how to work with metal the instructions are.....
Drill
Tap
Install
Adjust...
The premise is that the spring plunger nullifies some of the trigger torsion spring load and the body of the spring plunger
acts as the adjustable sear stop.
The factory trigger has pilot holes already in place. Be aware the rear hole is about .10" and necks down about .010 about half way in.
Your going to want to chase that hole out to a diameter of .109" to .117" It can have such a large range because your going
to have over three times diameter engagement with your long nose spring plunger. Refer to machinist handbook. The front hole shown in
the second photo is for the over travel. You can use any 6-32 tap but be aware that most tend to push the chips into the hole
or into the trigger in this case. I would recommend you use a spiral flute tap like #26255A52 ( $14.80 ) If you want to go cheap
all you need do is tap with the trigger inverted and clear the chips often.
I went to McMaster Carr and bought:
#8495A11 Hex drive long nose spring plunger with locking element ($4.56) Be sure to check the plunger with the locking element.
If you click on the thread locker option in the line item it will happen automatically.
#26255A52 Chip clearing tap with bottom chamfer TIN coated. ( $14.80)
#91385A148 6-32 x 1/2" socket set screw with locking element. (qty. 10/$8.00) From 1/4" to 1/2" will work.
Take your trigger off.
Invert the trigger holes and tap. **Rear hole, Push the trigger blade forward gently and you will feel when the tap contacts it.
**Front hole, Pull the trigger blade rearward and you will feel when the tap contacts it.
Put the spring plunger into the rear hole until the firing pin falls on a snap cap.
Back out plunger to get the sear engagement you want.
Install over travel set screw to your liking.
The diameter of the 6-32 is .138" The width between the two side plates of the trigger is .176"
I have found that when using back to back set screws that the second set screw moves the first by some small amount.
I highly recommend fasteners with locking elements.
In the last photo you will note the lead threads of the tap are incomplete. That will prevent the plunger or set screw from
proceeding into the hole. You can see in the first photo that the plunger needs to get pretty close to the trigger blade
in order to function.
[email protected]
Feel free to call.....
Attachments
-
 RUKO_internal_threads_on_point_cut.jpg42.3 KB · Views: 222
 -
 FRONT OVER TRVL..jpg349.8 KB · Views: 214
 -
 REAR PLUNGER WIDTH .176 INCH.jpg381.8 KB · Views: 218
 -
 REAR PLUNGER.jpg316.4 KB · Views: 213
 -
 2529a56p1-a02c-master1548357030-p9@1x_636598984709350000.png14.6 KB · Views: 212
 -
 2523a413p999-a02cl1548347737@1x_635229129600000000.png18.3 KB · Views: 227
 -
 bt3.jpg487.6 KB · Views: 216
 -
 bt-2.jpg684.8 KB · Views: 220
Thanks. I searched your posts after asking the question and found out a lot of what I needed to know. The additional detail you gave above is even more help. Thank you.
Hey MilSpec,
In the front right corner of the trigger there is a spring adjustment screw, you will want to adjust or remove it. It's adjustment screw has a point on it that acts like a fence.
It keeps the spring caught between the pin and the housing wall. Again, a SWAG.
I have bought a 8-32 spring plunger but it has a final nose force of about 7.3 pounds. Using it has a couple concerns like interfering with
the safety detent ball and it's spring. Since I have not taken my unit apart for closer inspection, I'm making a certain amount of SWAGs.
Also, the spring plunger must not over power the trigger blade torsion spring or the sear adjustment function wont work.
It always has to be somewhat bias in favor of the trigger spring. In my trigger I have removed all of the pre-load from the spring that
appears to act on the trigger blade. (front right corner screw)
But while writing that last post, I believe I came up with the solution to the #8-32 plunger over powering the trigger issue.
This is an exercise in mental gymnastics and not a replacement for a Bix-n Andy. It's also a simple fix for everyone. I can grind off the
seven rivets and really go crazy but I wanted it to be simple for all.
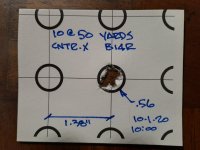
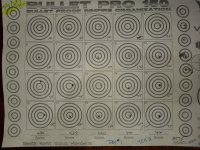
I'm really surprised at how many people are unhappy with the B14R. Straight out of the box with it's long, creepy POS trigger, my
gun shoots as well as my V22. It's just not as refined and it lacks the COOL ROLEX factor !! The .56" diameter in the forth photo is to the
outside of the line and the line weight is .06". My biggest complaint about the factory gun is the trigger, the heavy mag release
and the small bolt knob with it's overly sharp knurling. After being replaced with Vudoo knob it was all good.
It seems like a nice gun for $949. Though I hear all sorts of bad when it come to the pencil barrel, CF tube model. It's not bonded
but just a slip over tube. It does nothing to add rigidity to the bbl.
EDIT.... Both targets were shot with the factory trigger set to it's lowest setting of about 2lb/4oz.
Also.... some people install a #4-40 set screw and put the sear on the hairy edge. I don't approve of that approach.
It only makes the trigger short, it does nothing to lighten it.
In the front right corner of the trigger there is a spring adjustment screw, you will want to adjust or remove it. It's adjustment screw has a point on it that acts like a fence.
It keeps the spring caught between the pin and the housing wall. Again, a SWAG.
I have bought a 8-32 spring plunger but it has a final nose force of about 7.3 pounds. Using it has a couple concerns like interfering with
the safety detent ball and it's spring. Since I have not taken my unit apart for closer inspection, I'm making a certain amount of SWAGs.
Also, the spring plunger must not over power the trigger blade torsion spring or the sear adjustment function wont work.
It always has to be somewhat bias in favor of the trigger spring. In my trigger I have removed all of the pre-load from the spring that
appears to act on the trigger blade. (front right corner screw)
But while writing that last post, I believe I came up with the solution to the #8-32 plunger over powering the trigger issue.
This is an exercise in mental gymnastics and not a replacement for a Bix-n Andy. It's also a simple fix for everyone. I can grind off the
seven rivets and really go crazy but I wanted it to be simple for all.
I'm really surprised at how many people are unhappy with the B14R. Straight out of the box with it's long, creepy POS trigger, my
gun shoots as well as my V22. It's just not as refined and it lacks the COOL ROLEX factor !! The .56" diameter in the forth photo is to the
outside of the line and the line weight is .06". My biggest complaint about the factory gun is the trigger, the heavy mag release
and the small bolt knob with it's overly sharp knurling. After being replaced with Vudoo knob it was all good.
It seems like a nice gun for $949. Though I hear all sorts of bad when it come to the pencil barrel, CF tube model. It's not bonded
but just a slip over tube. It does nothing to add rigidity to the bbl.
EDIT.... Both targets were shot with the factory trigger set to it's lowest setting of about 2lb/4oz.
Also.... some people install a #4-40 set screw and put the sear on the hairy edge. I don't approve of that approach.
It only makes the trigger short, it does nothing to lighten it.
Attachments

Last edited:
It worked fine for a little while, but the adhesive didn't last very long and it eventually came off.How did this end up working out? I am having slight mag tilt from the front and need a good fix!
Snipes81,
I don't have any mag tilt issue, but I have some .001,.003 and .005 full hard SS sheet with PSA backing.
Id 'be happy to send you some to try. Whatever you try, I would put a radius on it's leading edge.
A shim with a nice looking horizontal line on your mag is the worst way to have it.
You may also consider painting the shim edge with clear enamel finger nail polish.
You could even wrap the shim so it adheres to the right, rear and left side. A "U" shape.
I also have some PTFE or UHMW with some aggressive adhesive. DO you know how thick your shim needs
to be?? From post #57, it looks like his needed at least .010" since he's using texture tap.
I may consider SS or UHMW shim on the btm metal instead of shimming all of your mags once you have established
your required thickness.
Have you done my trigger mod? You should !
Shawn
Attachments
Last edited:
MilSpecOkie,
How did your trigger mod work out?? Did you achieve eleven ounces?
How did your trigger mod work out?? Did you achieve eleven ounces?
Thanks. I searched your posts after asking the question and found out a lot of what I needed to know. The additional detail you gave above is even more help. Thank you.
Where are your firing pins failing?? Does anybody have a spare B14R trigger I can mess with?? $$
I want to try a #8-32 spring plunger to get even a lower pull, but would prefer to see inside first.
(11 oz. currently with about a .016" adjustable sear engagement. )
I want to try a #8-32 spring plunger to get even a lower pull, but would prefer to see inside first.
(11 oz. currently with about a .016" adjustable sear engagement. )
Shawn,Snipes81,
I don't have any mag tilt issue, but I have some .001,.003 and .005 full hard SS sheet with PSA backing.
Id 'be happy to send you some to try. Whatever you try, I would put a radius on it's leading edge.
A shim with a nice looking horizontal line on your mag is the worst way to have it.
You may also consider painting the shim edge with clear enamel finger nail polish.
You could even wrap the shim so it adheres to the right, rear and left side. A "U" shape.
I also have some PTFE or UHMW with some aggressive adhesive. DO you know how thick your shim needs
to be?? From post #57, it looks like his needed at least .010" since he's using texture tap.
I may consider SS or UHMW shim on the btm metal instead of shimming all of your mags once you have established
your required thickness.
Have you done my trigger mod? You should !
Shawn
I don't know how thick of a shim I would need. I appreciate your generous offer. I'll most likely try to get the extended mag catch release installed / adjusted to see if that will address it. I purchased it a while ago, but was hoping to not have to mess with it.
WRG to your trigger mod, I swapped out the factory trigger with one of the TT Diamonds and am happy with that route.
I haven’t messed with it yet. I have a TT trigger in it now and I was going to steal it for a centerfire build, but found another TT on the shelf so I can use that instead.MilSpecOkie,
How did your trigger mod work out?? Did you achieve eleven ounces?
I’m likely going to mod the stock one like you did eventually. I just need to have a big enough order from MC to make it worth the shipping costs.
Why don’t you use some epoxy on the back of the magazine. You can get golf club epoxy that dries black if that bothers you. Build it up and then file it down until it fits as needed. If it doesn’t work you can completely sand it off.Shawn,
I don't know how thick of a shim I would need. I appreciate your generous offer. I'll most likely try to get the extended mag catch release installed / adjusted to see if that will address it. I purchased it a while ago, but was hoping to not have to mess with it.
WRG to your trigger mod, I swapped out the factory trigger with one of the TT Diamonds and am happy with that route.
Mainly because I'd like to fix it once and not have to fool with it for each magazine down the road. If I can get it to work at the rifle level that's my preference after trying to "hack" it already once. I do like your idea in the event I need a fallback plan.Why don’t you use some epoxy on the back of the magazine. You can get golf club epoxy that dries black if that bothers you. Build it up and then file it down until it fits as needed. If it doesn’t work you can completely sand it off.
A couple months ago, I installed a set screw as an adjustable sear stop and another to act as an over travel stop. That lasted about
2 hours. I knew that incorporating a 6-32 lo0ng nose spring plunger would do the same thing but also reduce the trigger pull.
I so I did that and reduced the pull to 11 ounces with adjustable sear engagement. 1/12/2022 I decided to increase the plunger to
#8-32 long nose spring plunger. The housing width is .176 and the #8 screw is about .164" diameter. Although close, the threads don't
bite into the side plates. Though I would not really care if they did. Because of the limited spring rate available with the #8 spring plunger,
you are like better off using the stiffest #6-32 that McMaster Carr offers and end up with an crisp, short, 11 ounce trigger with sear adjustment and OT adjustment. It costs $4.50 plus the tap cost if you don't already have one. It's set up is near child proof as well. The #8-32 requires
a fair amount of spring balancing to achieve the same thing.
Get the one with nylon thread locker !!
Steel Long-Nose Spring Plunger, #6-32 Thread, 1.5-4.5 lb. Nose Force
With Thread Locker, 8495A11
$4.56 Steel Long-Nose Spring Plunger, 6-32 Thread, 1.5-4.5 lb. Nose Force
I will continue to play with the B14R trigger for mods that you can do at home without grinding off the 7 rivets.
HAS ANYONE opened up the barrel channel on the B14R to just over 1.125 for a pre-fit bbl. like an IBI ?? I'm not a fan of big changes on guns
but my B14R is nice enough to try something new. It's current groups are .32" ctc without much trouble.
Target was shot with factory trigger set to 2 pound, 4 ounce. It is pretty trashy unit from the factory.
Attachments
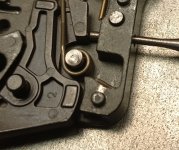
@357Max Thanks for the initial write up. I had seen this post prior to buying the B14R. Over this past Saturday I shot a PRS Rimfire match and put about 72 rounds (out of 80) down the tube in addition to 180 or so prior to the match zeroing, plinking, and verifying dope. Zero issues.
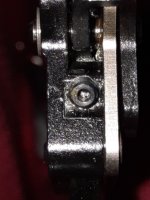
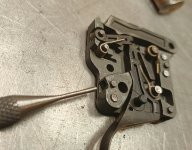
Today at the range I started to get intermittent extraction issues where the brass would pop off from the claw prematurely. I chalked it up to being dirty. Regardless I performed the assist spring mod when I got home. Tension feels just like the extractor claw now. While I’m at it I guess I’ll ramp the mag lips as well.
Tension before:
Tension after:
@357Max Thanks for the initial write up. I had seen this post prior to buying the B14R. Over this past Saturday I shot a PRS Rimfire match and put about 72 rounds (out of 80) down the tube in addition to 180 or so prior to the match zeroing, plinking, and verifying dope. Zero issues.
Today at the range I started to get intermittent extraction issues where the brass would pop off from the claw prematurely. I chalked it up to being dirty. Regardless I performed the assist spring mod when I got home. Tension feels just like the extractor claw now. While I’m at it I guess I’ll ramp the mag lips as well.
Tension before:
Tension after:
I'd say my tensioner is 70-80% of the extractor. Should be fine if equal cause the tensioner has more like an angle interface with the rim vs the hook on the extractor.
The feed ramps were definitly catching rims and prematurly dislodging brass on mine.
So far I've got 2500+ on it since the fixes without any malfunctions. I'm surprized not even one FTF defective round yet, but I have been feeding it good quality ammo. I really enjoy shooting this little rifle & not even really tempted to rebarrel.
Mine loves SK Long Range Match & Eley 10X faster lots only.
My B14R is sending the lot of SK LR I have out at 1107 fps avg. I tried a lot of Tenex that is labeled 1070 and it’s also around 1100-ish. The feeding on the Tenex however is hot garbage.
Yeah mine was shaving bullets initially unless the mag was in it's happy place. After the feed ramp mod (post #1), it's like Mikey, & eats anything.My B14R is sending the lot of SK LR I have out at 1107 fps avg. I tried a lot of Tenex that is labeled 1070 and it’s also around 1100-ish. The feeding on the Tenex however is hot garbage.
That ramp mod isn't for everyone I know, but I have the specialized tools and experience as a machinist. Done right it works very well. If done wrong it could easily ruin a barrel. FWIW although I biased the bottom, not really shown in the picture the edge was slightly beveled & polished all the way around. It would also occasionally shave a little lead on the top side prior to this.
Just seems dumb to me to have a sharp edge chamber entry for soft lead projectiles. I suspect even breaking the edge with some polishing rouge on one of the felt tips to break the edge would help a lot. It's a hard area to reach though.
UT8708 Universal Tool right angle pencil grinder is what I used along with Shars mini carbide burrs & a buffer with rouge similar to the one shown.
I shaped the buffer on the bench grinder to a small cone.
Shown with an Eley box for scale. I don't think anything larger would work.
Last edited:
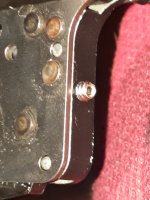
Does anyone know if Bergara has made any revisions to the current crop of B14R’s? I was wondering about the ejector and how some have staked the metal further locking it into place. My ejector is snug as a bug and doesn’t seem like it would go anywhere or wiggle. Maybe over time it will? The end of my serial number is -21. Does that indicate production year?
On a side note I am noticing that the bolt catch screw is turning out but is being stopped by my chassis. Common thing?
On a side note I am noticing that the bolt catch screw is turning out but is being stopped by my chassis. Common thing?
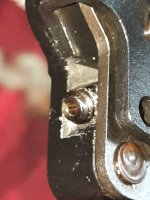
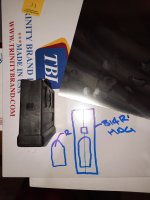
Nothing new but the mod took a few seconds to do with a Dremel. Another solution for a mag.

Nothing new but the mod took a few seconds to do with a Dremel. Another solution for a mag.
View attachment 7792649
What did you have to mod to make the Vudoo mag work?
See the pic I attached? The back edge of the mag by the ejector needed to relieved until it fit. Didn’t take much and doesn’t take but a few seconds with a fine sanding drum on a Dremel. If you have a Vudoo mag lying around you’ll see what I mean.What did you have to mod to make the Vudoo mag work?
Similar threads
- Replies
- 17
- Views
- 997
- Replies
- 3
- Views
- 828
- Replies
- 15
- Views
- 719
