Is that the front door to your house???Wow, all these well thought out spaces you guys are reloading in....mine was never built as a reloading room, it sort of evolved over time......
View attachment 7134017
View attachment 7134018
Join the Hide community
Get access to live stream, lessons, the post exchange, and chat with other snipers.
Register
Download Gravity Ballistics
Get help to accurately calculate and scope your sniper rifle using real shooting data.

Install the app
How to install the app on iOS
Follow along with the video below to see how to install our site as a web app on your home screen.
Note: This feature may not be available in some browsers.
You are using an out of date browser. It may not display this or other websites correctly.
You should upgrade or use an alternative browser.
You should upgrade or use an alternative browser.
Building the Perfect Reloading Room
- Thread starter sirhrmechanic
- Start date
Clean and simple, I like it.Maybe I did it ass backwards, but I mounted the T track, then drilled the plates on center to match the T track spacing ??
View attachment 7133850View attachment 7133851

Actually the only thing I use the Lee press for is depriming and loading for a 408 cheytac when I had it. Good press, but I use a co ax for precision. Dillon for bulk.I see you own a Lee press. I've found over the years I can drop and weigh consistent powder charges and load concentric low SD ammo at a fraction of the price with Lee Precision equipment. Nice room and safe!")
Here's a look at my bench/hurricane shelter. Little overkill, weighing in around 600lbs, but it is solid! I can run the press while the chargemaster trickles with no issues. Need to upgrade the lighting, but its a start!

Man, some of you guys have some bad ass rooms! Mine is a lil 8x10 space in the unfinish part of my basement. It works.

I have been building my reloading room so far this is how its looking

That is a GREAT start. I mean, you have a 'room' to do whatever you want with. There are many here on this forum, let alone many more in the hobby who don't have a 'room' to begin with.I have been building my reloading room so far this is how its lookingView attachment 7142937
The world is your oyster!
Situated in the corner of my garage. The ever important fridge is behind the shelving.
![IMG_0800[17773].JPG](https://www.snipershide.com/shooting/data/attachments/328/328917-2c46efdb6c65be12eeb9e4a356bd7d3c.jpg "IMG_0800[17773].JPG")
Props to all of the recent post and pictures of reloading room. Nice setups and tons of space.. My reloading bench is small and cluttered. But for years I’ve managed. The latest thing I did to my room 2 years ago is change my ceiling and work bench lites to LED. My humble bench...


Last edited:
My work area needs little more work but it’s coming along nice

Here's a look at my bench/hurricane shelter. Little overkill, weighing in around 600lbs, but it is solid! I can run the press while the chargemaster trickles with no issues. Need to upgrade the lighting, but its a start!
View attachment 7138375
Install some (lots and lots) LED can lights, a bit of insulation and then sheetrock that ceiling.
Hang some cabinets on the wall and put a good sound system in there.
BAM! A real man cave.
nice benchProps to all of the recent post and pictures of reloading room. Nice setups and tons of space.. My reloading bench is small and cluttered. But for years I’ve managed. The latest thing I did to my room 2 years ago is change my ceiling and work bench lites to LED. My humble bench...
View attachment 7145057View attachment 7145058
Where can you get something like that its niceThis is the setup I use while I'm working construction away from home. The big box stores have unfinished cabinets and maple butcher block counters. Easy to set up and take apart. Just leave everything packed away in the cabinets and on to the next one.
View attachment 7107210
Been following this thread for a while to see
What others do and now with a move planned I’m going to be leaving my shop space behind where I had a reloading bench and my own little world out there for a property that doesn’t currently have a shop.
So when it comes to a house with a basement and an attached garage where do most of you prefer to put reloading room?
Garage could be good but with doors opening daily that could cause some issues with moisture and temperature.
Basement isn’t really convenient to just grab ammo and a rifle and go shoot a ladder or practice etc. Also easier for kids to access that part of the house.
Been following this thread for a while to see
What others do and now with a move planned I’m going to be leaving my shop space behind where I had a reloading bench and my own little world out there for a property that doesn’t currently have a shop.
So when it comes to a house with a basement and an attached garage where do most of you prefer to put reloading room?
Garage could be good but with doors opening daily that could cause some issues with moisture and temperature.
Basement isn’t really convenient to just grab ammo and a rifle and go shoot a ladder or practice etc. Also easier for kids to access that part of the house.
Are you in a wheelchair or why isn’t the basement “convenient”?
At least in the basement you could hopefully have your own room for it, and lock the room up, as well as having a safe inside the room to lock up other things like primers/powders if that’s a concern.
I’d say it also depends on your environment for a garage setup. Where I live, we see on average a difference of 150 degrees Fahrenheit between coldest day and hottest day of the year. Trying to keep the garage at around 65-70 degrees year round with vehicles going in/out would not only be a PITA but it would cost a lot of money.
Sorry I should have said not AS convenient just due to layout of house with where stairs are compared to the convenience of garage.
Is it only me that would like to be able to walk out of the house with a rifle and bag without having to go through the living room and get the what for every time??? Or the could you do this first... lol
Temperature stability obviously goes to the basement. But I have never had much issue with my shop here that is heated and insulated. It gets warm in the summer is main downside along with humidity changes.
Nothing says you cant just keep your safe (with proper desiccants) and Annealing setup (if you have it) in the Garage. Then keep your reloading bench and supplies in the basement. Also, invest in a combo lock for your room if you’ve got kids around.
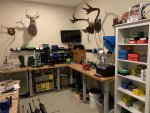
After following this thread for a while, I've incorporated a couple of ideas I gleaned here into my own setup. Here's my bench in it's mostly-final form....

Not as awesome as some on here but I'm new to reloading and just getting started.
Who makes that bench? Sams club?After following this thread for a while, I've incorporated a couple of ideas I gleaned here into my own setup. Here's my bench in it's mostly-final form....
View attachment 7156014
Who makes that bench? Sams club?
I honestly don't remember where I got the bench from. I've had it quite a while. Might have been Sam's. I'll have to see if I can figure it out. It's definitely heavy duty. Steel frame and heavy laminated wood top. Good stuff.
Good Lawd. That’s a lot of Bergers. If you have any 130 hybrids in that stash you need rid of, let me know.
Due to limited space at my house this is my setup in my garage. It doubles as a car work bench. The cabinet on the side house all the reloading stuff and car stuff so my desk is always kept clean.

Simple and clean. I like it ??Due to limited space at my house this is my setup in my garage. It doubles as a car work bench. The cabinet on the side house all the reloading stuff and car stuff so my desk is always kept clean.View attachment 7167438
Always enjoy seeing other people's reloading room setups. Everyone has specific needs and circumstances, so there is a lot of variation. To date, I have built three shops with included reloading areas with a few conclusions:
1.) Make the reloading bench as stout as possible.
2.) Unless the bench is dual purpose, make it fairly shallow. This helps stiffness and prevents the clutter that seems to collect behind the presses. (Perhaps that is just me)
3.) Add plenty of light and climate control if at all possible.
Here are a few pics of my third iteration. It is a 8'x20' part of a larger climate controlled area. (Mitsubishi mini-split heat pump) The 2x6 framework was lagged into the wall studs, overtopped with two layers of 3/4" plywood glued and screwed together with overlapping joints. This was sheathed with 1/8" stainless sheet that came from a scrapped catch basin. Really like the stainless; I write reloading info on it while I reload with a sharpie and wipe it off afterwards with solvent.
Edited to add: Bench dimensions are 16" wide and 34" tall
Area is still in flux; I do have my 1050 and 550s mounted, along with a Redding T7 on the opposite side. There is also a mounted aluminum plate with a bunch of 10-32 tapped holes for those rarely used items.
The windows were single pane, scrounged from a remodel, and open into the interior of my shop.
The door opens into a 4x20 closet with shelves (3/4"x11") for component storage. Really like the lights mounted on the wall to illuminate the shelves.
Last edited:
That’s an amazing set upAlways enjoy seeing other people's reloading room setups. Everyone has specific needs and circumstances, so there is a lot of variation. To date, I have built three shops with included reloading areas with a few conclusions:
1.) Make the reloading bench as stout as possible.
2.) Unless the bench is dual purpose, make it fairly shallow. This helps stiffness and prevents the clutter that seems to collect behind the presses. (Perhaps that is just me)
3.) Add plenty of light and climate control if at all possible.
Here are a few pics of my third iteration. It is a 8'x20' part of a larger climate controlled area. (Mitsubishi mini-split heat pump) The 2x6 framework was lagged into the wall studs, overtopped with two layers of 3/4" plywood glued and screwed together with overlapping joints. This was sheathed with 1/8" stainless sheet that came from a scrapped catch basin. Really like the stainless; I write reloading info on it while I reload with a sharpie and wipe it off afterwards with solvent.
Area is still in flux; I do have my 1050 and 550s mounted, along with a Redding T7 on the opposite side. There is also a mounted aluminum plate with a bunch of 10-32 tapped holes for those rarely used items.
The windows were single pane, scrounged from a remodel, and open into the interior of my shop.
The door opens into a 4x20 closet with shelves (3/4"x11") for component storage. Really like the lights mounted on the wall to illuminate the shelves.
View attachment 7168107View attachment 7168108View attachment 7168109View attachment 7168110View attachment 7168111
Always enjoy seeing other people's reloading room setups. Everyone has specific needs and circumstances, so there is a lot of variation. To date, I have built three shops with included reloading areas with a few conclusions:
1.) Make the reloading bench as stout as possible.
2.) Unless the bench is dual purpose, make it fairly shallow. This helps stiffness and prevents the clutter that seems to collect behind the presses. (Perhaps that is just me)
3.) Add plenty of light and climate control if at all possible.
Here are a few pics of my third iteration. It is a 8'x20' part of a larger climate controlled area. (Mitsubishi mini-split heat pump) The 2x6 framework was lagged into the wall studs, overtopped with two layers of 3/4" plywood glued and screwed together with overlapping joints. This was sheathed with 1/8" stainless sheet that came from a scrapped catch basin. Really like the stainless; I write reloading info on it while I reload with a sharpie and wipe it off afterwards with solvent.
Area is still in flux; I do have my 1050 and 550s mounted, along with a Redding T7 on the opposite side. There is also a mounted aluminum plate with a bunch of 10-32 tapped holes for those rarely used items.
The windows were single pane, scrounged from a remodel, and open into the interior of my shop.
The door opens into a 4x20 closet with shelves (3/4"x11") for component storage. Really like the lights mounted on the wall to illuminate the shelves.
View attachment 7168107View attachment 7168108View attachment 7168109View attachment 7168110View attachment 7168111
What is the depth of your bench? Also how high off the floor? It’s the little things like that you don’t realize until it’s too late and would rather get right upfront
This is my current setup. Most of my components are stored in the cabinets below.

This was my old setup in my condo. It was cramped but it worked.

This was my old setup in my condo. It was cramped but it worked.
What is the depth of your bench? Also how high off the floor? It’s the little things like that you don’t realize until it’s too late and would rather get right upfront
Will get those measurements for you.
What is the depth of your bench? Also how high off the floor? It’s the little things like that you don’t realize until it’s too late and would rather get right upfront
Benches are 16" wide and 34" tall. Edited my original post to add that info also.
Always enjoy seeing other people's reloading room setups. Everyone has specific needs and circumstances, so there is a lot of variation. To date, I have built three shops with included reloading areas with a few conclusions:
1.) Make the reloading bench as stout as possible.
2.) Unless the bench is dual purpose, make it fairly shallow. This helps stiffness and prevents the clutter that seems to collect behind the presses. (Perhaps that is just me)
3.) Add plenty of light and climate control if at all possible.
Here are a few pics of my third iteration. It is a 8'x20' part of a larger climate controlled area. (Mitsubishi mini-split heat pump) The 2x6 framework was lagged into the wall studs, overtopped with two layers of 3/4" plywood glued and screwed together with overlapping joints. This was sheathed with 1/8" stainless sheet that came from a scrapped catch basin. Really like the stainless; I write reloading info on it while I reload with a sharpie and wipe it off afterwards with solvent.
Edited to add: Bench dimensions are 16" wide and 34" tall
Area is still in flux; I do have my 1050 and 550s mounted, along with a Redding T7 on the opposite side. There is also a mounted aluminum plate with a bunch of 10-32 tapped holes for those rarely used items.
The windows were single pane, scrounged from a remodel, and open into the interior of my shop.
The door opens into a 4x20 closet with shelves (3/4"x11") for component storage. Really like the lights mounted on the wall to illuminate the shelves.
wow this setup is amazing. I wish I had that much room but I do not think my wife would approve me taking over her closet haha
In the middle of remodeling my house and part of that is closing in my garage and turning it into a second master suit for my oldest daughter. Im redoing my kitchen as well and some other items around the home. The garage has been my reloading/ shop/storage area for years, so I had to buy a building for my stuff. Always wanted one that was climate controlled and away from kids and wife.
Bought a 12x30 and had it delivered mid September.
Had the dividing wall built in giving me a 12x12 garage space and a 12x18 reloading area.

.jpg")
.jpg")
.jpg")
more to follow.
Bought a 12x30 and had it delivered mid September.
Had the dividing wall built in giving me a 12x12 garage space and a 12x18 reloading area.
more to follow.
I upgraded my main panel in my home and reused the existing 200 amp panel for my shop. I added a main disconnect and ran a true 200 amp service to my shed along with spare conduit for low voltage cable like coax for satellite, internet cabling and security system.


rough in for plugs and lights. I have at least 3 to 4 plugs on every wall several of witch are dedicated.
rough in for plugs and lights. I have at least 3 to 4 plugs on every wall several of witch are dedicated.
Once all of the wiring was complete and tested I started covering the walls. I had a hard time decing on a wall covering. I knew I didn't want rough plywood or drywall. I decided on a 1/4" Maple plywood that I could either paint or stain or leave alone.
I didnt get any pictures of the insulation but used R13 wall insulation.


The walls ar 7'-9" to the top. this would make for a short ceiling so I ripped the 4x8 plywood in half and added it to the top of the walls.
For an accent wall I chose a laminated Masonite form Lowes, in a barn wood pattern. this is the wall my TV will go on.
Commercial lay in for the ceilings gives me a higher ceiling some insulation value and easy access and replacement if needed.
Ceilings are now 8'-7".


I didnt get any pictures of the insulation but used R13 wall insulation.
The walls ar 7'-9" to the top. this would make for a short ceiling so I ripped the 4x8 plywood in half and added it to the top of the walls.
For an accent wall I chose a laminated Masonite form Lowes, in a barn wood pattern. this is the wall my TV will go on.
Commercial lay in for the ceilings gives me a higher ceiling some insulation value and easy access and replacement if needed.
Ceilings are now 8'-7".
With ceiling completed I added 6 45k dimmable cut in can lights on with dimmable switches. I did putty and sand quiet a bit of the
walls but didnt get pictures. Im not a carpender by any means. im just kind of making this up on the go.
Oh added a 18k BTU window unit in the back window and plan to run a portable heater in the winter. its big enough to heat the area
no problem as I used it in my RV.


walls but didnt get pictures. Im not a carpender by any means. im just kind of making this up on the go.
Oh added a 18k BTU window unit in the back window and plan to run a portable heater in the winter. its big enough to heat the area
no problem as I used it in my RV.
One of the biggest issues im having is working around some of my stuff. lots more that's not shown is in the garage part. construction on the house left me with little storage for this project.
I will be using several of the cabinets uppers and lowers form my kitchen and laundry room. I plan to use butcher block counter tops for the bench tops. Im painting all of the cabinets a graphite gray. Below is where Im at currently. I plan to install the carpet this weekend and the cabinets in the next week or so after my kitchen is demoed. More updates coming next week.

I will be using several of the cabinets uppers and lowers form my kitchen and laundry room. I plan to use butcher block counter tops for the bench tops. Im painting all of the cabinets a graphite gray. Below is where Im at currently. I plan to install the carpet this weekend and the cabinets in the next week or so after my kitchen is demoed. More updates coming next week.
One of the biggest issues im having is working around some of my stuff. lots more that's not shown is in the garage part. construction on the house left me with little storage for this project.
I will be using several of the cabinets uppers and lowers form my kitchen and laundry room. I plan to use butcher block counter tops for the bench tops. Im painting all of the cabinets a graphite gray. Below is where Im at currently. I plan to install the carpet this weekend and the cabinets in the next week or so after my kitchen is demoed. More updates coming next week.View attachment 7170093
Carpet. Up to you, but be advised a live primer caught by the beater bar of an upright vacuum operated by your wife will *never* be forgotten. Mine still brings it up 25+yrs later...
Looks good!
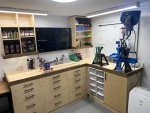
Just finished mine this past week. Haven’t had a chance to get tools on the wall yet but I’m pretty happy with it. Built all the cabinets and countertops myself so I’m pretty proud. Was an awkward space in our unfinished basement.
Attachments
Still in the 'planning ahead' stage of my area. Currently using the shop cabinets that were in there when I moved in, as well as a couple of previous work tables.
At this point in time, I'm considering doing an 'L' shaped bench in the corner, with tall overhead cabinets (to the ceiling if I can manage it).
The part that is bugging me is efficient use of the corner area. In other shop cabinet builds (not necessarily reloading) I've seen people either a) leave it open, and tuck a shop-vac or waste bin under there, b) close it off or c) put in a lazy susan with an angled door face.
For those of you with an L shaped reloading area in a corner of the room... what's your preference?
Still in the 'planning ahead' stage of my area. Currently using the shop cabinets that were in there when I moved in, as well as a couple of previous work tables.
At this point in time, I'm considering doing an 'L' shaped bench in the corner, with tall overhead cabinets (to the ceiling if I can manage it).
The part that is bugging me is efficient use of the corner area. In other shop cabinet builds (not necessarily reloading) I've seen people either a) leave it open, and tuck a shop-vac or waste bin under there, b) close it off or c) put in a lazy susan with an angled door face.
For those of you with an L shaped reloading area in a corner of the room... what's your preference?
Definitely hard to efficiently utilize corner space under a bench. I found a specific use for mine; built a small plywood cart, installed wheels and a folding handle so it can be easily moved in or out - and then stacked my 16", 14", and 12" Dutch ovens on the cart. The rolling cart could be used for anything.
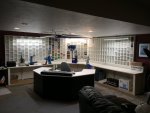
Oh myBeen slowly putting this together for about three years in my basement. Hoping to load my first rounds soon.
Really like this setup.Been slowly putting this together for about three years in my basement. Hoping to load my first rounds soon.
Did you make the wall storage or prefab?
Getting ready to plan my room.
Thanks for posting.
Myron
Been slowly putting this together for about three years in my basement. Hoping to load my first rounds soon.
And a Prometheus.....
Been slowly putting this together for about three years in my basement. Hoping to load my first rounds soon.
God damn Batcave! I like it!
Similar threads
- Replies
- 66
- Views
- 3K
- Replies
- 103
- Views
- 5K
