• Watch Out for Scammers!

    We've now added a color code for all accounts. Orange accounts are new members, Blue are full members, and Green are Supporters. If you get a message about a sale from an orange account, make sure you pay attention before sending any money!

Advanced Marksmanship Fundamentals of Marksmanship.

Re: Fundamentals of Marksmanship.

Dan K-another fellow noob here!

Great post. I started working with DTA a few months ago with pretty limited previous experience. Now as a by-product of working here, I'm getting some exposure and time behind the guns.

Been a lot of fun. For me, the biggest determining factor in my consistency has been follow through-particularly pulling the trigger all the way through and not slapping it...looking forward to more!

p.s. been shooting the DTA covert with a 16 inch barrel in .308
 
Re: Fundamentals of Marksmanship.

http://www.amazon.com/gp/aw/d/1479256293/

Up to date precision rifle read called Precision Rifle B.I.B.L.E (Ballistics In Battlefield Learned Environents), with a lot of good info from US Special Operations Snipers.
19 chapters. Info in regards to revised fundamentals, wind (basic, advanced, mountain, and urban),various ballistics, kestrel, ballistic software, high angle, shooter myths, increasing precision, etc.
Check it out.
 
Re: Fundamentals of Marksmanship.

<div class="ubbcode-block"><div class="ubbcode-header">Originally Posted By: sniper33</div><div class="ubbcode-body">http://www.amazon.com/gp/aw/d/1479256293/

Up to date precision rifle read called Precision Rifle B.I.B.L.E (Ballistics In Battlefield Learned Environents), with a lot of good info from US Special Operations Snipers.
19 chapters. Info in regards to revised fundamentals, wind (basic, advanced, mountain, and urban),various ballistics, kestrel, ballistic software, high angle, shooter myths, increasing precision, etc.
Check it out.</div></div>
Is the any relationship between this book and FM 3-05.222?
 
Re: Fundamentals of Marksmanship.

I know a great place to learn the fundamentals and they will actually pay you while you do it! The only cost is 4 years of your life.
smile.gif
 
  • Like
Reactions: Anonymoose
Gil Hibbert (Pistolsmith), all the national champs say "sight alignment then trigger press" always basics.
 
I know a great place to learn the fundamentals and they will actually pay you while you do it! The only cost is 4 years of your life.
smile.gif
Have they begun teaching the fundamentals again? Because I haven't seen it lately.

I'm siding with 1SJ: USAMU. That, or Rifles Only.
 
Absolutely great info here! I've been infantry (USMC 0311 rah!) for over 5 years now and I still keep learning! Those basic fundamentals make such an enormous difference. I started off in boot camp as a Sharpshooter (M16A2), then dropped to Marksman on an M16A4 (ACOG). I blamed it all on the weather (40 degress out, 30mph crosswinds, and rainy). I didnt think that I was doing anything wrong.

This past rifle qual I asked one of our Scout Snipers to help me with my snap-in and mentor me. We literally changed everything: my bone support, trigger control, trigger finger placement, re-learned how to compensate for wind with my ACOG (qualled this time with an M4), and my follow through. I took it all to heart through the 3 full days of snap-in we did and it paid off. I shot Expert Marksman with all of my 500yd shots in the black. The only position that I had issues with was the kneeling (I shot better standing lol!)

Lesson learned: never think that youre not at fault and humble yourself and ask for help. There is no shame in admitting that you suck at something and that you need help to improve.

Hopefully this summer I can get my first bolt action rifle and begin my adventure with long range shooting!
 
It's pretty sad to see so many people who think they can't be taught to shoot because they know it all. I don't often agree with Sterling Shooter but this thread is not one of those times.
 
My coach has a saying when he teaches people to shoot:
"There is no magic or hidden secretes in shooting. Advanced shooting is proper application of fundamentals plus practice."
I still hope that the old fox hides something behind his sleeve but I have not found anything yet. Maybe that is it.
 
Last edited:
Calling the shot was mentioned in the article and I'd like to add something to that comment. Forty years back the Russians did much research work concerning their Olympic shooters and vision. What they discovered was that if the non-aiming eye was closed there was a loss of visual acuity of up to 28% in the aiming or dominate eye. Many shooters do not focus their vision in the right location at shot break because the shooter has his/her focus upon the target and the reticule is seen by the secondary vision! This is not correct. The focus should be upon the intersection of the cross hairs at shot break and if this is done the shooter will learn how to make an accurate call as to POI! To avoid possibly double vision by keeping both eyes open...if need be the shooter should blind the non-aiming eye with some form of opaque blinder!
 
Thanks guys. Great thread for the fundamentals and group therapy. I can now get 5 shots on a 1/2" dot and hit 5 of 6 hits on a slow and simplified dot drill but realize I still know almost nothing about so many things in the rifle shooting world. The issues I face seem to be shared by many and that is comforting but also reassuring me that even I can do better at more positions and under less than perfect conditions with the right practice. I'd head back to the range today (went yesterday) but hunting Easter eggs with my grandchildren seems paramount today.

Next, get off the bench and go prone.
 
Re: Fundamentals of Marksmanship.

Making recoil resistance consistent shot to shot with your 7mm mag would be difficult even for a really hard holder. But, since you are already getting the results needed for most any scenario with such a rifle, why not get into developing your basic marksmanship skills with a lower recoiling rifle, which is less likely to give you a concussion or detached retina? You might even want to develop your skills with something like an M4 with BDC. You can learn everything there is to know about good shooting with such a platform and everything you learn will transcribe to anything else you may want to shoot.

This is consistently good info. I need to get back to basics I have apparently forgotten. Many thanks for your excellent input.
 
Here’s some pics of two different “grips.”

Would like to hear any theories or experiences if the one with the angle would negatively influence the rifle.

Thanks
 

Attachments

  • AFA5BF8A-351E-426B-ACA0-DA6E3677FDE5.jpeg
    AFA5BF8A-351E-426B-ACA0-DA6E3677FDE5.jpeg
    480.7 KB · Views: 274
  • 16AD12CD-25C7-4EE3-B11C-29DBBDD2640F.jpeg
    16AD12CD-25C7-4EE3-B11C-29DBBDD2640F.jpeg
    357.3 KB · Views: 265
  • 1B42432A-DC26-49C8-9B55-62435C61A9E3.jpeg
    1B42432A-DC26-49C8-9B55-62435C61A9E3.jpeg
    356.1 KB · Views: 266
  • C2AADED8-B842-431C-BD9C-E91AEBD169B4.jpeg
    C2AADED8-B842-431C-BD9C-E91AEBD169B4.jpeg
    351.8 KB · Views: 266
  • Like
Reactions: todd
 
Here’s some pics of two different “grips.”

Would like to hear any theories or experiences if the one with the angle would negatively influence the rifle.

Thanks
Not experience, just theory: Parallel and perpendicular might make it easier to be more repeatable as well as the force from your hand/finger will be more in line with the recoil.
 
Not experience, just theory: Parallel and perpendicular might make it easier to be more repeatable as well as the force from your hand/finger will be more in line with the recoil.

I’ve experimented quite a bit. There’s a bit more sympathetic squeeze with thumb with the angled.

But as long as you are aware and don’t let your thumb torque the rifle, it doesn’t have any vertical influence.

Important part is still the 90deg of the trigger finger. Jointed trigger pulls is where the real problems occur.
 
Based on the two topics, "Is Marksmanship Dead" and Equipment Versus Shooter" and the comments engendered.
I know nobody here needs to read what is about to be posted, but it's been around a long time and used by a lot of people and covers fundamentals pretty well. I know, reticle is mispelled throughout the whole thing.
And it's not about iron sights, I don't have that one handy right now, but maybe I can dig the iron sight one out and post it too. Maybe.

*HOW TO HOLD AND SHOOT YOUR RIFLE: Aka Fundamentals of Marksmanship.

*How to Hold, *Aim, *Eye Relief, *Sight Alignment, *Sight Picture, *Breathing, *Trigger Manipulation, *Follow Through, and *Recovery.

Now that your rifle fits you properly and you have learned to properly clean and maintain your rifle, you must learn how to hold the rifle. ACCURACY IS A FUNCTION OF CONSISTENCY, BOTH WITH THE RIFLE AND AMMUNITION, AND THE SHOOTER'S ACTIONS. You must hold the rifle the same way each time. You will practice holding the rifle, your sight picture, your breathing, and trigger manipulation through dry firing. You will practice building a good steady, stable, solid position each time, bone on bone, not held by muscle power. Although you have to exert some muscle control, the position should be a natural relaxed position to avoid muscle fatigue, tension, and shaking that occurs after muscles are overextended for any period of time. You will check your natural point of aim before each shot. NATURAL POINT OF AIM is a position that allows the rifle to point naturally at the target without any muscle tension required to hold it on point of aim. You should keep the same position each time, changing nothing, to maintain consistency, to keep your natural point of aim the same each time. Before beginning this portion, or preceding sections, or any exercises, you should stretch first to loosen up your muscles. Besides the natural relaxing effect of stretching, it helps to prepare you mentally as well. Being physically fit will help you shoot better, and if you are not physically fit, you should make it a point to become fit.

*HOW TO HOLD YOUR RIFLE:
Assume the prone supported firing position.
The front of the rifle will rest either on a bipod attached to the stock or on a sandbag placed under the front of the stock.
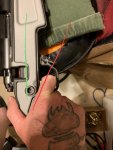
Use the nonfiring hand to support the butt of the rifle. Place your hand next to your chest and rest the TIP of the butt of the rifle on top of your hand. Ball your hand into a fist to raise the butt of the rifle or relax your fist to lower the butt of the rifle. A preferred method is to use a sock filled with sand or a small sand bag placed in your non firing hand and squeeze it to raise the rifle butt and release the bag to lower the rifle butt. Using this sock or bag method lessens body contact with the rifle and can eliminate an added human variable.
Place the butt of the rifle firmly in the pocket of the shoulder. The sniper can place a pad in his clothing in the pocket of his shoulder to reduce pulse beat and breathing movement.
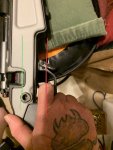
With the firing hand, grip the the small or pistol grip of the stock. Using the middle through little fingers, exert a slight rearward pull to keep the butt of the rifle firmly in the pocket of the shoulder. Place the thumb over the top of the pistol grip of the stock. Place the index or trigger finger on the trigger and insure it does not touch the stock and does not disturb the lay of the rifle when the trigger is pulled.
Find a comfortable position for your elbows that provide the greatest support for you and your rifle without creating a strain.
Place your cheek in the same place on the stock each time. This is called the stock weld. Changing your position changes sight alignment and will cause misplaced shots.

*AIMING THE RIFLE:
Begin the aiming process by aligning the rifle with the target when assuming a firing position. THE RIFLE SHOULD POINT NATURALLY AT THE DESIRED AIMING POINT. No muscular tension or movement should be neccessary to hold the rifle on target. To check the Natural Point of Aim (NPA), you assume a comfortable, STABLE, firing position. Place your cheek on the stock at the correct stock weld and breath, and entering the natural respiratory pause, look away from the scope moving only your eye and relax. Let the rifle drift to its natural point of aim, then look back through the scope. If the crosshairs remain on the correct position on the target, the natural point of aim is correct.
If the NPA is not correct, you must change your body position to bring the sights on the target. If muscles are used to bring the rifle to NPA, the muscles will relax when the rifle is fired and the rifle will begin to move to its NPA. Because this movement begins just before the weapon discharges, the rifle is moving at the bullet leaves the muzzle. This causes displaced shots with no apparent cause as recoil disguises the movement. By adjusting the rifle and body as a single unit, rechecking, and readjusting as necessary, you achieve a true natural point of aim. Once this position of established, you will them aim the rifle at the exact point on the target. Aiming involves three areas, eye relief, sight alignment, and sight picture.

*EYE RELIEF:
This is the distance from the firing eye to the scope tube. This distance is fairly constant with a scope. You should take care to avoid injury by the scope tube striking the eyebrow during recoil.
You should place your head as upright as possible behind the scope with your eye directly behind the scope. This head placement allows the muscles around your eye to relax. Incorrect head placement causes you to have to look out the corner of your eye resulting in muscle strain, causing blurred vision and eye strain. Eye strain can be avoided by not staring through the scope for long periods of time and correct stock weld alleviates eye strain as well by maintaining consistent eye relief.

*SIGHT ALIGNMENT:
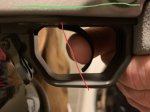
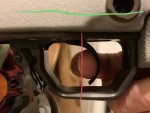
Sight alignment is the relationship between the crosshairs (reticle) and field of view. You must place your head behind the scope so a full field of view appears in the scope tube with NO DARK SHADOWS OR CRESENTS. Center the reticle in a full field of view with the vertical crosshair straight up to ensure the scope is not canted.

*SIGHT PICTURE:
Sight picture is centering the reticle with a full field of view on the target as seen by you. Place the reticle crosshairs on what portion of the target you wish to hit.

*BREATHING:
You must exercise breathing control during the aiming process. Breathing while trying to aim, with the natural up and down motion of the chest while breathing, causes the rifle to move up and down. Up and down movement occurs while laying down. Breathing movement can be side to side when sitting at a bench rest type table when your body is against the table. You must therefore accomplish sight alignment while breathing and finish aiming while holding your breath. You do this by inhaling, exhaling, and stop at the moment of natural respiratory pause before beginning to inhale again.
A respiratory cycle lasts four to five seconds. Inhalation and exhalation take only about two seconds, thus between each respiratory cycle there is a pause of two to three seconds. This pause can be extended to ten seconds without any special effort or unpleasant sensations. You should fire during this pause when your breathing muscles are relaxed. This avoids strain on the diaphragm.
You should assume your firing position and breath naturally until your hold begins to settle.
The respiratory pause should never feel un-natural. If it is too long, the body suffers from oxygen deprivation and begins to send out signals to resume breathing. These signals produce involuntary movements of the diaphragm which interfere with the shooters concentration and lack of movement needed to make a shot.

*TRIGGER CONTROL:
Trigger control is the most important fundamental of sniper marksmanship. It is defined as causing the rifle to fire when the sight picture is at its very best, without causing the rifle to move. Trigger Squeeze on the other hand is defined as the independent action of the forefinger on the trigger with a uniformly increasing pressure on the trigger straight to the rear until the rifle fires. Trigger Control is the last task to be accomplished before the rifle fires.
Proper trigger control occurs when the sniper places his firing finger as low on the trigger as possible and still clears the trigger guard, thereby achieving maximum mechanical advantage. He engages the trigger with that part of his firing finger (middle of the pad of the last digit) that allows him to pull the trigger straight to the rear. In order to avoid transferring movement of the finger to the entire rifle, the sniper should see daylight between the trigger finger and the stock as he squeezes the trigger straight to the rear. He fires the weapon when the reticle is in a position to insure a properly placed shot, or when the reticle is on target.
As the stability of a firing position decreases, the wobble area increases. The larger the wobble area, the harder it is to fire the shot without reacting to it, attempting to influence the sight placement when the trigger breaks. This reaction occurs when the sniper:
1. Anticipates recoil. The firing shoulder begins to move forward just before the rifle fires, thus pushing the rifle out of line with the target.
2. Jerks the Trigger. The trigger finger moves the trigger in a quick, choppy, spasmodic attempt to fire the shot before the reticle can move from the desired point of aim.
3. Flinches. The sniper's entire body (or parts thereof) overreacts to the anticipated noise or recoil (jerks). This is usually due to unfamiliarity with the weapon.
4. Avoids Recoil. The sniper tries to avoid recoil or noise by moving away from the weapon or by closing the firing eye just before the weapon fires. This again is caused by unfamiliarity with the weapon and a lack of knowledge of the weapon's actions upon firing.
Trigger control is best handled by by assuming a stable position, adjusting on the target, and beginning a breathing cycle. As the sniper exhales the final breath approaching the natural respiratory pause, he secures his finger on the trigger. As the reticle settles on the target at the desired point of aim, and the natural respiratory pause is entered, the sniper applies initial pressure to the trigger. He increases the tension on the trigger during the respiratory pause as long as the reticle remains on the desired point of aim to insure a properly placed shot. If the reticle moves away from the desired point of aim, and the respiratory pause is free of strain or tension, the sniper stops increasing the tension on the trigger, waits for the reticle to return to the desired point of aim, and then continues to squeeze the trigger. This is trigger control. If movement is too large for recovery, or if the respiratory pause has become uncomfortable (extended too long), then the sniper should whenever possible, release the pressure off the trigger and start the respiratory cycle again.

*FOLLOW THROUGH:
Applying the fundamentals increases the odds of a well aimed shot being fired. There are however, additional skills, that when mastered, make the first round correct hit even more of a certainty. One of these skills is follow through.
a. This is the act of continuing to apply all the sniper marksmanship fundamentals as the weapon fires as well as after the weapon fires. Follow through consists of:
* Keeping the head in firm contact with the stock (stock weld) upon firing and after firing.
* Keeping the finger on the trigger pulling all the way to the rear when and after the weapon fires.
* Continuing to look through the scope when and after the weapon fires.
* Insuring the muscles stay relaxed when and after the weapon fires.
* Avoid reacting to the recoil or noise during and after firing.
* Releasing the trigger only after the recoil has stopped.
b. Good follow through insures that the weapon is allowed to fire and recoil naturally, and the sniper/rifle combination reacts as a single unit to such actions.

*CALLING THE SHOT:
Calling the shot is being able to tell where the bullet should impact on the target. The sniper must be able to accurately call the shots. Proper follow through will aid in calling the shot. The dominant factor in calling the shot is, whereever the reticle is when the shot is fired. This location is called the final focus point.
agreed
 
Accuracy by volume?? That's on there right? Asking for a friend.

All seriousness, great post with good information. Thank you!!
 
Have they begun teaching the fundamentals again? Because I haven't seen it lately.

I'm siding with 1SJ: USAMU. That, or Rifles Only.
Probably taught using a slide deck...
 
This is wonderful, thank you!
Good Morning Makata,

Welcome to the forum.

Also, please stop necroposting. I know you just joined today, but that's not how this forum works. Contribute something meaningful, or refrain from posting. Of note, the "watch" button at the top is good gouge (no need to post in order to monitor the thread). The only issue is it'll ping you when someone posts something irrelevant 4 months later.

R,
Pucker
 
All basic information is helpful to me. I am returning to the shooting sports after a long semi inactive time.
 
16 years into this topic, I've reviewed as much as my elder mind can retain.

I caught the comment about needing a mentor. Mentors are not something/someone picks from Column A and Column B. I find that the best ones are made, by the shooters themselves, and often best made in pairs (at least). My connection to the MCL shooting league is somewhat of a memory, but how we got it rolling was by using the buddy method. Two guys would arrive at the range, one with a newly absorbed skill, and the other with another.

On arrival, it was all book knowledge. Make sure it's an agreed upon good book on the subject. One would start by explaining his skill and then engage in their first efforts to turn the book knowledge into practical knowledge, under the watchful eye of the partner. Fumbles and errors would be observed by each, with the partner coaching on basics and noting the errors and attempting to identify the sources. The process would be both a dialogue and a negotiation. Once agreement was reached (or not), the pair would move on to the next step involved in mastering the process. When one partner's new skill was acceptably shared, the other partner would reverse roles and transfer his new skill in the same way. This could take more than one (or more) range sessions. That's OK, the important waypoint is the point of agreement that the skill has been successfully imparted.

Including the fumbles and errors in this brings home the fact that these skills are learned skills, and emphasizes that the partners are not there to dominate, but to complement, with the skill of both being improved by the combination of teachers. IMHO marksmanship skill is less about winning, and more about learning, best as a group. The final part of learning is passing the knowledge on, because it forces the teacher to formulate their knowledge in a manner that can be understood clearly by others, and therefore, better by themselves as well.

Moving on, this shared search for marksmanship excellence has always seemed to me to be a unique benefit of 'Hide membership. It's what we do, maybe better than most. Some excellent writeups have resulted from this topic and many others here on The 'Hide.

Looking back to the year 2000, I can see where the topic has shifted gears and the emphasis has become evolved from its original thrust. Much of my own knowledge has been proven wrong and that pleases me; for remember, error is the most essential tool to learning. What has emerged is improvement.

Like De Nero once said, we're just gettin' warmed up...

Greg
 
Last edited:
Great thread. As a novice just getting into the precision rifle hobby, it's changed my focus a bit from gathering equipment to asking more questions before I gather- so the formal training and self practice can be most effective.
 
I bought the Precision Rifle Marksmanship: The Fundamentals (2020) for myself and daughter. On page 179 there is a calculation for wind correction for a .308 at 2650 fps with a ballistic coefficient of around .485 at 600 yards with a 100 yard zero for wind speeds of 4, 12, and 18 mph (I assume at 90 degrees(. The author gets .6 Mil, 1.2 Mil, and 1.8 Mil respectively and I am suspicious of the 12 and 18 mph results. It seems to me I should just divide the 12 or 18 mph by 4 mph and multiply by .6 Mil, giving me 1.8 Mil and 2,7 Mil for 12 mph and 18 mph. Using the Berger online software it gives 1,84 Mil and 2.76 Mil, very close to my calculation. Is there a mistake in the book or do I misunderstand?
 
I bought the Precision Rifle Marksmanship: The Fundamentals (2020) for myself and daughter. On page 179 there is a calculation for wind correction for a .308 at 2650 fps with a ballistic coefficient of around .485 at 600 yards with a 100 yard zero for wind speeds of 4, 12, and 18 mph (I assume at 90 degrees(. The author gets .6 Mil, 1.2 Mil, and 1.8 Mil respectively and I am suspicious of the 12 and 18 mph results. It seems to me I should just divide the 12 or 18 mph by 4 mph and multiply by .6 Mil, giving me 1.8 Mil and 2,7 Mil for 12 mph and 18 mph. Using the Berger online software it gives 1,84 Mil and 2.76 Mil, very close to my calculation. Is there a mistake in the book or do I misunderstand?

My quick guess is that the relationship between drag and cross wind speed is not linear. That's why your simple extrapolation doesn't match a more sophisticated calculation.
 
  • Like
Reactions: Emerson0311
I am sure there are many factors and I would assume the Berger software would account for most of them. My calculation comes out almost exactly the same as that from Berger. But the calculation in the book does not and it is not well explained so I am starting to believe it may be a misprint.
 
Would be interested in seeing exactly what the book says, if maybe one variable was deviated way out. 308, avg bullet, avg speed, assuming avg conditions, basically 4mph gun...those calls are light. A 12mph full value wind hold of 1.8 and an 18 of 2.7 should get you on a plate at 600.
 
I am sure there are many factors and I would assume the Berger software would account for most of them. My calculation comes out almost exactly the same as that from Berger. But the calculation in the book does not and it is not well explained so I am starting to believe it may be a misprint.
I agree.
 
Would be interested in seeing exactly what the book says, if maybe one variable was deviated way out. 308, avg bullet, avg speed, assuming avg conditions, basically 4mph gun...those calls are light. A 12mph full value wind hold of 1.8 and an 18 of 2.7 should get you on a plate at 600.
I agree
 
"At 600 yards with a 4-mph wind is the first bracket, so that means a .6-Mil hold. If the wind speed is 12 mph, I am in bracket 2, so the wind hold is 1.2 Mils. If the wind increases to 18 mph, I am in bracket 3, so I am needing a 1.8-Mil hold." I think the wind speeds in the example should have been 8 mph and 12 mph instead of 12 mph and 18 mph and it is a misprint. But it really confused me. Thanks for your input.
 
Thank you for the wonderful post. I was a much better marksman when I was younger. I practiced breathing exercises, relaxation exercises, rapidly focusing close and then distant as I trained with iron sights. Now, I am frustrated. Occasionally, everything is 1/2 MOA or better, but more often, I settle in and I'm shocked that I'm off. I go through my drills, but somehow get random placements that I don't sense coming. There are times when the body is willing, the eyes clear, up and my mind is in the right place, but then an uncalled shot happens.
It's probably too much to expect, but I really wish I had a coach or adviser.