Re: Mosin-Nagant Sight Interest?
Choosing, installing, and improving a Mosin Nagant scope mount.
Here are some of my options:
a) The ATI mount, a #21 drill [pre tap .159"], a # 11 drill [center drill .191" ], a 10-32 tap, and (2) 10-32 x 1/2" slotted cap screws is ~ <span style="color: #FF0000">$31</span> delivered from Optics Planet via Amazon
b) The ATI mount with above, stainless cast bolt handle, washer, and 10-32 flat head screw is ~ <span style="color: #FF0000">$39</span> from ATI via Amazon
c) The Rock Solid mount is ~ <span style="color: #FF0000">$108</span> delivered from Rock Solid
d) I have milled Mosin Nagant mounts from generation 1 Tapco AR15 riser mounts.
e) I have drilled and tapped mounted a block of Aluminum on the front of a Mosin Nagant, TIG welded steel in the rear, and milled out Weaver rails in place.
f) I have built fixturing for bolt bore alignment and TIG welded steel mounts with integral 1" rings to Mosin Nagant receivers.
g) I have seen pictures from Lucas of Shootfarther.com [landcbeitner at Snipershide] with 8" of thick Picatinny rail drilled and tapped mounted on the receiver ring and a lug welded on the rear.
Here are some thoughts:
a) Someone milled out one of my Tapco risers for me, with thickness .213" under the slots. The stiffness of a cantilever or beam is a function of the height cubed, and .213" cubed is too small a number. While Aluminum may be nearly as strong as mild steel, steel is 3 times as stiff. Aluminum's compliance means the cantilever moves further. While the rifle was extremely accurate, the old Leupold vari x II 2x7 scope did not last long. The reticule shook loose.
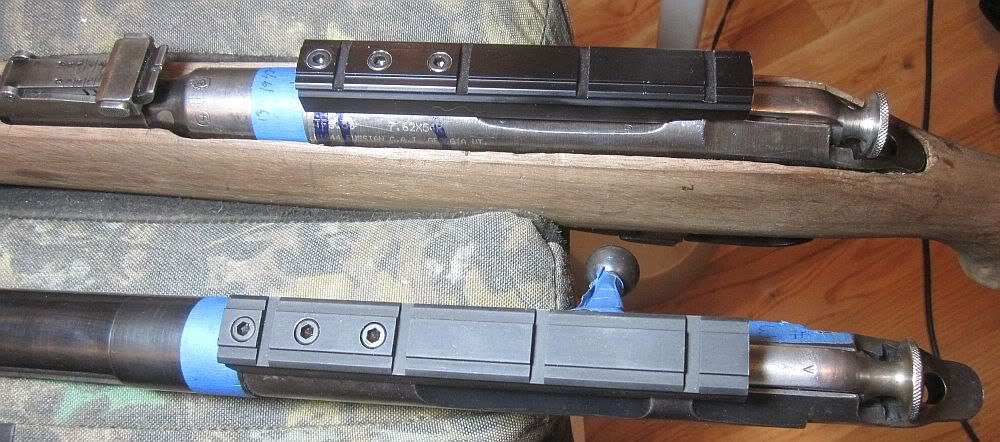
Best would be for a mount to also fasten to the receiver in the rear. When the rifle recoils, the rear of the scope pulls up on the mount. The left side of the mount on the ATI has a web that makes the effective height .68", making the mount stiff, but I see no easy way to mount the rear to the receiver.
The ATI design touches the round top of a Mosin receiver on lines along the side, like a "V" block force multiplier.
The ATI bolt handle has no value for me. I don't want a bolt handle held on with a single 10-32 screw, and my welder says about welding it on, "No guarantees with that thing."
I have concluded that I no longer want to buy a Mosin Nagant for $35 with a gun show with rotten bore, and then spend 80 hours designing and building a scope mount. I have lots of cheap rifles following me home from every gun show, and it seems like I only finish ~4 projects per year that make it to the range, so I must speed it up. I am currently thinking that for the hunter- varmint hunter - non competitive target - cheapskate- shooter that I am, the ATI mount is good enough, fast enough to install, and cheap enough.
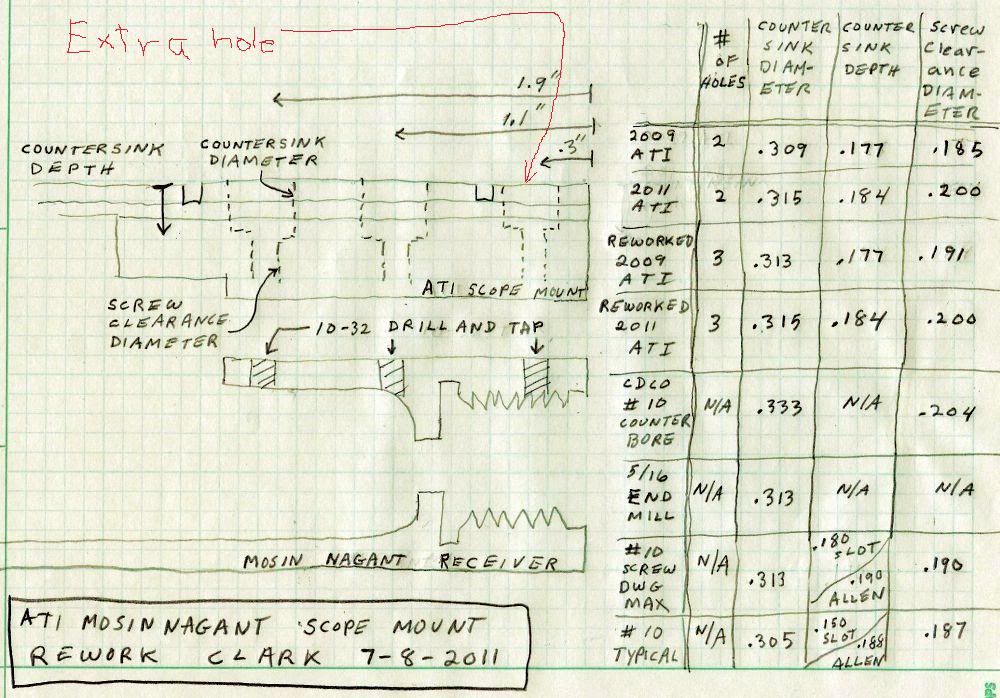
Where I deviated from the ATI instructions:
1) I have had my brother and I have had Randy Ketchum TIG weld Mosin Nagant bolt handles for me, so I did not use the ATI handle.
2) I drilled and tapped the receiver on the mill with the barrel removed, not with the mount C clamped to the receiver on the drill press.
3) I drilled and tapped 3 holes in the receiver, not 2.
4) I used Allen head 3/4" cap screws and cut them to length, not the 1/2" slotted cap screws.
5) I drilled and countersunk a third hole in the mount.
6) I opened up the 2009 anodized ATI mount countersinks and screw clearance holes, where they were too small. The 2011 ATI conversion coated did not have anodizing built up.
7) I de burred sharp corners on the mount.
Trimming the 10-32 screws:
The more thread engagement the better. The ATI supplied 1/2" screws only get ~ 2.5 turns of engagement, and it is possible to get ~ 3.5 Turns with longer screws.
The two holes in the ATI mount allow longer screws to interfere with the bolt movement. To trim these screws I simply torque a long screw into the mount and receiver, and then count how many turns I must back the screw out to get clearance on the bolt movement. I put the screw into a lathe fixture [a short piece of hex steel with a 10-32 hole drilled and tapped through the center] and remove that much from the screw length. Because the screw is right hand threads, the lathe must run clockwise and cut with the tool on the far side of the chuck, to keep the screw from backing out of the fixture. There may be some false interference from the drilled and tapped hole, not the screw, getting hit by the bolt lugs. These can be filed, deburred, and ignored.
The hole and countersink I drilled in the mount and the hole in front of of the receiver, I continued with 0.8" centers like the other two holes. That hole in the receiver looks down into the barrel threads. The receiver should be drilled and tapped for that hole with the barrel removed, but the screw must be cut to length by fitting with the barrel installed. There is a problem in counting turns of engagement, it seems there is always one more turn when unscrewing than when screwing in. To avoid a error being cause by this I verified with a two screws, one too short and one too long and yet were within a thread pitch in length. The one too long will not make the mount stiff when torqued down. The one too short will. The correct length will make the mount stiffly mounted, but does not have the final torqued rotational clocking with the mount as the same screw without the mount between the screw and the receiver. To keep track of this clocking, I put a piece of masking tape on one of the handle bars of a T handled Allen wrench. My final screw lengths for 2011 ATI mount for the VZ59 machine gun barrel on the 1937 Izhevsk receiver were .489" in the rear, .586" in the middle, and .503" in the front. My final screw lengths for the 2009 ATI mount for the M44 were .488" in the rear, .550" in the middle, and .491" in the front.
Torquing the 10-32 screws:
Most information on how much to torque assumes enough thread engagement. You may be told to buy American made screws with 120 kpsi steel with rolled threads instead of cut threads. But the screws are not going to break in Mosin scope mount application, the receiver threads are going to strip out. The proper amount of engagement is 1 to 1.2 times the root [minor diameter of the screw]. The 10-32 minor diameter is ~ .159". 1.2 time that is a .19" inch deep threaded hole.
~ 3 threads of engagement is ~ .1", so we will have to do ~ 52% of the torque that 10-32 screws usually get.
The highest numbers for installation torque for 10-32 with high strength screws is 68 inch pounds plain [dry] and 51 inch pounds lubricated. Typically the waxed number should be 1/2 the dry number = ~ 34 inch pounds.
I bought an inch pounds torque wrench at Harbor Freight for <span style="color: #FF0000">$20</span>.
I milled some mild steel to .1" thick.
I drilled and tapped 4 holes with #21 drill.
I expect that I should be ok with 52% of the usual high ratings
..a) waxed 52% of 34 in lb = 17.8 in lb, but got a 15 and a 16 yield
..b) lubed 52% of 51 in lb = 26.5 in lb, but got yield at 28 in lb
..c) dry 52% of 68 in lb = 34.7 in lb, but got yield at 34 in lb
I decided to lower my expectations for the mounting the scope mount, and torque to 20 in pounds with oil on the threads, that would be ~ 70% of the yield torque.
After running screws in and out of 6 holes in 2 Mosin Nagants many times and torquing to 20 in lb, no stripped threads so far.
I measured the feel of that much toque.
The threshold of me grunting with a 1" diameter round handle screw driver is 20 inch pounds.
The threshold of me grunting with a 3.75" across T handle Allen wrench is 120 inch pounds.
It seems there is a huge difference in torque limited by grip and that limited by push.
<span style="font-weight: bold">What does it all mean?
The ATI mount is fast, cheap, and often good enough.
ATI seems to be improving them, and you can improve them even further.</span>