The big reality about thermal images that people (especially new thermal users) have to truly understand are this.
1. Emissivity conditions are always changing. Sometimes slowly, sometimes fast.
2. You need a device that allows you to change a large range of settings to get the best image.
3. You need to spend a good bit of time learning your adjustment features and how they affect your particular unit in given emissivity conditions.
4. You will typically get great images when emissivity conditions are good. When thermal conditions are poor, even the best devices struggle to produce a decent image.
5. There are no one and done (plug & play) settings that will "always" produce the best image.
6. Good content creators on Youtube and other platforms whom understand thermal devices very well, will typically cherry pick thermal conditions that are great for producing great thermal images. This shows what the particular unit is capable of.
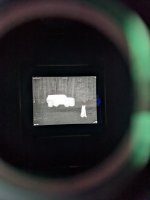
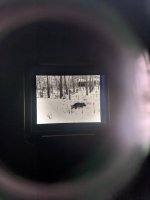
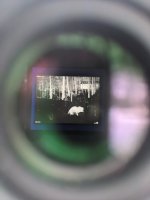
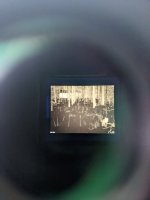
7. For me personally, I do not judge a thermal device on how good it produces an overall scene image during good thermal conditions. I judge a thermal device on how good it is at detecting a live critter in poor thermal conditions. Then I analyse the different Palette algorithms under varying conditions to see what "special" image features they bring to the table for quick contrast and detection by the human eye of live critters. Then I analyse what algorithm features it possesses for a sharper encapsulation of a live critters body for shooting purposes if the device is to be used as an aiming solution.
8. A good thermal will possess a Palette choice that has an algorithm written such as to devote most processing power to the live critter and somewhat ignore the "scenery" out there.
Takes a good bit of time, effort and "want to" to become knowledgeable and proficient with thermal devices and you never quit learning.
1. Emissivity conditions are always changing. Sometimes slowly, sometimes fast.
2. You need a device that allows you to change a large range of settings to get the best image.
3. You need to spend a good bit of time learning your adjustment features and how they affect your particular unit in given emissivity conditions.
4. You will typically get great images when emissivity conditions are good. When thermal conditions are poor, even the best devices struggle to produce a decent image.
5. There are no one and done (plug & play) settings that will "always" produce the best image.
6. Good content creators on Youtube and other platforms whom understand thermal devices very well, will typically cherry pick thermal conditions that are great for producing great thermal images. This shows what the particular unit is capable of.
7. For me personally, I do not judge a thermal device on how good it produces an overall scene image during good thermal conditions. I judge a thermal device on how good it is at detecting a live critter in poor thermal conditions. Then I analyse the different Palette algorithms under varying conditions to see what "special" image features they bring to the table for quick contrast and detection by the human eye of live critters. Then I analyse what algorithm features it possesses for a sharper encapsulation of a live critters body for shooting purposes if the device is to be used as an aiming solution.
8. A good thermal will possess a Palette choice that has an algorithm written such as to devote most processing power to the live critter and somewhat ignore the "scenery" out there.
Takes a good bit of time, effort and "want to" to become knowledgeable and proficient with thermal devices and you never quit learning.