I really want to buy this, if it were to work it would be the perfect solution. I am wanting to use it in my SPS Tactical hogue stock. Has anyone tried this? If so what were the results? Also is there only a 5 round magazine available?
Join the Hide community
Get access to live stream, lessons, the post exchange, and chat with other snipers.
Register
Download Gravity Ballistics
Get help to accurately calculate and scope your sniper rifle using real shooting data.

Install the app
How to install the app on iOS
Follow along with the video below to see how to install our site as a web app on your home screen.
Note: This feature may not be available in some browsers.
You are using an out of date browser. It may not display this or other websites correctly.
You should upgrade or use an alternative browser.
You should upgrade or use an alternative browser.
PTG "bolt in" BDL DBM for Remington SA?
- Thread starter flirtinwithdisaster
- Start date
-
- Tags
- ptg bolt in dbm sa
I really want to buy this, if it were to work it would be the perfect solution. I am wanting to use it in my SPS Tactical hogue stock. Has anyone tried this? If so what were the results? Also is there only a 5 round magazine available?
I tried it on my aac-sd sps hogue stock and it was not a "drop in." I would've needed to head to the garage for some milling. There are too my knowledge only 5 round mags available at the moment.
ok thanks thats the exact stock that I was looking to put it in. How much "off" was it? I don't have the skill set to mill it open and I was hoping to keep from having to send my stock off. If I am going to have to mill a stock its not going to be the Hogue one lol.
ok thanks thats the exact stock that I was looking to put it in. How much "off" was it? I don't have the skill set to mill it open and I was hoping to keep from having to send my stock off. If I am going to have to mill a stock its not going to be the Hogue one lol.

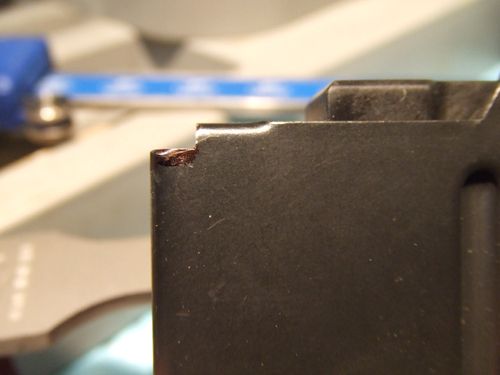
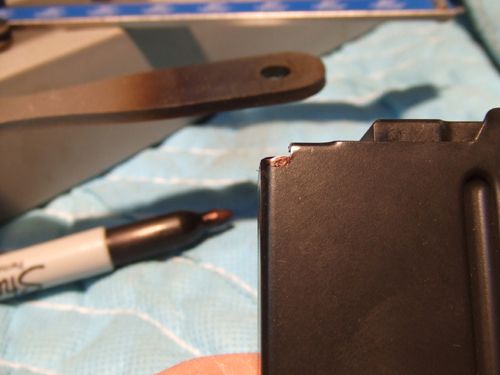
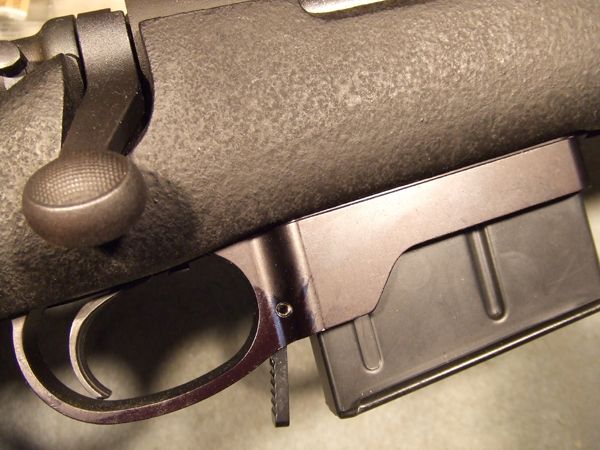
Youll have to atleast take off these corners and get the black material flush across the front of the mag well. You may need to take more than that off as well, its a bit hard to tell.

You could manage with a dremel and steady hand. Im fortunate and have a mill in my garage so I prefer that.
Hope the pictures help/make sense.
I milled out my bell and carlson A3 for it to fit but the ran into other issues/feed issues. Just put back my stock bdl for now.
I purchased the BDL package deal with Stealth profile and the mag a couple weeks back.
It wasn't a "drop in" fit--I had to spend a pleasant hour or so with a flatbar and some 60 grit sandpaper tweaking the inletting--but personally I am very grateful that PT&G made such awesome bottom metal avaialble to those of us on a tight budget. Spending $300 on DBM simply wasn't going to happen in my world.
For the quality of this stuff and at this price point (!) I'll tweak it all day long if I have to--but hey, that's me.
PT&G might consider adding a disclaimer to the product listing such as:
Given the innate variations in a wide variety Remington 700 BDL stocks, if you are not comfortable with performing minor fitting and shaping operations using sandpaper and simple hand tools you may want to consider purchasing the M5 style bottom metal instead and having your stock professionally milled.
I have fit this metal to an HS stock, and function is about 90%.
I did have to sand the front action screw a little, as there was some binding when torqued to spec--but I'm talking ten or twenty passes across a piece of 400 grit wet/dry sandpaper.
I currently still have the "bolt-over" feed situation--i.e. the round tips up and the bolt rides over--but I shot it all weekend, and it's very close. The temporary work-around for the bolt over is to modify your feed stroke--run the bolt 3/4 forward, draw it back half a stroke (to 1/4), and run it forward again--and the round pops right into the chamber.
I know it maybe/probably sounds like a hack work-around to a lot of you guys, but give it a try for awhile--I'm noticing that as the mag lips are breaking in there is a definite improvement with feeding consitency, and it is almost there.
I'm going to contine to use it for awhile before I commit to any more tweaking of the internal geometry, just to give the components awhile to break in.
I'll post pictures of the inletting I did to the HS stock, and will update if I remedy the bolt-over isssue with the HS stock.
Thanks again PT&G for making this available. This is real nice quality stuff.
Eight ring it sounds like you maybe having one of the same problems I was experiencing w/ the bolt riding over the round in the dbm. This was solved by removing material from the stocks pillars till they were flush with the stocks inlet. My problem was much more severe than yours and also required a small amount of material to be removed from the upper rear of the dbm, the action and magazine to facilitate the correct fit and function .
I too agree that pt&g make an excellent product but should definitely include a disclaimer in their dbm bdl discription. With that said I am quite pleased with the finished out come and won't think twice about using pt&g again for all my bottom metal needs.
I too agree that pt&g make an excellent product but should definitely include a disclaimer in their dbm bdl discription. With that said I am quite pleased with the finished out come and won't think twice about using pt&g again for all my bottom metal needs.
I'll have an oppotunity to get into the feeding issue over the next couple days, and I'll take a good look at the pillars--thanks for that lead.
I was actually inspecting the feed geometry a little bit earlier tonight. My bottom metal is angled downward at the front ever so slightly, and it is not quite touching/flush with underside of the feed ramp. I think if I can get it squared and flush against the bottom of the feed ramp (by inletting the front pillar, as CDiver0109 suggested) that might resolve the issue, though I MAY also have to file the front notch in the mag down lower.
I'll post the pics I took of the actual inletting work in a couple days.
I tried but had to return it. It was too long for both my B&C A3 stock and the original tuperware stock on a R700 SA Varmint. I ordered before the bundle price showed up (not too anxious about the dropin BM potential, huh). Sheila was nice enough to offer the bundle discount after the fact. Measuring with my calipers, it was 0.035 too long. I don't have the tools or experience to try and inlet it myself. I could not find any local shops that could do it either. I haven't heard back about the credit either (it was received a week ago). I am hoping I am not stuck with shipping two ways and a restocking fee too.
Update: The restocking fee was waved and credit applied. No complaints here about customer service or about the bottom metal. It was worth a try, especially given my budget. I still haven't found a local gunsmith that does custom rifle work (beyond what I can already do myself). The places for any long range shooting in this area are few and far between so I guess there isn't much of a market. I had high hopes that this would be an easy upgrade but my usual luck prevails.
 The club I belong to will eventually have a 600 yd range. I have been learning by reading and practicing with an R700 to get me started. I picked the wrong time to get started in reloading too--that luck thing again! But, I'm hooked.
Gotta love Massachusetts, huh?!Update: The restocking fee was waved and credit applied. No complaints here about customer service or about the bottom metal. It was worth a try, especially given my budget. I still haven't found a local gunsmith that does custom rifle work (beyond what I can already do myself). The places for any long range shooting in this area are few and far between so I guess there isn't much of a market. I had high hopes that this would be an easy upgrade but my usual luck prevails.
600 yd range here is pretty much unheard of.
Gotta love Massachusetts, huh?!
600 yd range here is pretty much unheard of.
Sad to say that MA no longer seems to be the worst state (for now) in New England for nonsensical gun laws. I believe that there are 600 yd ranges in Reading, MA, Nashua, NH and Scarborough, ME. They are in development in Pelham, NH and Sturbridge, MA (where I shoot).
Gotta love Massachusetts, huh?!
600 yd range here is pretty much unheard of.
Don't they shoot 600 at Fort Devens?
Last edited:
Don't they shoot 600 at Fort Devins?
Maybe. I don't know but I will look into it--Devans is a little over an hour's drive. I also just got an email from the club I do shoot at--the "500yd" range should be ready by 2016....
The rifle I'm working on is a Remington 700P in an HS Precision stock.
I haven't yet committed to any irreversible mods to the stock or to the receiver, apart from working the inletting to accept the DBM.
Fitting the bottom metal so that it seats in the stock is actually fairly easy. The second hurdle (for some of us) is getting the cartridges to feed reliably.
The issue on my rifle seems to be that when the bottom metal is installed the mag seats too low in the action to allow it to feed--the bolt contacts only a small portion of the topmost edge of the cartridge rim.
As the round feeds from the mag, nosing up the feed ramp, the back end of the cartridge dips, the rim of the case slips under the bolt face, and the bolt rides over.
It was stated in earlier posts (by Kiff--presumably Dave Kiff of PT&G) that the actual way to remedy this is to simply order a longer clip latch from PT&G.
Does anybody know if the longer clip latches are actually available yet?
I'd also be curious to hear from anybody who has received and installed one. Could anyone relay the specs--how much additional seating depth is afforded, vs. the original design?
And lastly--has it completely solved your feeding issues?
Just to get eyes on the problem I measured the depth of the pillars and mocked up the action using nylon spacers from Home Depot. Total cost was like .60 cents.
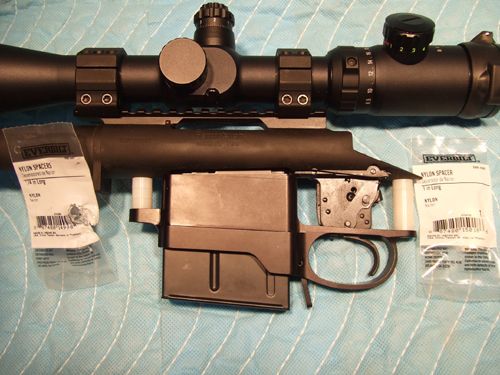
Cycling the action with dummy rounds I could watch exactly what I was experiencing with the rifle at the range. I could also see where the top of the mag made contact with the which parts of the receiver, and what various fore-and-aft adjustments might mean to the ability of the mag to seat. Pretty interesting stuff.
To try to simulate additional seating depth for the entire bottom metal (vs. just the mag seating depth) I shortened the nylon spacers (by grinding them on a belt sander).
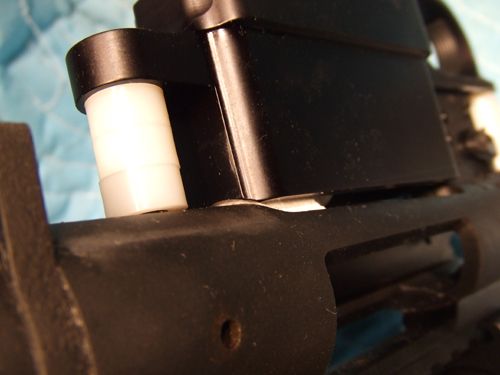
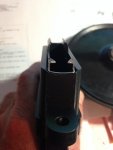
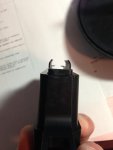
To get the mag to seat deeper in the receiver it will be necessary (on my rifle anyway) to remove a bit of metal from the top front part of the mag, forward of the feed lips, which makes hard contact with the bottom/underside of the feed ramp, (note area to be removed is marked with a black sharpie). Another solution would be to relieve/grind/mill away the bottom/underside of the feed ramp, which is obstructing the upward movement of the mag.
I'm going to guess that in my case I am going to need to deepen the seating depth of the entire bottom metal.
This would entail milling down the existing aluminum pillars in the stock itself. (To simulate this deeper-seating-of the-entire-DBM approach, I ground down the nylon pillars on a belt sander).
As the seating depth increased, the bottom metal began to make hard contact with the receiver, and I began relieving areas which were making contact.
Thus far I have only hacked artlessly at $75's worth of aluminum bottom metal.
Before I commit to milling down the pillars any substantial amount and/or making deep mods to the mag, I'd welcome the input of people who have made their feeding 100%--were the mods you employed fairly drastic?
Also--I'm curious as to how you ended up milling down the aluminum stock pillars themselves. Did you have access to a proper mill? If I have to go that route I'll be working it with a hand drill--and that ought to be interesting.
I bought a Forstner bit at Home Depot, and I'm hoping the bit will hold up to milling aluminum for the small while I need it to--I'm thinking 4 or 5 thousandths ought to do it.
LINK: Diablo 1/2 in. High-Speed Steel Forstner Bit-FB-003 at The Home Depot
I'd appreciate any thoughts or observations from the people who have overcome feeding issues--and if anybody has actually gotten ahold of (and actually installed) the longer/replacement mag latch I'd be curious as to the specs (how much longer than the original is it?), and to hear how it worked out. Did the longer latch by itself get your rifle feeding 100%?
All the best.
I haven't yet committed to any irreversible mods to the stock or to the receiver, apart from working the inletting to accept the DBM.
Fitting the bottom metal so that it seats in the stock is actually fairly easy. The second hurdle (for some of us) is getting the cartridges to feed reliably.
The issue on my rifle seems to be that when the bottom metal is installed the mag seats too low in the action to allow it to feed--the bolt contacts only a small portion of the topmost edge of the cartridge rim.
As the round feeds from the mag, nosing up the feed ramp, the back end of the cartridge dips, the rim of the case slips under the bolt face, and the bolt rides over.
It was stated in earlier posts (by Kiff--presumably Dave Kiff of PT&G) that the actual way to remedy this is to simply order a longer clip latch from PT&G.
Does anybody know if the longer clip latches are actually available yet?
I'd also be curious to hear from anybody who has received and installed one. Could anyone relay the specs--how much additional seating depth is afforded, vs. the original design?
And lastly--has it completely solved your feeding issues?
Just to get eyes on the problem I measured the depth of the pillars and mocked up the action using nylon spacers from Home Depot. Total cost was like .60 cents.


Cycling the action with dummy rounds I could watch exactly what I was experiencing with the rifle at the range. I could also see where the top of the mag made contact with the which parts of the receiver, and what various fore-and-aft adjustments might mean to the ability of the mag to seat. Pretty interesting stuff.
To try to simulate additional seating depth for the entire bottom metal (vs. just the mag seating depth) I shortened the nylon spacers (by grinding them on a belt sander).


To get the mag to seat deeper in the receiver it will be necessary (on my rifle anyway) to remove a bit of metal from the top front part of the mag, forward of the feed lips, which makes hard contact with the bottom/underside of the feed ramp, (note area to be removed is marked with a black sharpie). Another solution would be to relieve/grind/mill away the bottom/underside of the feed ramp, which is obstructing the upward movement of the mag.


I'm going to guess that in my case I am going to need to deepen the seating depth of the entire bottom metal.
This would entail milling down the existing aluminum pillars in the stock itself. (To simulate this deeper-seating-of the-entire-DBM approach, I ground down the nylon pillars on a belt sander).
As the seating depth increased, the bottom metal began to make hard contact with the receiver, and I began relieving areas which were making contact.
Thus far I have only hacked artlessly at $75's worth of aluminum bottom metal.
Before I commit to milling down the pillars any substantial amount and/or making deep mods to the mag, I'd welcome the input of people who have made their feeding 100%--were the mods you employed fairly drastic?
Also--I'm curious as to how you ended up milling down the aluminum stock pillars themselves. Did you have access to a proper mill? If I have to go that route I'll be working it with a hand drill--and that ought to be interesting.
I bought a Forstner bit at Home Depot, and I'm hoping the bit will hold up to milling aluminum for the small while I need it to--I'm thinking 4 or 5 thousandths ought to do it.
LINK: Diablo 1/2 in. High-Speed Steel Forstner Bit-FB-003 at The Home Depot
I'd appreciate any thoughts or observations from the people who have overcome feeding issues--and if anybody has actually gotten ahold of (and actually installed) the longer/replacement mag latch I'd be curious as to the specs (how much longer than the original is it?), and to hear how it worked out. Did the longer latch by itself get your rifle feeding 100%?
All the best.
Last edited:
I must say that I am really happy to see you all struggling with this "drop in" DBM.
Only because I felt a horrible pit in my stomach as I ground away at my mags and stock getting the "drop in" to fit.
I will take some pics this evening of my DBM and stock and mag to show what I had to do. Mine feeds 100% so far. I do not have the action as it is out for build right now so I can only hope that when it comes back it still feeds as reliably as it did.
I did my stock inletting with an air grinder and my mag grinding with a Dremel. The stock isn't pretty, but it's mine and it works. I could clean it up a mill but if it ain't broke don't fix it, it fits nice and snug as is. I had to take so much off the back of the mags that if I'm not careful I will push a round out the back of it.
Last edited:
I must say that I am really happy to see you all struggling with this "drop in" DBM.
Only because I felt a horrible pit in my stomach as I ground away at my mags and stock getting the "drop in" to fit.
I will take some pics this evening of my DBM and stock and mag to show what I had to do. Mine feeds 100% so far. I do not have the action as it is out for build right now so I can only hope that when it comes back it still feeds as reliably as it did.
I did my stock inletting with an air grinder and my mag grinding with a Dremel. The stock isn't pretty, but it's mine and it works. I could clean it up a mill but if it ain't broke don't fix it, it fits nice and snug as is. I had to take so much off the back of the mags that if I'm not careful I will push a round out the back of it.
Hopefully I won't have to do any milling to my reciever--but I seem to have good clearance in the rear.
Just out of curiosity--did you relieve the bedding block front of the mag well, to center your action screws?


I noticed that the easiest/first-fit of the bottom metal had the screws a little off-center, and I was concerned about them inappropriately becoming an element in absorbing recoil.


I clearanced the aluminum bedding block at the front of the mag well, shifting the bottom metal forward slightly, so that the screws were not making contact with the pillars, and so (therefore) the recoil lug would absorb all the recoil energy by itself.
It seems that my bottom metal aligns with the back of the reciever in such a way that rear of the mag well is perched nicely at the very back edge of the reciever and the reciever doesn't overhang into the recess of the mag well, so (hopefully/presumably) I won't have to relieve the rear of the mag.
I've been enjoying the work at the bench, but I'm starting to feel like a bit of a hack.
I wonder if PT&G would offer a re-anodizing service? Then I wouldn't feel quite so horrible. (lol)
Last edited:
Finally had a window of good weather and got to test out the new dbm. I'm pleased to say that the unit work 100% for all ten strings fired. That's more than I can say for the fella behind the gun. Below are a few pictures to show what was altered to get the unit functioning properly.


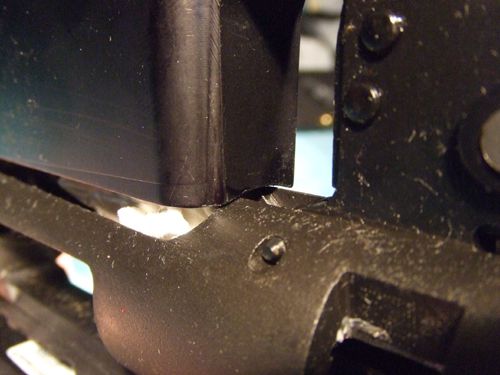
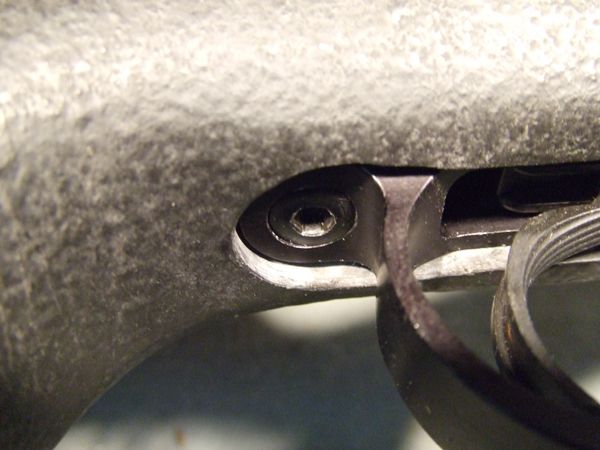
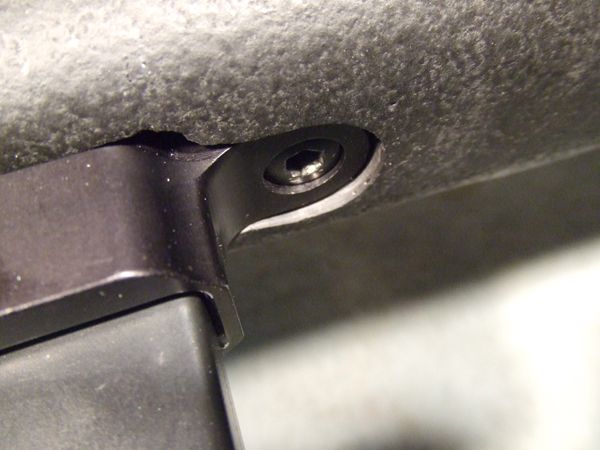
The first three pictures show modifications to h&s stock bedding block and pillars. They go as followed; due to front action screw binding from dbm sitting too far to rear of inlet the bedding block was relieved a few thousands to allow it to be moved slightly forward. Secondly the i.d of the front and back pillars were opened to help facilitate this. The pillars were also milled down flush to the stock inlet to allow dbm to sit deeper within inlet.

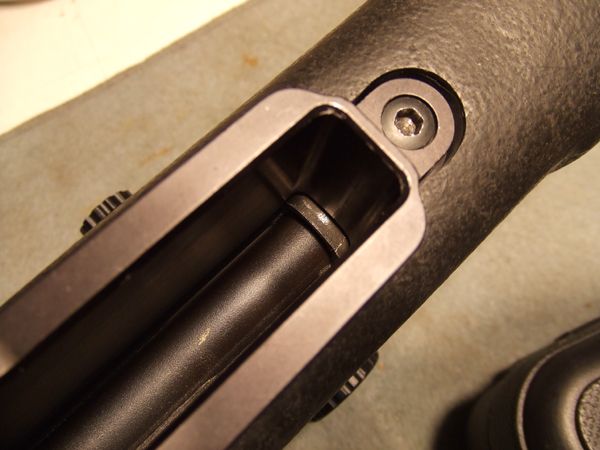
 the above two pictures show the areas on the action and bottom metal that were modified. First picture shows part of the action that was keeping the magazine from seating at all. This area was milled flush with the inside of the bottom metal. Next picture shows where a small amount of material was removed from rear bottom metal where it contacted the action. This improved feed angle and allowed bottom metal to sit slightly deeper, correcting the bolt riding over rounds.
I apologize for the poor quality phone pics and hope this gives any of you experiencing the same problems some insight into possible solutions.
The first three pictures show modifications to h&s stock bedding block and pillars. They go as followed; due to front action screw binding from dbm sitting too far to rear of inlet the bedding block was relieved a few thousands to allow it to be moved slightly forward. Secondly the i.d of the front and back pillars were opened to help facilitate this. The pillars were also milled down flush to the stock inlet to allow dbm to sit deeper within inlet.
the above two pictures show the areas on the action and bottom metal that were modified. First picture shows part of the action that was keeping the magazine from seating at all. This area was milled flush with the inside of the bottom metal. Next picture shows where a small amount of material was removed from rear bottom metal where it contacted the action. This improved feed angle and allowed bottom metal to sit slightly deeper, correcting the bolt riding over rounds. I apologize for the poor quality phone pics and hope this gives any of you experiencing the same problems some insight into possible solutions.
Here's a couple pics of the finished product

Before modifying the rifle the bottom metal sat flush with the stock now it sits just inside of it


Before modifying the rifle the bottom metal sat flush with the stock now it sits just inside of it
Nicely done. You did a more elegant job relieving the back of the bottom metal than I did--and let's just leave it at that (lol).
I ground down the aluminum pillars to flush or maybe a bit below--and I'm within striking distance of 100% function. The rifle feeds nicely if I apply firm, upward pressure on the mags while running the bolt--but I need to get ahold of a longer clip latch (or mod something up in the meantime).
Thanks for the pix.
Why not just give us a call and send us ur stock, we will CNC inlet it inside of a week for $60, and a little bolt trimming and you're good to go with genuine AI mags that work. Just trying to help put a little lol.;
Jeff
Jeff
Why not just give us a call and send us ur stock, we will CNC inlet it inside of a week for $60, and a little bolt trimming and you're good to go with genuine AI mags that work. Just trying to help put a little lol.;
Jeff
Sir--
No worries, I'll send you my stock when I save up enough scratch go with a true M5 DBM.
For now I've just been trying to suss out a way for a guy on a tight budget (like me, for example lol) with paltry $150 budget and simple hand tools to get himself into a good DBM setup.
So far so good--I've finally got the unit rocking.
I didn't have access to a mill or even a drill-press, but figured out how to mill down the pillars nicely with just a hand-drill and a 5/8 drill bit.
The bit I used was an Irwin Speedbore--bi-metal, designed to cut through nails, and it cut through aluminum like butter.
LINK: Irwin Speedbor Max Durability 5/8 in. Bi-Metal Drill Bit-1765136 at The Home Depot .
The Speedbore cuts fast and clean--it is WAY better than wasting time grinding aluminum with a dremel.
To keep the bit centered in the pillar, I made a pilot out of an aluminum spacer (1/4" OD /pics later)--and it worked great.
LINK: Everbilt #8 x 1/4 in. x 1 in. Aluminum Spacer-87648 at The Home Depot
I had to take off about .07 of an inch, but now the feed lips are just under the bolt, and now it feeds fantastic.
Once the aluminum was milled away, the dremel stone made short work of grinding the composite perfectly flush.
Before I started drilling on the HS stock's pillars (and just out of curiosity) I downloaded the Badger Ordnance M5 inletting spec--because SOME day I'd like to go with M5/AICS mags--and was relieved to see that I am still well above the depth of the M5 inlet, and comfortably inside the footprint as well.
All my hack work can get cleaned up with a CNC machine, and nobody will ever be the wiser (lol).
M5 Template LINK: http://www.badgerordnance.com/wp-content/themes/buro/resources/306-82-Inst-copy.pdf
NOTE: If you print out the template, make sure that it prints at 100%--don't let your printer scale it down to fit the page.
I'm hitting the range tomorrow to test function with different bullets/ogives, and I'll post pics/inletting tips for anybody who is interested.
All the best.
Last edited:
It was stated in earlier posts (by Kiff--presumably Dave Kiff of PT&G) that the actual way to remedy this is to simply order a longer clip latch from PT&G.
Does anybody know if the longer clip latches are actually available yet?
I'd also be curious to hear from anybody who has received and installed one. Could anyone relay the specs--how much additional seating depth is afforded, vs. the original design?
And lastly--has it completely solved your feeding issues?
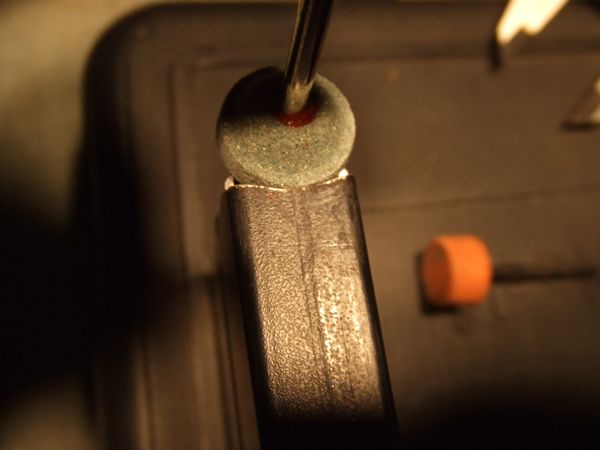
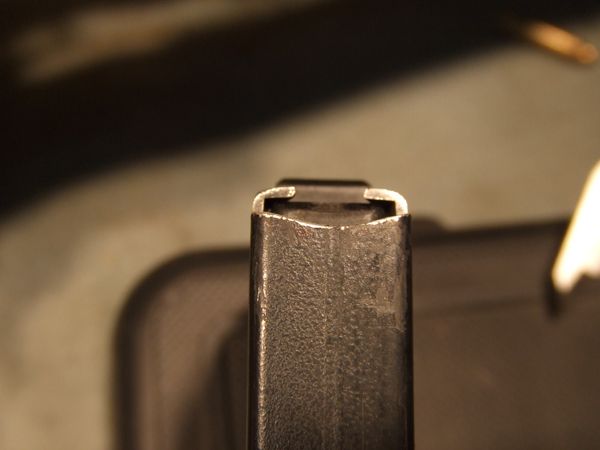
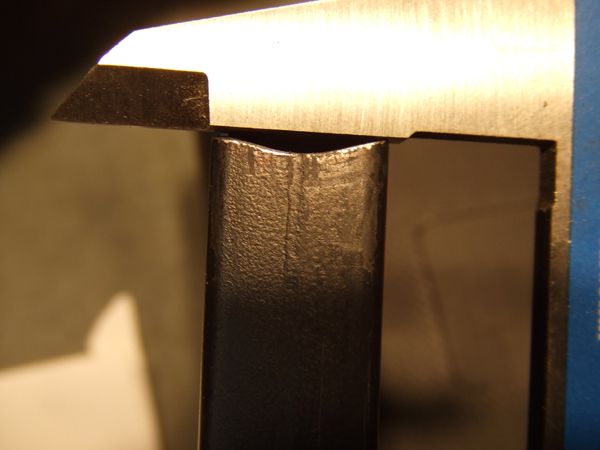
Yes, I received an extended latch a while ago. The new latch is .050" longer than the original latch that was shipped with the DBM. It comes with a pin ground undersized so you can easily take the latch in and out for fitting. As I stated before my inlet was the correct depth for the DBM. I modified the front of the mag so it could sit higher and give me room to adjust the new latch. I ended up shortening the latch ~.025" to get the mag lips to clear the bolt and to feed. I opened up the front of the mags feed lips slightly to fine tune. The pictures show the the trimmed mag and how high the mag sat in the DBM before fitting the latch.
Attachments

Last edited:
We had a great Shot Show . Jessica and I met with Ian the Accuracy International Design Engineer , Scott , Lance and the Owner of A.I. and we had a great meeting . He pledged the support of his factory to not only manufacture the 2467 magazine with a front notch and feed design for the 2.950 but also make a shorter magazine for the customer that doesn't plan on extending there Stock inlet and receiver for a longer round. This is great news as a lot of folks would rather just truly plug and play . We have stated a great relationship with Accuracy International and Scott McRee . With there help we will be coming out with many new Bottom Metal , chassis and Magazine designs . The model Seven Stealth is on the computer next . Scotty and I will get a Magazine together for that . Thank you all for giving us this chance to come out with all these new products and the feed back to make better designs . I guarantee by Shot Show 2015 we will have a Stealth Bottom metal combo , One piece Bolt and skeletonized Stocks and chassis Systems for all Bolt Action Rifles made or sold in the United States . Our newest facility Pacific Tactical is located a block behind Pacific Tool and Gauge will be opening in Three weeks and has 54 CNC mills , Lathes and Grinders dedicated to Rifle parts and accessories at a low cost and precision fit . We will also be working with Israel defense , Scotty , McMillan , Remington , Stiller and many others to bring you inexpensive combination kits using there products combined with ours . Again thanks for all the orders at the Shot show and all the continued support , Dave Kiff owner of Pacific Tool and Gauge , Cabin Fever Sports and Pacific Tactical.
That's great news kiff, keep up all the great work. I'm currently debating going to a chassis system when I upgrade my stock so I'm definitely interested to hear what y'all come up with at PT&G.
I skimmed through most of this topic really quick because I am pressed for time. When dicks had there sale I bought a Rem 700 ADL 308 26" bull barrel. It came with a crap-tastic stock that was not free floating though it claimed.
Now your sitting here reading my post and going wtf does this @$$ hole trying to say besides he an idoit.
That Remington started life as the ADL model, I bought a B&C A2 stock for a BDL and bought a PTG m5 bottom metal with a 5 round detachable box mag.
I don't have my iphone synced up to my computer yet but I will post pics of the gun and what was needed to complete this
OK
1 my B&C did not have to be milled out like most, the width of the BDL inlet was fine. the length had to be adjusted, with an Air tool and a carbide bur I was done in 5 mins flat.
2 The biggest problem you will face or find out is that when the m5 is fitted and the action is torqued on is the mag wont lock in. the mag will either need to be trimmed or your feed ramp will have to be milled out (I did both)
I saw one others talking about this in the other posts but I don't have time to read right now. Oh and I love my gun after I did this. my advice to you is do it and never look back. I got single stack mags too, forgot to mention that. I will post pics tomorrow and tell you my full story
I hope my earlier posts about the challenges I've had adapting this kit to my HS stock hasn't discouraged anyone from buying this DBM kit.
It really is a fantastic value--and now, looking back, the problems and obstacles to getting my rifle to feed (and the tools to employ to create my solutions to those problems) seem so much clearer.
The main thing I was running into (with an HS stock) was getting either the DBM unit to recess far enough for the mag to feed--or (more simply) maybe just replacing the clip latch with a longer unit, which will hold the mag higher in the mag well.
After some measuring, I was pretty convinced that an additional .05 of seating depth was not going to get my mag high enough to feed, so I went the route of recessing the entire DBM unit.
If you compare the photos that Otero51 posted earlier in the thread (page 2) you can use those as a sort of "before" picture.

This would be the "after" pic:
My bottom metal is recessed far enough into the stock so that it looks like this:
I was reluctant to mod the stock at first--but after comparing the Badger specs on M-5 inletting, I saw that I was still quite a bit shallower than any future M5 inletting (that I might one day decide to have done)--and after enjoying the benefits of a detachable mag there is absolutely NO way I was ever going back to a BDL setup.
It really IS that much nicer.
If you need to mod an HS stock and don't have access to a milling machine or even a drill press (and I didn't) the Irwin Speedbore works fantastic--but be aware that it cuts pretty fast.
This is the unit I used:
Irwin Speedbor Max Durability 5/8 in. Bi-Metal Drill Bit-1765136 at The Home Depot
I made a pilot out of one of these (found in the nuts & bolts bins)
Everbilt #8 x 1/4 in. x 1 in. Aluminum Spacer-87648 at The Home Depot
Dremel down the aggressive spiral threads found in the center of the Irwin drill bit until they fit inside the 1/4" aluminum spacer, which will itself then serve as a pilot to center the drill bit--and also to protect the inside of the pillar from getting chewed up.
Cut using light pressure, and in quick bursts--i.e. one- or two-second intervals.
I would say that my total elapsed cutting time (using light pressure) was five seconds total to accomplish seating depth. I didn't mill down the front pillar much at all--mostly just the back.
Square up the drill and--One-one-thousand, Two-one-thousand--and then check your depth. Repeat. Two half-second touch ups--and you're pretty much there.
As an aid to cutting I marked the pillars and surrounding composite with a sharpie, so I could be sure that I was cutting square. After cutting, inserting a 1/4" punch (or wooden dowel) into the hole from the other side will also show if you are cutting square--if you insert the punch from the other side, and you can tell from the face that one side is higher than the other, mark the low side with a sharpie, and as you cut the sharpie should disappear slowly--then check again that your work is square using the face of inserted punch.
Square up the black composite with a dremel stone. The dremel stone wouldn't grind the aluminum pillars for shit, but it makes short work of the black composite material.
Seating the DBM deeper in the stock causes the bottom metal screws to protrude further into the action when tightened--mine were proud by a couple threads, and it caused the bolt to bind when locked down into battery. Remove the bolt (so it does not bind when torqued in position), tighten down the bottom metal, and count your excess threads. You can guesstimate the front screws protrusion by counting revolutions after it first starts to bind. I had an angle-grinder to use, so I threaded three nuts onto the screw, left the excess threads exposed, tightened the screw into a vise (tightened onto the nuts, not the threads) then ground the top flush. I ordered a backup set from Remington--apparently they ship through Amazon.
LINK: http://www.shopremingtoncountry.com/Triggers-Bottom-Metals-Rifle-Parts-Gun-Parts/b/4601832011
The 700P has its own particular set of screws listed (I guess to accomodate the HS stock--part numbers are F104127 and F104126 ).
LINK: http://www.shopremingtoncountry.com...archPage=2&searchRank=salesrank&searchSize=12
One other issue which arose as I began to mill down the pillars--and that was the decision whether or not to relieve/grind away the underside of the feed ramp to accomodate the mags (and also to be able to take full advantage of the additional COAL these mags now make possible).
I decided against making any permanent mods to my receiver, and I found that decision directly impacted how deeply I could actually seat my mags.
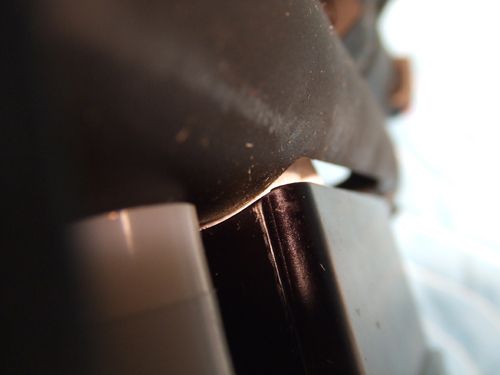
When inserted in the mag well, the front lip of the mag was making contact with the underside of the feed ramp.
Note the bright metal where the mag was bottoming.
The rear of the mag did not make contact with the receiver at all, so that was not an issue for me.

I decided to mod the front of the mag with a Dremel, to shape it to the underside of the feed ramp so it could seat higher.
The only downside is that my mags are now custom mags--they will work in any other PT&G DBM, but I must mod the front of any additional mags that I buy.
It only takes two minutes with a dremel. I was willing to live with that compromise.
Now when I seat a mag, and (with the bolt removed) look in through the back of the receiver I can see the top third of the cartridge case, and the very top margin of the primer pocket as well.
When the mag is seated to that depth, the bolt rides just over the lips of the mag, and the cartridge feed is fantastic.
So that's it--I hope the pics help somebody else along. It's totally doable--and with minimal tools.
Thanks again to PT&G for making this excellent DBM available to those of us on a budget.
It really is a fantastic value--and now, looking back, the problems and obstacles to getting my rifle to feed (and the tools to employ to create my solutions to those problems) seem so much clearer.
The main thing I was running into (with an HS stock) was getting either the DBM unit to recess far enough for the mag to feed--or (more simply) maybe just replacing the clip latch with a longer unit, which will hold the mag higher in the mag well.
After some measuring, I was pretty convinced that an additional .05 of seating depth was not going to get my mag high enough to feed, so I went the route of recessing the entire DBM unit.
If you compare the photos that Otero51 posted earlier in the thread (page 2) you can use those as a sort of "before" picture.

This would be the "after" pic:

My bottom metal is recessed far enough into the stock so that it looks like this:


I was reluctant to mod the stock at first--but after comparing the Badger specs on M-5 inletting, I saw that I was still quite a bit shallower than any future M5 inletting (that I might one day decide to have done)--and after enjoying the benefits of a detachable mag there is absolutely NO way I was ever going back to a BDL setup.
It really IS that much nicer.
If you need to mod an HS stock and don't have access to a milling machine or even a drill press (and I didn't) the Irwin Speedbore works fantastic--but be aware that it cuts pretty fast.
This is the unit I used:
Irwin Speedbor Max Durability 5/8 in. Bi-Metal Drill Bit-1765136 at The Home Depot
I made a pilot out of one of these (found in the nuts & bolts bins)
Everbilt #8 x 1/4 in. x 1 in. Aluminum Spacer-87648 at The Home Depot
Dremel down the aggressive spiral threads found in the center of the Irwin drill bit until they fit inside the 1/4" aluminum spacer, which will itself then serve as a pilot to center the drill bit--and also to protect the inside of the pillar from getting chewed up.
Cut using light pressure, and in quick bursts--i.e. one- or two-second intervals.
I would say that my total elapsed cutting time (using light pressure) was five seconds total to accomplish seating depth. I didn't mill down the front pillar much at all--mostly just the back.
Square up the drill and--One-one-thousand, Two-one-thousand--and then check your depth. Repeat. Two half-second touch ups--and you're pretty much there.
As an aid to cutting I marked the pillars and surrounding composite with a sharpie, so I could be sure that I was cutting square. After cutting, inserting a 1/4" punch (or wooden dowel) into the hole from the other side will also show if you are cutting square--if you insert the punch from the other side, and you can tell from the face that one side is higher than the other, mark the low side with a sharpie, and as you cut the sharpie should disappear slowly--then check again that your work is square using the face of inserted punch.
Square up the black composite with a dremel stone. The dremel stone wouldn't grind the aluminum pillars for shit, but it makes short work of the black composite material.
Seating the DBM deeper in the stock causes the bottom metal screws to protrude further into the action when tightened--mine were proud by a couple threads, and it caused the bolt to bind when locked down into battery. Remove the bolt (so it does not bind when torqued in position), tighten down the bottom metal, and count your excess threads. You can guesstimate the front screws protrusion by counting revolutions after it first starts to bind. I had an angle-grinder to use, so I threaded three nuts onto the screw, left the excess threads exposed, tightened the screw into a vise (tightened onto the nuts, not the threads) then ground the top flush. I ordered a backup set from Remington--apparently they ship through Amazon.
LINK: http://www.shopremingtoncountry.com/Triggers-Bottom-Metals-Rifle-Parts-Gun-Parts/b/4601832011
The 700P has its own particular set of screws listed (I guess to accomodate the HS stock--part numbers are F104127 and F104126 ).
LINK: http://www.shopremingtoncountry.com...archPage=2&searchRank=salesrank&searchSize=12
One other issue which arose as I began to mill down the pillars--and that was the decision whether or not to relieve/grind away the underside of the feed ramp to accomodate the mags (and also to be able to take full advantage of the additional COAL these mags now make possible).
I decided against making any permanent mods to my receiver, and I found that decision directly impacted how deeply I could actually seat my mags.
When inserted in the mag well, the front lip of the mag was making contact with the underside of the feed ramp.
Note the bright metal where the mag was bottoming.

The rear of the mag did not make contact with the receiver at all, so that was not an issue for me.

I decided to mod the front of the mag with a Dremel, to shape it to the underside of the feed ramp so it could seat higher.


The only downside is that my mags are now custom mags--they will work in any other PT&G DBM, but I must mod the front of any additional mags that I buy.
It only takes two minutes with a dremel. I was willing to live with that compromise.
Now when I seat a mag, and (with the bolt removed) look in through the back of the receiver I can see the top third of the cartridge case, and the very top margin of the primer pocket as well.
When the mag is seated to that depth, the bolt rides just over the lips of the mag, and the cartridge feed is fantastic.
So that's it--I hope the pics help somebody else along. It's totally doable--and with minimal tools.
Thanks again to PT&G for making this excellent DBM available to those of us on a budget.
Last edited:
I've had one sitting here for a while and got an A3 w/BDL inlet to build on. Figured to use this new DBM and see how it works.
Initial fit was NFG, DBM would not fit up inside factory magazine location. A bit of Dremeling with a round wheel to relieve the forward portion of the magwell, and it slid right up. This part was EASY to relieve, under 5 minutes...

The BDL inlet itself looks to be sitting pretty flush with the bottom of the stock, just a bit proud at the rear action screw. Please note, this stock has factory installed pillars, NOT using the PT&G supplied pillars. Just showing how this DBM sits with the factory McMillan pillars, looks like it will need some millwork for a perfect fit. But the BDL footprint itself is very close to spot on..

Gonna not mess with it further & send the stock & DBM off to my smith and have him get it fitted to my barreled action. Would like to have messed with it myself, but chamber work isn't even done yet.
Will report back on feed & function...
Initial fit was NFG, DBM would not fit up inside factory magazine location. A bit of Dremeling with a round wheel to relieve the forward portion of the magwell, and it slid right up. This part was EASY to relieve, under 5 minutes...
The BDL inlet itself looks to be sitting pretty flush with the bottom of the stock, just a bit proud at the rear action screw. Please note, this stock has factory installed pillars, NOT using the PT&G supplied pillars. Just showing how this DBM sits with the factory McMillan pillars, looks like it will need some millwork for a perfect fit. But the BDL footprint itself is very close to spot on..
Gonna not mess with it further & send the stock & DBM off to my smith and have him get it fitted to my barreled action. Would like to have messed with it myself, but chamber work isn't even done yet.
Will report back on feed & function...
Last edited:
Glad to you got that dbm 100% eightring
Me too (lol). Now I gets to have me some fun. It feeds like a champ.
Got the .22-243AI up & runnin' with the BDL inlet DBM installed. Did some brass fireforming on coyotes, and the rounds all fed great from the single stack AE mags...

Well since this thread was so beneficial to me I figured I should post up my findings with the install of this set up also.
Rifle: rem 700 tactical (1:12")
Stock: B&C light tactical (the hook) model.
P.S thanks Niles Coyote for your thread about a work in progress I have and still do reference it quite a bit!!
To start:
-install of the bottom metal required me to take out a very considerable amount of material from the front of the mag well inlet in my stock as others have posted.
- now that the bottom metal fit in my stock I could not get the magazine to lock up in the bottom metal. I had to remove some material from the front of the magazine so it would sit deeper in the magwell. The front of the mag was bottoming out on the bottom side of my action.
- now that that was solved a round would not even hardly begin to feed from the magazine. The steps I followed to solve this was to: 1) remove material from the area where the rear pillar is in hopes of allowing the back of the bottom metal to sit deeper thus allowing the bolt to catch a round better and feed properly. 2) while doing this the rear of the magwell had bottomed out on my action. So then I removed material from this area. After removing small amounts at a time from both of the previous areas I soon discovered another area to remove material where I was again bottomed out somewhere else. 3) there is a small pin on the bottom right side of the trigger housing that was bottoming out on the top part of the trigger guard so I notched out an area to allow the trigger guard to go around this.
Those are the areas I had to relieve in order to get this system to even half way function. Now that I knew the locations of resistance I just little by little removed material from one at a time test fitting after each step and seeing which area I had to tackle next.
In order to mill out the areas described I used of course the trusty dremel for spots on the magazine and bottom metal. And I used a drill press with various end mill bits for the work inletting the stock.
Now I finally have my system functioning pretty solid for the most part ( still haven't got a chance to take it out to the range).
What sucks the most is that unless I remove some material from my action I won't be able to use this magazine's full internal length. Still debating on this.
But for the most part I think I'm going to really enjoy this set up now that I have it functioning. Had I realized though that it would require this much inletting I would not have bought this product I would have stuck with my original bottom metal or would have went the M4 route and had a smith inlet the stock for it.
I understand this product is new and still getting the kinks worked out but in my case I do not believe this product should be labeled a "bolt in" product. Because it is no where near "bolt in" until you have modified your stock and the bottom metal itself. And after all any m4, etc. style dbm bottom metal is bolt in after your stock has been inlet.
With all this said I do feel like the overall quality of this dbm bottom metal is great and the price is good too. Looking forward to purchasing improved models in the future.
Sorry I don't have pics to go along with this but most of what I describe in this post has pictures in other posts with in this thread.
Oh and as far as the extended latch I did not go this route because I removed the latch from the BM and slid the magazine up in the BM and it would only go as far as the current latch was letting it so I didn't figure a longer one would make any beneficial difference.
Has anyone installed the R700 SA Stealth bottom metal into a Choate Tactical stock? Did it drop in or was there some work to be done? I would like to add this bottom metal/DBM to my R700 with Choate Tactical for now until I either get a new stock or go full custom build.
Similar threads
- Replies
- 0
- Views
- 460
- Replies
- 10
- Views
- 1K
- Replies
- 2
- Views
- 608
- Replies
- 0
- Views
- 351
