I mean, I brought this thread back from the dead to prevent creating a new thread.
Join the Hide community
Get access to live stream, lessons, the post exchange, and chat with other snipers.
Register
Download Gravity Ballistics
Get help to accurately calculate and scope your sniper rifle using real shooting data.

Install the app
How to install the app on iOS
Follow along with the video below to see how to install our site as a web app on your home screen.
Note: This feature may not be available in some browsers.
You are using an out of date browser. It may not display this or other websites correctly.
You should upgrade or use an alternative browser.
You should upgrade or use an alternative browser.
Reload precision rifle on Dillon 650?
- Thread starter ubet
- Start date
This one in blue even!
You would link me the unit with a one star review!
Tried some light vibratory action, and didn't have any powder bridging. I'm going to try it with the powder meter on there next, you guys may be on to something here...
I'm now tempted to try this. I have been making 308 rounds for my Tikka T3x and been getting 0.25MOA with 4064/Lapua Brass/ 175SMK... yet it's on my Co-Ax and can take 2.5hr of hands-on time to load 100 rounds if I'm efficient. I spend a lot of time though with brass prep and weighing/sorting components to ensure better consistency... but if I can easy size and then load on a progressive with similar results I'd love to. I already have a XL650 for pistol rounds.
Is the general consensus to
1) Lube, Deprime, FL size, mandrel on one tool head
2) Tumble
3) Trim as needed and brass prep (on my lyman brass prep center)
4) prime, charge, seat on another tool head
I already have Redding dies for FL and seating and a Gempro 250 scale and CM to weigh charges into the 419 funnel. Does this sound feasible? Any suggestions to make it better?
I just got my monthly The Blue Press, and the Dillon 650 is no longer offered in this catelog. In it's place is the new Dillon 750. I wonder why. I sold my Dillon 650 a few years ago after I got fed up with rebuilding the primer feed several times (though parts were supplied free by Dillon).
I’m still using an older RL450
Now that I can reach out beyond 300 I’m looking forward to what I can do with this “old tech” thanks to all on the thread for the tips and tricks as I learn about life beyond 500 yards.
Now that I can reach out beyond 300 I’m looking forward to what I can do with this “old tech” thanks to all on the thread for the tips and tricks as I learn about life beyond 500 yards.
Look up my post on “Speed up your powder weighing with a Gempro”. Might be an approach to consider.I already have Redding dies for FL and seating and a Gempro 250 scale and CM to weigh charges into the 419 funnel. Does this sound feasible? Any suggestions to make it better?
For the guys that use an expander mandrel. What do you use to lube the inside of the case neck?
Nothing. I use a 21st Century TiN coated mandrel. No lube needed
For the guys that use an expander mandrel. What do you use to lube the inside of the case neck?
Some light incidental spray will get into a few necks when spraying alcohol/lanolin onto a tub of cases. Otherwise nothing. Main key is not having the mandrel do much work (ie expanding only 0.001) and corn cob tumbling so there is some residual carbon in the neck too. Using a carbide or TiN coated mandrel helps too.
Nothing. I use a 21st Century TiN coated mandrel. No lube needed
Same here, I use the expander vs the turner with wet tumbled brass and never a problem.
Even without the need for trimming though, I’ll chamfer the necks to avoid brass shavings.
A couple of questions for those of you using the 'full' progressive presses with case feeders i.e. 650(/750), 1050, LnL AP, etc.
Do you use the case feeder when processing and/or loading your 'precision' rifle ammo? Just during brass processing i.e. tool-head #1, or for both?
Have you ever tried a bullet feeder? From some of the pics over on MrBulletFeeder.com, it looks like it *should* work with some of the long/pointy projectiles like ELD-Ms, etc. but I don't know that I've ever seen/heard of anyone running such a setup...
Always case feederA couple of questions for those of you using the 'full' progressive presses with case feeders i.e. 650(/750), 1050, LnL AP, etc.
Do you use the case feeder when processing and/or loading your 'precision' rifle ammo? Just during brass processing i.e. tool-head #1, or for both?
Have you ever tried a bullet feeder? From some of the pics over on MrBulletFeeder.com, it looks like it *should* work with some of the long/pointy projectiles like ELD-Ms, etc. but I don't know that I've ever seen/heard of anyone running such a setup...
Bullet feeder for rifle bullets requires flaring case mouth then crimping. Not something I want to do with precision rifle brass
Bullet feeder for rifle bullets requires flaring case mouth then crimping. Not something I want to do with precision rifle brass
Ah. I had forgotten about that.
Although...
I do seem to recall some discussion, in various places over the years, about using things like the RT1200/1500... and similar concerns were raised about needing to flare or bell the case mouth like on a pistol round. Seemed like the 'solution' often recommended was to use something like a Lyman 'M' die adjusted so it just barely touches the case mouth, and then a taper crimp die set to just smooth the neck back out. Not a traditional roll crimp, just enough to tuck everything back where it should be. Various proponents claimed that it didn't affect the accuracy in any noticeable way.
Whether that would be enough of a 'flare' to work with a bullet feeder... I honestly don't know. Seems like you'd get a little extra 'forgiveness' with the kind of bullets and brass prep we use, between the (typically) chamferred case mouths and boat-tail bullets...
@milanuk and others,
I do use a case feeder for all steps with the 650xl.
I do have the Lyman M die I use as a “mandrel” die.
I do see how adjusting it “just so” you could use it for a mouth flare tool.
Buuut then I wonder will a normal seating die get that flare back to where it should be? I would not want to crimp as I would wonder about my neck tension then...
Thoughts?
Travis,
I have, on occasion, used a Lee taper crimp die to just lightly squeeze the mouth on some .223 rounds for AR stuff. The point of that particular exercise was to replicate some BH 75BTHP loads, where the (non-cannelured) bullet was in there *tight* - like couldn't physically pull the bullet without a press-mounted collet tightened to where it literally deformed the projectile. The relevant - and interesting - bit was that while I had replicated the brass, powder, primer and bullet... I couldn't get the damn load to shoot. Until I started tinkering with the taper crimp die. You could literally see the groups shrink as I increased the crimp (in very small increments). Granted, we're not talking BR, or even F-class, level of groups here, but it was very noticeable, and repeatable.
Also, it's a little bit surprising that some of the BR (and F-class) guys I talk with are using more neck tension rather than less these days.
Hmm interesting
I would think maybe is it getting the tension “more” consistent?
Or, does it increase pressure which is better As in the case getting the powder burn at a better burn/gas expansion prior to the bullet releasing?
I am curious, did you chrono the loads? Between the BH and your crimp vs non crimp?
Not that a difference is always present for accuracy. But was the sd better on one or the other?
Years ago I was in the same boat, asking about reloading precision rifle on a Dillon 650, below is the process I’ve decided on….. for now. I’m always looking for ways to be more efficient with this process. Could this process be shortened some, probably, but I’ll include text below for each step explaining why I’ve settled on this setup. It seems like a lot but really it’s quite fast.
Feel free to substitute your own ideas etc., and we can all learn something.
I did purchase 1 of the John Whidden Dillon 650 Floating Tool Heads, but then I decided to modify my own tool heads to float the dies so I never used the Whidden tool head (It’s for sale if anyone wants it). To modify your own tool heads you’ll need to go to your local hardware store and pick up some of those little roll pins, I think I got the 1/16” diameter pins. You will also need a drill and bit which is slightly larger than the pin diameter. I found the Hornady Die Lock Rings to work the best for me. I can make a separate write up if needed explaining more about the process if needed.
Someone above mentioned using the case feeder on the 650, hell ya use it, makes this so much faster! I couldn’t imagine not using it.
Also someone above mentioned using a bullet feeder. I have the Mr. Bullet Feeder for the 650 and use it for .223 and 9mm. I’ve thought about using it for the 6.5 Creedmoor but then decided NOT to use the bullet feeder because I didn’t want to take a chance of damaging any of the bullet points, I shoot Sierra 142 Match Kings, they are not plastic tipped. If I was shooting a plastic tipped bullet then yes I might use the bullet feeder, because it would speed things up just a tad, but then we add case flaring and flair removal into the mix.... The more I think about it, nope not going to go down that rabbit hole with precision rifle on the 650, it's so easy to just manually place a bullet.
Notes:
(a) I’ve assigned “LINE numbers” to each line / possible step where something can happen, also makes this easier for me to reference text about a step.
(b) This process requires three tool heads; each tool head on the 650 has 5 positions. So tool head 1 position 1 would be TH1-1, position 2 is TH1-2, etc.
-------- Start process --------
Starting with a fired case.
LINE 1: Dry tumble (10 min).
LINE 2: Media Separator
LINE 3: TH1-1 – Universal Decap
LINE 4: TH1-2 – none
LINE 5: TH1-3 - none
LINE 6: TH1-4 - none
LINE 7: TH1-5 - none
LINE 8: Anneal the brass
LINE 9: Lube the brass
LINE 10: TH2-1 Full Length resize with bushing.
LINE 11: TH2-2
LINE 12: TH2-3
LINE 13: TH2-4
LINE 14: TH2-5
LINE 15: Trim the brass
LINE 16: Debir / Chamfer
LINE 17: Dry Tumble (1 hour)
LINE 18: Media Separator
LINE 19: TH3-1 – Universal Decap Die
LINE 20: TH3-2 – Expand with mandrel & seat primer.
LINE 21: TH3-3 – Powder charge case.
LINE 22: TH3-4 – Seat Bullet
LINE 23: TH3-5 - none
Finished round…..
-------- End Process --------
Descriptions for each line:
Line 1: We have dirty cases to start with, so off to a quick 10 minute tumble in walnut media in the Dillon CV-2001 tumbler to knock off any crud. (Side bar: If you are looking for a tumbler this Dillon CV-2001 is the mac daddy when it comes to tumblers. Monster case capacity and very powerful vibration, this tumbler really cleans cases fast!)
Line 2: We must separate the cases from the media. When we tumble the cases in the media separator there is a chance that the case mouths will get dented / dinged up in the tumbling process, we will address this later with tool head 3. (Side bar: We are going to need a large media separator to handle all of the cases and walnut, the Dillon CM-2000 handles this perfectly).
Line 3: In tool head 1 position 1, Redding Universal Decap Die - The Lapua 6.5 Creedmoor cases I use have small rifle primers, the Redding universal decap die is designed to handle these small flash holes. Load up the case feeder and goto town… In my case, decaping 200 cases shouldn’t take you more than 10 minutes tops. (The reason I decap is sometimes the primers crater, thus preventing the cases to sit flush for the next step, annealing. They need to sit flush on the case heads).
Lines 4 -7: nothing installed in the tool head 1 positions 2 – 5.
Line 8: I anneal the brass using a Benchsource Annealing Machine. Don’t forget your templiaq fuild for setting up the machine.
Line 9: Lube the brass – self-explanatory.
Line 10: Now on the 650, I load up tool head 2, position 1 with a Redding Type S Full Length Bushing Die. Install your bushing of choice to set the desired neck tension, also setup the die to bump the shoulder if you want. I bump my shoulders .001”. For the bushing size, I use a bushing that yields .002” neck tension, meaning .002” smaller than the outside neck diameter of a loaded round. Load up the case feeder and resize them all...
Lines 11 - 14: nothing installed in the tool head 2 positions 2 – 5.
Line 15: At this point we have lubed and sized cases, we need to trim. Run the cases through your favorite trimmer. Personally I use a “Trim-It 2” which trims, chamfers, and debirs all in one step.
Line 16: Debir and chamfer if your trimmer doesn’t do that in the previous step. I skip this step because the Trim-It 2 in the previous step takes care of this.
Line 17: I throw the cases back into the tumbler with walnut for 1 hour to tumble off the case lube and clean any metal bits / pieces from the trimming process.
Line 18: We must separate the cases from the media. When we tumble the cases in the media separator there is a chance that the case mouths will get dented / dinged up in the tumbling process, we will address this later with tool head 3.
Line 19: Load up tool head 3, position 1 with a Redding universal decapping die –I use this to make sure the flash holes are not plugged with tumbling media or debris. Load the cases up in the case feeder.
Line 20: Tool Head 3 position 2 - I install a Sinclair Mandrel & Die. This mandrel is .001” larger then the bushing size. Meaning we are going to expand the neck .001”, this gives us a finished neck tension of .001”. Remember when I said the case necks might get dinged up in the media separator (lines 2 & 18), this mandrel straightens out any dings. Here we also use the priming system on the Dillon 650, seat a primer.
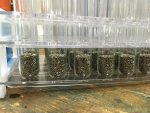
Line 21: Drop powder into the case. I use a Dillon powder die with funnel. Raise the 650’s ram, grab a test tube, flick off the tube cap with my thumb into a box, dump the powder in the powder die, and replace the tube into the rack.
Background info: To weigh the powder I use an RCBS Charge master, but I’ve found it isn’t accurate enough for my liking to get really low ES and SD numbers on the chronograph. I also use a Redding beam scale I had Scott Parker tune up; holy crap is that scale accurate, and a Little Dandy two speed electric powder trickler.
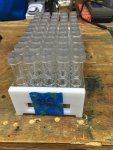
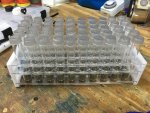
Also I weight my powder inside the house in the cool A/C, not out in the hot ass garage, so I need to have a place to store the weighed powder charges, because the cases will be in the case feeder... Glass test tubes with caps and a tube rack are your friends.
For me to weight 200 charges with the charge master, trickle up, and then dump into the test tube and install the cap, it takes aprox 2.5 to 3.0 hours’ time. I have ordered an Auto Throw / Auto Trickler V3 setup, but that won’t be here until closer to the end of the month. The Auto Throw setup should cut the powder weighing time down to about 45 minutes, and be just or more accurate than I am now.
Line 22: Tool Head 3 position 4: I installed a Redding competition seater die with the appropriate seating stem for your bullet profile. Manually I grab a bullet from the 650 bullet tray and place it onto the case mouth, then pull down on the 650 handle.
Line 23: TH3-5 – none
Finished case! Yea!
Now to give you an idea on how long it takes me to assemble my 200 rounds starting at the point of Tool Head 3 (Lines 19 – 23) is………….. 35 minutes! Remember the cases have already been prepped / sized, powder weighted, etc…. Just 35 minutes to expand the necks, seat primers, drop powder, seat bullets.
Now you are wondering about bullet run out etc. Since I floated the dies, when I measure the run out it’s .001” or less. I’ll take it!
This past weekend I thought I would eliminate a step in the above process, that step was “trimming” since I have the Dillon RT-1500 trimmer. I ordered the Dillon 6.5 Creedmoor trim die and did some testing this past weekend. I’ve decided to return the Dillon trim die, because it resizes the case just a little too much for my liking. It’s to bad because I would have liked to trim on the press, but I would still have to chamfer / debir. For now I’ll stick with the Trim-It 2.
Have fun guys! Hope this helps someone!
All the best,
Jeff
Feel free to substitute your own ideas etc., and we can all learn something.
I did purchase 1 of the John Whidden Dillon 650 Floating Tool Heads, but then I decided to modify my own tool heads to float the dies so I never used the Whidden tool head (It’s for sale if anyone wants it). To modify your own tool heads you’ll need to go to your local hardware store and pick up some of those little roll pins, I think I got the 1/16” diameter pins. You will also need a drill and bit which is slightly larger than the pin diameter. I found the Hornady Die Lock Rings to work the best for me. I can make a separate write up if needed explaining more about the process if needed.
Someone above mentioned using the case feeder on the 650, hell ya use it, makes this so much faster! I couldn’t imagine not using it.
Also someone above mentioned using a bullet feeder. I have the Mr. Bullet Feeder for the 650 and use it for .223 and 9mm. I’ve thought about using it for the 6.5 Creedmoor but then decided NOT to use the bullet feeder because I didn’t want to take a chance of damaging any of the bullet points, I shoot Sierra 142 Match Kings, they are not plastic tipped. If I was shooting a plastic tipped bullet then yes I might use the bullet feeder, because it would speed things up just a tad, but then we add case flaring and flair removal into the mix.... The more I think about it, nope not going to go down that rabbit hole with precision rifle on the 650, it's so easy to just manually place a bullet.
Notes:
(a) I’ve assigned “LINE numbers” to each line / possible step where something can happen, also makes this easier for me to reference text about a step.
(b) This process requires three tool heads; each tool head on the 650 has 5 positions. So tool head 1 position 1 would be TH1-1, position 2 is TH1-2, etc.
-------- Start process --------
Starting with a fired case.
LINE 1: Dry tumble (10 min).
LINE 2: Media Separator
LINE 3: TH1-1 – Universal Decap
LINE 4: TH1-2 – none
LINE 5: TH1-3 - none
LINE 6: TH1-4 - none
LINE 7: TH1-5 - none
LINE 8: Anneal the brass
LINE 9: Lube the brass
LINE 10: TH2-1 Full Length resize with bushing.
LINE 11: TH2-2
LINE 12: TH2-3
LINE 13: TH2-4
LINE 14: TH2-5
LINE 15: Trim the brass
LINE 16: Debir / Chamfer
LINE 17: Dry Tumble (1 hour)
LINE 18: Media Separator
LINE 19: TH3-1 – Universal Decap Die
LINE 20: TH3-2 – Expand with mandrel & seat primer.
LINE 21: TH3-3 – Powder charge case.
LINE 22: TH3-4 – Seat Bullet
LINE 23: TH3-5 - none
Finished round…..
-------- End Process --------
Descriptions for each line:
Line 1: We have dirty cases to start with, so off to a quick 10 minute tumble in walnut media in the Dillon CV-2001 tumbler to knock off any crud. (Side bar: If you are looking for a tumbler this Dillon CV-2001 is the mac daddy when it comes to tumblers. Monster case capacity and very powerful vibration, this tumbler really cleans cases fast!)
Line 2: We must separate the cases from the media. When we tumble the cases in the media separator there is a chance that the case mouths will get dented / dinged up in the tumbling process, we will address this later with tool head 3. (Side bar: We are going to need a large media separator to handle all of the cases and walnut, the Dillon CM-2000 handles this perfectly).
Line 3: In tool head 1 position 1, Redding Universal Decap Die - The Lapua 6.5 Creedmoor cases I use have small rifle primers, the Redding universal decap die is designed to handle these small flash holes. Load up the case feeder and goto town… In my case, decaping 200 cases shouldn’t take you more than 10 minutes tops. (The reason I decap is sometimes the primers crater, thus preventing the cases to sit flush for the next step, annealing. They need to sit flush on the case heads).
Lines 4 -7: nothing installed in the tool head 1 positions 2 – 5.
Line 8: I anneal the brass using a Benchsource Annealing Machine. Don’t forget your templiaq fuild for setting up the machine.
Line 9: Lube the brass – self-explanatory.
Line 10: Now on the 650, I load up tool head 2, position 1 with a Redding Type S Full Length Bushing Die. Install your bushing of choice to set the desired neck tension, also setup the die to bump the shoulder if you want. I bump my shoulders .001”. For the bushing size, I use a bushing that yields .002” neck tension, meaning .002” smaller than the outside neck diameter of a loaded round. Load up the case feeder and resize them all...
Lines 11 - 14: nothing installed in the tool head 2 positions 2 – 5.
Line 15: At this point we have lubed and sized cases, we need to trim. Run the cases through your favorite trimmer. Personally I use a “Trim-It 2” which trims, chamfers, and debirs all in one step.
Line 16: Debir and chamfer if your trimmer doesn’t do that in the previous step. I skip this step because the Trim-It 2 in the previous step takes care of this.
Line 17: I throw the cases back into the tumbler with walnut for 1 hour to tumble off the case lube and clean any metal bits / pieces from the trimming process.
Line 18: We must separate the cases from the media. When we tumble the cases in the media separator there is a chance that the case mouths will get dented / dinged up in the tumbling process, we will address this later with tool head 3.
Line 19: Load up tool head 3, position 1 with a Redding universal decapping die –I use this to make sure the flash holes are not plugged with tumbling media or debris. Load the cases up in the case feeder.
Line 20: Tool Head 3 position 2 - I install a Sinclair Mandrel & Die. This mandrel is .001” larger then the bushing size. Meaning we are going to expand the neck .001”, this gives us a finished neck tension of .001”. Remember when I said the case necks might get dinged up in the media separator (lines 2 & 18), this mandrel straightens out any dings. Here we also use the priming system on the Dillon 650, seat a primer.
Line 21: Drop powder into the case. I use a Dillon powder die with funnel. Raise the 650’s ram, grab a test tube, flick off the tube cap with my thumb into a box, dump the powder in the powder die, and replace the tube into the rack.
Background info: To weigh the powder I use an RCBS Charge master, but I’ve found it isn’t accurate enough for my liking to get really low ES and SD numbers on the chronograph. I also use a Redding beam scale I had Scott Parker tune up; holy crap is that scale accurate, and a Little Dandy two speed electric powder trickler.
Also I weight my powder inside the house in the cool A/C, not out in the hot ass garage, so I need to have a place to store the weighed powder charges, because the cases will be in the case feeder... Glass test tubes with caps and a tube rack are your friends.
For me to weight 200 charges with the charge master, trickle up, and then dump into the test tube and install the cap, it takes aprox 2.5 to 3.0 hours’ time. I have ordered an Auto Throw / Auto Trickler V3 setup, but that won’t be here until closer to the end of the month. The Auto Throw setup should cut the powder weighing time down to about 45 minutes, and be just or more accurate than I am now.
Line 22: Tool Head 3 position 4: I installed a Redding competition seater die with the appropriate seating stem for your bullet profile. Manually I grab a bullet from the 650 bullet tray and place it onto the case mouth, then pull down on the 650 handle.
Line 23: TH3-5 – none
Finished case! Yea!
Now to give you an idea on how long it takes me to assemble my 200 rounds starting at the point of Tool Head 3 (Lines 19 – 23) is………….. 35 minutes! Remember the cases have already been prepped / sized, powder weighted, etc…. Just 35 minutes to expand the necks, seat primers, drop powder, seat bullets.
Now you are wondering about bullet run out etc. Since I floated the dies, when I measure the run out it’s .001” or less. I’ll take it!
This past weekend I thought I would eliminate a step in the above process, that step was “trimming” since I have the Dillon RT-1500 trimmer. I ordered the Dillon 6.5 Creedmoor trim die and did some testing this past weekend. I’ve decided to return the Dillon trim die, because it resizes the case just a little too much for my liking. It’s to bad because I would have liked to trim on the press, but I would still have to chamfer / debir. For now I’ll stick with the Trim-It 2.
Have fun guys! Hope this helps someone!
All the best,
Jeff
Attachments
-
 935FB7F9-0EC6-454F-B43E-F2EC52235281.jpeg645.6 KB · Views: 217
 -
 9CD99C63-5DFF-4954-B861-E4C6FB2C18DA.jpeg643.1 KB · Views: 205
 -
 1466EDE1-9EC7-4028-B51B-78EA9F035813.jpeg679.4 KB · Views: 202
 -
 74EE03EE-EBA3-41BD-A023-C6B98E838E81.jpeg628 KB · Views: 224
 -
 0743D4FF-DBDC-4A1E-B0EE-BC17E898B635.jpeg1 MB · Views: 229
 -
 FD10C2F7-E648-4559-8C56-89C8D6C04D25.jpeg792.8 KB · Views: 222
 -
 58745BA4-7992-44EA-B6E8-E2479C37BD58.jpeg898.7 KB · Views: 201
 -
 CDDCF36E-F9CF-491B-A149-B6526173E838.jpeg785.5 KB · Views: 202
Last edited:
Years ago I was in the same boat, asking about reloading precision rifle on a Dillon 650, below is the process I’ve decided on….. for now. I’m always looking for ways to be more efficient with this process.
Why two steps and two toolheads for decapping then anneal/lube then sizing? Why not anneal, lube, then decap/size on the same toolhead?
Always case feeder
Bullet feeder for rifle bullets requires flaring case mouth then crimping. Not something I want to do with precision rifle brass
Slightly OT, but related to the question......
I have two 650's, one set up for 9mm and the other for .45 ACP. Each one has a Mr. Bulletfeeder. They take a bit to set up/tune up for each caliber/machine. But, once dialed in, they are absolutely the shizzle. I tried going back and forth between 9 and 45 on a single machine/single Mr. Bulletfeeder and the "conversion" (and associated tweaking) was more of a pain in the ass than it was worth. Now, I have each machine dedicated to one caliber and dialed in. I just add primers, powder, brass and pills and away I go.......
Having said that, I have never, nor will I likely ever try to set up any kind of a bulletfeeder for precision C/F, for the reasons that Padom mentions above.
Last edited:
Threadcutter308,
Oh yes I can agree with your reasoning. Yes there is more to using the bullet feeder than just the feeder itself, ya got to expand / flair the case mouths, then remove the flair. Agreed I don’t want to do that on precision CF rounds. Thanks for the reminder. Plus like I said, for me to load (assemble) my 200 Lapua cases is only 35 minutes time, going at a fairly good pace. I really think the time savings will come with the Autotrickler/Thrower for the powder.
All the best,
Jeff
My question, why do yall use separate tool heads? Just fir the slide in and out convenience?
Couldnt you just use the same tool head and screw the dies in and out and save their location with a lock ring? Its works for a single stage and turret press, why wont it work on these progressive presses?
Couldnt you just use the same tool head and screw the dies in and out and save their location with a lock ring? Its works for a single stage and turret press, why wont it work on these progressive presses?
I would imagine switching out a single toolhead with several dies is faster than unscrewing/screwing multiple dies into/out of the toolhead.My question, why do yall use separate tool heads? Just fir the slide in and out convenience?
Couldnt you just use the same tool head and screw the dies in and out and save their location with a lock ring? Its works for a single stage and turret press, why wont it work on these progressive presses?
My question, why do yall use separate tool heads? Just fir the slide in and out convenience?
Couldnt you just use the same tool head and screw the dies in and out and save their location with a lock ring? Its works for a single stage and turret press, why wont it work on these progressive presses?
Just one person's opinion here........
Changing dies on a toolhead is a bit of a PITA, particularly when all 5 stations have dies in them. Quarters are close. I bought a bunch of the Dillon die lock nuts/rings because they are thinner (in both height and outside diameter) and give you more room to work. I also bought the Dillon hex key set which includes a small lock ring wrench that is easier to use than standard open end wrenches.
In order to rotate dies in and out of toolheads as you describe above, a person should use lock rings with set screws to lock the lock ring in place on the die(s). That gets me away from using the Dillon lock nuts (see above). Also, the toolheads are so thick that the dies have to be screwed almost all of the way down, leaving very little exposed thread on the top of the die for purchase by the die lock ring.
Even though the 650 has been marketed with the "quick change" feature, after a few years of having to tweak things (more than I wanted to) when changing calibers, I finally broke down and just bought a second 650. One is set up for 9mm and the other is set up for .45 ACP. When I want to load, I turn on power, add components and away I go.
I'm not necessarily that the above is "better", is just what works well for me. Having said that, If I was back to having only one 650, I'd still use multiple toolheads. BTW, I don't load any precision C/F on the 650. For that, I use an arbor press and neck sizers and seaters that I have made using 12L14 bar stock and the same reamer I used to chamber the specific cartridge for. It is not fast, but it is damn precise and consistent, which is my goal.
Last edited:
Couldnt you just use the same tool head and screw the dies in and out and save their location with a lock ring? Its works for a single stage and turret press, why wont it work on these progressive presses?
I add/remove dies from a Dillon 1050 for processing 223 brass. Lots of empty slots, I just add a FL die and expander mandrel when I want to process brass then remove them for when I'm loading ammo. Since i do 1k of brass at a time it's not any inconvenience.
Toolheads are cheap compared to the headaches and time of setting up all your dies each time you change calibers.
Toolheads are cheap compared to the headaches and time of setting up all your dies each time you change calibers.
Agreed......
My question, why do yall use separate tool heads? Just fir the slide in and out convenience?
Couldnt you just use the same tool head and screw the dies in and out and save their location with a lock ring? Its works for a single stage and turret press, why wont it work on these progressive presses?
Speed...
Toolheads are cheap compared to the headaches and time of setting up all your dies each time you change calibers.
Nailed it. That and alot of us do prep and loading for rifle cartridges separately usually because we clean the lube off before loading so it's just easier to use two separate heads rather than mess with moving dies.
Another point is alot of us drill and tap roll pins into the dies to keep them from moving but leave them loose enough to float on orings under the dies. Huge hassle pulling those and setting them up again once they are set.
Pistol ammo I do everything on one tool head. The brass gets cleaned first and is not lubed because I use carbide dies so I load and prep all in one go.
Speed...
Another point is alot of us drill and tap roll pins into the dies to keep them from moving but leave them loose enough to float on orings under the dies. Huge hassle pulling those and setting them up again once they are set.
Hadn't heard of that before.........mind posting or PM'ing a pic or two ?
Not sure I'll do it though. If installed horizontally and perpendicular to the die in the toolhead, it sounds like a one way trip for the roll pin, correct ? Oh, and not sure what you mean by drill "and tap" roll pins.......I'm not gettin' sumptin".......
@jetsurgeon posted pics up in post #119 that shows the drilled holes for his pins. His are much much prettier than mine ?.
I drill and tap a hole for a set screw in my die lock ring to set HS die length etc into the tool head. I then drill a hole for the roll pin that goes through the die lock ring into the tool head itself to keep the die from moving. This allows all my dies to float and run out is just as tight as my single stage press.
Last edited:
Hadn't heard of that before.........mind posting or PM'ing a pic or two ?
Not sure I'll do it though. If installed horizontally and perpendicular to the die in the toolhead, it sounds like a one way trip for the roll pin, correct ? Oh, and not sure what you mean by drill "and tap" roll pins.......I'm not gettin' sumptin".......
Look over on Whidden's site, under 'floating tool head'.
The concept was, AFAIK, first popularized in one of Tubb's books on High Power Rifle competition. Essentially, you put threaded inserts in the locator pin holes in the tool head, and then use jack screws to lock the tool head in place. Then you have small holes drilled into the tool head adjacent to each die station, and inset a small roll pin - say 1/10" - sticking up just enough to engage corresponding holes/notches in the die rings.
The theory is that the odds of having dies in all four holes end up perfectly aligned, particularly with the factory mass-produced castings, are vanishingly small. Instead, you let each die float inside it's own hole, so it can self-align to the case and shell plate under it.
For a period of time, Uniquetek sold a kit for modifying the factory tool heads (edited to add: it's still available). It included the appropriate sizes of drill bit, tap, handle, helicoils and insert tool, along with the correct screws, to do the mods to the tool head to be able to lock it in place. If you wanted to float the die rings though, you were on your own. Fairly simple with a drill press, though. Never tried it with a hand drill, myself.
Later, Whidden started offering a combination setup, including modified Forster lock rings. Essentially, it looked like they took a batch of them, clamped them in a mill and ran a slotting cutter across them. I still have a few of those kicking around.
More recently, Whidden sells complete kits, with holes and pins already installed, along with the hardware for locking the tool head into the press frame. There may be other people doing similar things, as the use of CNC machining in niche markets has expanded greatly over the last 5-10 years. FWIW, I believe Uniquetek now (re)sells the Whidden tool heads, already set up and ready to go.
Hadn't heard of that before.........mind posting or PM'ing a pic or two ?
The threaded inserts...
The two different styles of modified lock rings - drilled vs. notched.
The roll pin...
As they sit in the press.
Last edited:
View attachment 7130608
The threaded inserts...
View attachment 7130611
The two different styles of modified lock rings - drilled vs. notched.
View attachment 7130617
As they sit in the press.
Coolio.......Thanks !
Pardon, sorry to reach back into an older thread, however I’m looking for feedback on 650 brass prep accuracy… And it looks like you’re having success! Do you use the case feeder with lubricated brass does it cause any concerns when switching back the pistol... does it gum it up? I have a priming tool, trimmer, V3 powder system and will seat with an arbor press. Goal is to reduce to one large press, and use the 650XL to look after the brass prep (decapping die, FL sizing die and a turning mandrel (.306). Do you mind sharing any new updates or key learnings? Thanks for your help!To add to my above post, in my XL650 with the billet toolheads I am using Forster Ultra Micrometer seating dies and Forster FL Sizing dies for rifle cartridges (expander removed and 21st Century TiN expander mandrels for .002 neck tension) and Redding Competition Micrometer pistol seating dies. I was getting higher but acceptable runout with Dillon dies.
Also, for those that are interested. I do not process brass and load all on the same toolhead. I have separate brass prep and loading toolheads for each caliber (except pistol cartridges). I run all my LC 5.56, LC 300blk and 6.5cm semi through a brass prep toolhead that deprimes, bumps shoulder, trims (Dillon RT1500) and mandrel sets neck tension. I prep brass in large batches of a few thousand at a time over the winter months. I then SS tumble, debur the case mouth and store in large plastic bins.
I dont have to prep brass at all for these calibers during the shooting season. I have more than enough brass ready to load.
View attachment 6529942View attachment 6529943
View attachment 6529946


Leo,
I use the case feeder for everything! If you get so much lube n the case feeder, just wipe the inside of the case feeder bowl and feed plate with some Windex or alcohol (something that will dissolve the lube but not the plastic. As for the inside of the case feeder drop tube, just run a 12g shotgun cleaning patch and cleaning rod through the drop tube to clean out any lube etc.....
Did you go back and re-read the very lengthy PM's we had previously?
All the best,
Jeff
Pardon, sorry to reach back into an older thread, however I’m looking for feedback on 650 brass prep accuracy… And it looks like you’re having success! Do you use the case feeder with lubricated brass does it cause any concerns when switching back the pistol... does it gum it up? I have a priming tool, trimmer, V3 powder system and will seat with an arbor press. Goal is to reduce to one large press, and use the 650XL to look after the brass prep (decapping die, FL sizing die and a turning mandrel (.306). Do you mind sharing any new updates or key learnings? Thanks for your help!
Yes I use the case feeder with lubed brass. Have been for many years. When I switch from processing lubed rifle brass to loading cleaned rifle brass, pistol, etc. I remove the plate and give it a quick spray with 99% alcohol and wipe it off with a paper towel. All lube is gone. I do a quick spray inside the case feeder with no plate and wipe that out as well. Lube is gone. Never had it gum up.
Since I'm planning on getting an XL750 at some point this year, largely for the case feeder (but also for more room on the tool head)... I'm curious...
Do those of you using the case feeder for brass prep do anything *different* as far as lube, die setup, etc. for virgin brass?
The reason I ask, is that in the past I was always one of those 'new barrel = new brass' guys, so I was always (at least it felt like!) processing new brass for the next barrel. And I had a *lot* of issues with brass building up on the expander ball/mandrel, to the point where it'd start measurably affecting the resulting ID of the case necks. At which point I'd stop, clean/polish the ball or expander til it was clean again, and resume. Had a few instances where the clean/polish process actually reduced the size of the mandrel, measurably affecting the case neck ID...
Much (but not all) of that went away when I switched to carbide expander mandrels. Still a little bit of a problem, but much less.
I'd heard from a Lapua rep a few years ago that one part of their final process resulted in a bit of an oxide layer forming on/inside the cases, unfortunately giving that rough / high drag feel to the initial expand / seat stage. He recommended tumbling in dirty media, to get a bit of dust inside the necks as a sort of dry lube. Other people I know use Imperial dry graphite neck lube, laboriously applied one case at a time with a bore mop, and still others use either Hornady One Shot spray lube, or some sort of lithium grease spray in a small container (like a bottle cap) and dip each case neck in it, again one-at-a-time, and then wet-tumble briefly post processing to get it off. I've used the Zediker 'squiggle' method with Imperial die wax on my finger tip... again, one-freaking-case-at-a-time. Which rapidly pegs the Suck-Factor meter...
As such, I'm looking for any other options/opinions/solutions.
Leo,
I use the case feeder for everything! If you get so much lube n the case feeder, just wipe the inside of the case feeder bowl and feed plate with some Windex or alcohol (something that will dissolve the lube but not the plastic. As for the inside of the case feeder drop tube, just run a 12g shotgun cleaning patch and cleaning rod through the drop tube to clean out any lube etc.....
Did you go back and re-read the very lengthy PM's we had previously?
Jeff, your earlier posts were brilliant... since July I’ve been acquiring equipment... I’m almost 90% to your recommendation. The only hiccup was that I was looking at the forester coax, but it was backordered... so I dropped that approach in favor of a SI hydraulic arbor for seating. Desire was to have 1 press on the bench... since priming, powder charge and seating are now “on the bench” vs. the press... I’m now just looking at the Dillon for brass prep (decapping, Redding FL resizing and turning mandrel.
Now, I’ve run into a snag with the 650. Understand case feeder isn’t an issue... but I’m thinking I would be better served with a 550C. I need to manually rotate the shell plate... decapping then cleaning, then FL sizing/neck expansion. Unless I use a separate toolhead to decap, and then insert the Whidden floating/locked toolhead the 650 progressive will cause concerns.
The other point of discussion... shell plate in the 550C is less “flexible”... in comparison to the 650... according to Dillon.
For my needs - replacing my 650 for a 550 appears to be the best solution.
And, thanks again for spending the time to help draft the earlier notes... extremely helpful!
Leo
Since I originally made this thread we've moved and I just got my bench at back up. Been doing a lot more shooting of pistol and ar than the old 308. But am going to get all my brass loaded back up for it. I forgot all the great advice in here and am thankful for it. It will make getting the 308 running again a lot easier. I do highly recomend the 419 funnel, that thing is great. Have a chargemaster would also be nice, but such is life.
I have realized my accuracy ability isnt going to be affected by +/- .1gr difference in powder. Especially since I used a combination of ocw/ladder test at 300 yards to develp it. That I personaly dont shoot good enough to see the difference in .001” difference in ol. Personally I would rather spend my time doing something else than chasing that small of a difference in a bullet being as I know that I do not shoot good enough to see the difference.
Thread resurrect! I have the same setup and the same issue with bridging H4350. Actually caused me to get a squib load that jammed a bullet about 2 inches down my 6.5 CM barrel, which really sucked to get out. Wondering if the little vibrating motor would resolve this, gotta be careful searching those online though, lol.I have the Area 419 setup (with the Dillon adapter) and used both the 3” tube and double stack. It’s an attractive and functional setup, but with H4350 I have had numerous incomplete drops due to unnoticed bridging. First time I noticed was after several consecutive drops, enough powder had bridged and hung up it resulted in an overfill on the last, when it eventually broke thru.
(Granted, my setup on the bench puts the funnel above eye level, so I don’t regularly stand up and look down into the funnel to ensure its empty, especially with the double stack.)
Without a see thru funnel (or bottom tube), I’m never certain every kernel is making it into the case - double stack or not.
View attachment 7121744
Thread resurrect! I have the same setup and the same issue with bridging H4350. Actually caused me to get a squib load that jammed a bullet about 2 inches down my 6.5 CM barrel, which really sucked to get out. Wondering if the little vibrating motor would resolve this, gotta be careful searching those online though, lol.
That's one of the benefits of the cheap MTM funnel. You can see through and watch the powder drop, and catch any bridging. I've never had mine bridge on me though.
I use the Area 419 funnel and 3" extended drop with a Dillon Powder Die..... Never had any bridging problems with H4350, guess I must be lucky......
Seems to be hit our miss for people. When someone has a bridging issue it’s usually with H4350 based off what I’ve seen.
I use the Area 419 funnel and 3" extended drop with a Dillon Powder Die..... Never had any bridging problems with H4350, guess I must be lucky......
I've been running the same setup for YEARS without issue....until last week with 4166 loading 22BR.... I think the small 22 necks and amount of powder and kernel size is the perfect storm as I got tons of bridging. First time ever.....never had this issue with 223rem, 220TB or any others.....
Similar threads
- Replies
- 17
- Views
- 951
