Barrel Torque Ludicrocity

Out of curiosity, do you happen to know which kind the new Seekins rifles use? I hope it's the AI system and not the Curtis.

Thanks for the explanation by the way, it was very good.
Thanks. I do not know what Seekins uses now. At one point they had a bolt rifle with an aluminum receiver that was using a barrel extension to carry the loads much like an AR10.

Maybe “point load” isn’t perfect, but with the apposing 60* threads, the mechanism being compressed into the side of the thread is pushing forward on the tenon as it is pulling it back. I do not feel the tenon in an AWMC is loaded in tension due to the locking mechanism.
I get what you're saying, but with respect, your concept is incorrect here. There's an air gap clearance in the threads, which is why you can screw them together with only running torque. When you bottom the shoulder to the face of the action this closes the air gap on only one side of the thread and opens it further on the other side. The screw closes down the pitch diameter in the localized area and this drives axial load (tension) into the joint because the shoulders are butted against each other.

If there was not a shoulder reference in place then your argument would be valid and it would just be contact friction holding the joint in place.
 
You have a jam nut on the AR 15 & AR 10, Savage, etc.

No such thing on the direct thread joint of barrel to the action, with no jam nut.
Big Difference!
This type of joint depends on high contact pressure and slightly stretched threads to hold the parts firmly together.
So 95 to 150 ft-lbs for this particular application will usually suffice...80 ft-lbs would be a minimum, that I probably wouldn't consider unless specified by the builder in a particular application which I have seen in some pre-fits, without jam nuts.
So a jam nut at 55ftlbs is imparting more/equal torque on the barrel nut face and receiver face than a 100ftlbs shouldered prefit?
 
Josh already said it but once the shoulder touches the action face, only one flank is loaded. On the barrel, its the flank facing the shoulder thats loaded. On the receiver, it’s the flank facing the shooter.
But the chingadera in the receiver of the AWMC is floating in the receiver. All it is doing is pushing and self centering into apposing vees.
 
Fun story.

I used to run about 30-35ft/lbs barrel torque, in the range where you could use your feet to hold the butt stock and a clamp on barrel vise to pop the barrel off without putting it into a fixture. Never had any issues with accuracy or otherwise.

One day I adjusted my muzzle brake with a crescent wrench, loosened and tightened it a couple times to get it lined up correctly. Then later that week I shot a one-day PRS club match. I won the club match, cleaning the last stage, tossed my rifle in the bag and drove home.

When I got home to clean the gun I looked and the muzzle brake was crooked. I thought... Well darn, I tightened that. How did it come loose? I reach to grab the muzzle brake and it turns out the brake was tight but the whole darn barrel was loose.

Now I run about 75 fl/lb. :)
I had a similar experience with a barrel that was just snapped in place. Trying to take the suppressor off with the customer who "knows how to install it just fine" the barrel spun off the action and I had a suppressed barrel in my hands. :ROFLMAO:
 
  • Like
Reactions: lash and 4g64loser
But the chingadera in the receiver of the AWMC is floating in the receiver. All it is doing is pushing and self centering into apposing vees.
Think about this another way. You screw the barrel into the receiver until it shoulders. The flanks I described above are loaded slightly(hand torque). Tightening the quickloc screw shrinks the pitch diameter, and loads those flanks even more, creating a tensile load.
 
From an accuracy standpoint, I can't remember a situation where higher barrel torque resulted in poor dispersion. I'm sure if you get to the point that you're swelling the receiver ring (several hundred foot pounds+) you can get some problems, but nobody is gonna get anywhere close to that, so the top end has really no detriment. On the low side, what you're messing with is accidentally coming loose through firing, and the joint stiffness of the barrel/receiver. Screw a barrel on snug by hand, shoot a group. It will print a great group most likely. Now take a rubber mallet and hit the left side of the barrel. Shoot another group and it will impact right of where the first group was. Now torque the barrel to 50 ft-lb and repeat this. You are much less likely to experience this MPOI shift. How hard it has to be hit to shift it vs. torque will be very situationally dependent, but for certain the higher the joint stiffness, the higher force needed to cause that shift.

I tend to do (I'm guessing-- I don't personally torque wrench my barrel installs) 40-50 ft-lb. It's tight enough to keep it on, easy enough to break loose next year when I put a new pipe on. But functionally, as long as you have proper work-holding that prevents slips and deformation, there should be no issue going to 100-150 ft-lb.
 
And I recanted, and explained that only one flank is loaded.
The flank may be loaded by the torque of hand tightening, BUT mechanism in the AWMC does not increase the tension in the joint.

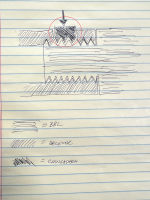
If you put pressure at the arrow onto the chingadera, will it increase the pressure beteeen the barrel shoulder and receiver face, decrease it, or stay the same?
IMG_2059.jpeg
 
The flank may be loaded by the torque of hand tightening, BUT mechanism in the AWMC does not increase the tension in the joint.

If you put pressure at the arrow onto the chingadera, will it increase the pressure beteeen the barrel shoulder and receiver face, decrease it, or stay the same?
View attachment 8787122
That's not what's happening in the action. Your drawing is incorrect.
 
The flank may be loaded by the torque of hand tightening, BUT mechanism in the AWMC does not increase the tension in the joint.

If you put pressure at the arrow onto the chingadera, will it increase the pressure beteeen the barrel shoulder and receiver face, decrease it, or stay the same?
View attachment 8787122
The pressure at the shoulder increases. The wedge drives the barrel rearward and provides additional load into the shoulder.
The piece you're calling the chingadera isn't floating in the action. It's cut as a single unit to the receiver body and they have an H shaped cut that allows for the ears of the tab to flex. This means that the loaded flank continues to be the loaded flank and drive additional load into the shoulder face.
But it does flex, and is not rigid. There is clearance.
 
The flank may be loaded by the torque of hand tightening, BUT mechanism in the AWMC does not increase the tension in the joint.

If you put pressure at the arrow onto the chingadera, will it increase the pressure beteeen the barrel shoulder and receiver face, decrease it, or stay the same?
View attachment 8787122
Most of the receiver is threaded normally(fixed), any squeeze by the clampc which is closing at the 6 oclock position, puts additional load on the already loaded flank. This is where the tensile load comes from. Its pulling the shoulder into the receiver face.

IMG_7559.jpeg
 
But it does flex, and is not rigid. There is clearance.
I said it's not floating. Floating and flexing are different. The way you have it drawn the thread wedge can move forward and aft in the joint without any significant load applied. In the action the ears must flex through significant preload applied by the locking screw. That load is translated into joint preload on the entire joint. The important factor in that setup is the ears have the same thread position that the rest of the tenon has. This means that when the ear flexes inward the timing of the thread flank doesn't change initially but rather once the screw load is applied to fold the ear into the threads. As the ear comes into contact with the barrel threads it moves as the driving contact on the barrel male thread. The tighter you make the screw the more force it applies to the ear, the farther the ear's thread drives towards the barrel and those threads form a ramp that effectively closes the PD down on the joint.

Since the joint is stationary against the shoulder plane the change in PD creates axial load due to the change in radial load. That axial load is the preload we're talking about being applied and acts just like torque to the joint.

All of this is because the ear does not move axially in the joint without significant load applied to it. It's not like a floating thread wedge like you might find in a locking ring on a Redding die body.
 
@AccuSol-ERN - I got a beautiful BA from you a few years ago. Deviant and a Bartlein blank I sent you. What torque do you use on a barrel install?

@MikeRTacOps - yeah…not bc asking for your secret sauce, but do you torque your barrels to at least 100 ft/lbs or greater?

Thanks
Remington 700's between 500 and 800
Surgeon 591's min. 350
Any other custom actions 300 to 450

Red Ryder BB guns hand tight 😉

Mike R
 
@Rubicon Precision you can demonstrate this for yourself in your loading room. Have any split die rings from forster? Not the Redding ones Josh described above.

Screw the die into a traditional press(rock chucker for example). Make sure the die ring clamp screw is loose. Now screw the die ring down to the press so it touches(no torque). In this state, you should be able to grab the die and unscrew it, the flanks are touching but almost zero load.

Now tighten the clamp screw on the die ring. The shrinking pitch diameter pulls a tensile load against the press. You will not be able to remove the die by hand any more, at least not easily.

IMG_7560.jpeg
 
@Rubicon Precision you can demonstrate this for yourself in your loading room. Have any split die rings from forster? Not the Redding ones Josh described above.

Screw the die into a traditional press(rock chucker for example). Make sure the die ring clamp screw is loose. Now screw the die ring down to the press so it touches(no torque). In this state, you should be able to grab the die and unscrew it, the flanks are touching but almost zero load.

Now tighten the clamp screw on the die ring. The shrinking pitch diameter pulls a tensile load against the press. You will not be able to remove the die by hand any more, at least not easily.

View attachment 8787156
Perfect approach, wish I thought of that. You're right on the money.
 
@Rubicon Precision you can demonstrate this for yourself in your loading room. Have any split die rings from forster? Not the Redding ones Josh described above.

Screw the die into a traditional press(rock chucker for example). Make sure the die ring clamp screw is loose. Now screw the die ring down to the press so it touches(no torque). In this state, you should be able to grab the die and unscrew it, the flanks are touching but almost zero load.

Now tighten the clamp screw on the die ring. The shrinking pitch diameter pulls a tensile load against the press. You will not be able to remove the die by hand any more, at least not easily.

View attachment 8787156
Now you’re making it click!

I’ll admit I was wrong!
 
I've posted my explanation for 75-100 before but here it is again:

I tested snapping them on hand tight up through "way too much".

I could not get any zero shift or impact shift from day to day or when I whacked the barrel off something above 50 ftlbs with a 308 case head and 65 on a Win Mag. However, since lots of people don't have a torque wrench and "good enough" is a wild range depending on the person (farmers like shit TIIIIIIGHT) then our spec that I've published for years has been 75 for 223/308 and 100 for mags. This gives a specific value for folks and the consistency isn't an issue.

Ted says 100 because he asked me and I told him what my data was... so he used it.
Aaron from Zermatt asked me what I recommended when they were making up the insert cards that come with all their receivers and I told them too. So they used it.


The AI system isn't a point load. It uses a cutout in the tenon thread that the screw closes up the effective pitch diameter and drives preload into the joint by closing down the thread in the receiver to create a normal force on the ramp which in turn creates tensile load in the joint. Point loads on thread suck... which brings me to:


The Curtis system? No, it causes problems sometimes and we decline warranty of zero shift and groups when that system is used. Every single time that we've had an issue with a barrel and the set screws were installed it was fixed by removing those set screws and torquing the barrel in place. MPA ran into that years ago and quietly stopped recommending the use of the system even though their branded actions as the time from Curtis still had the features in the receiver.

Back in 2009 or so it was relative commonplace on this forum for someone to talk about having issues with groups and wandering zero or fliers in a freshly assembled Rem 700 build. One of the first things that was brought up was "check that your front action screw isn't too long and touching the bolt. Check that the front scope rail screw isn't too long and touching the top of the barrel threads."

In 2017 or so the powers that be in the market decided another quick change system was needed and since the systems on the market that created preload into the joint were already patented the set screw setup was adopted. This was about the time that the WTO lug was flashing into popularity and the "I can change barrels at the range" idea was all the rage.
Well shoot, I just ordered a Terminus QC.
 
Remington 700's between 500 and 800
Surgeon 591's min. 350
Any other custom actions 300 to 450

Red Ryder BB guns hand tight 😉

Mike R

To anyone who thinks the above values are crazy, if you look up engineering data for suggested torque by thread diameter and pitch the numbers Mike posted above are reasonable for the thread diameter and pitch you find in R700 style actions. I'd also say based on his tiny, tiny test targets and apparent lack of the cold bore shot being outside that tiny group that the high barrel torque is certainly working as part of his overall build process.

What is a problem is trying to achieve those kinds of torques on a cylindrical barrel and action, specifically the work holding and tooling needed to not mar, gouge, slip, or deform/crush anything when trying to tighten to said torque values. Mike obviously has the tooling and has the process figured out; his fit and finish is beautiful, and his rifles don't shoot half bad either. :ROFLMAO:

For the average home assembler with a cheap barrel vise and an internal action wrench, don't even think about trying to get things "Tac Ops Tight"... Lol
 
@Rubicon Precision you can demonstrate this for yourself in your loading room. Have any split die rings from forster? Not the Redding ones Josh described above.

Screw the die into a traditional press(rock chucker for example). Make sure the die ring clamp screw is loose. Now screw the die ring down to the press so it touches(no torque). In this state, you should be able to grab the die and unscrew it, the flanks are touching but almost zero load.

Now tighten the clamp screw on the die ring. The shrinking pitch diameter pulls a tensile load against the press. You will not be able to remove the die by hand any more, at least not easily.

View attachment 8787156
This made a complex subject very simple. Good job!
 
  • Like
Reactions: Supersubes and lash