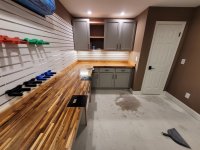
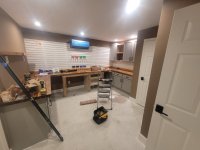
New gun room, had to downsize pretty significantly, went from 25' of linear benchtop space to 10', and 300sqft to 120sqft for the room. However, it forced me to dramatically organize the room, and more specifically the workbench. I have since fixed the cable management, moved the AMP to the back right corner, and added a bench vise. I'm not too happy with the lighting as it projects towards the front of the bench and not straight down, casting shadows where there shouldn't be shadows.

Join the Hide community
Get access to live stream, lessons, the post exchange, and chat with other snipers.
Register
Download Gravity Ballistics
Get help to accurately calculate and scope your sniper rifle using real shooting data.

Install the app
How to install the app on iOS
Follow along with the video below to see how to install our site as a web app on your home screen.
Note: This feature may not be available in some browsers.
You are using an out of date browser. It may not display this or other websites correctly.
You should upgrade or use an alternative browser.
You should upgrade or use an alternative browser.
Building the Perfect Reloading Room
- Thread starter sirhrmechanic
- Start date

Well you still have a good space. No telling when I will get my new one done.New gun room, had to downsize pretty significantly, went from 25' of linear benchtop space to 10', and 300sqft to 120sqft for the room. However, it forced me to dramatically organize the room, and more specifically the workbench. I have since fixed the cable management, moved the AMP to the back right corner, and added a bench vise. I'm not too happy with the lighting as it projects towards the front of the bench and not straight down, casting shadows where there shouldn't be shadows.
View attachment 8259516
Add you some can-less can lights in that drop ceiling man, just a few will take care of the lighting and shadows and you should be able to do it easily.
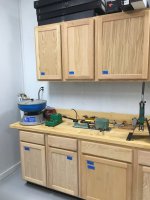
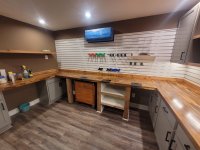
This was in its infancy, a lot more has been added especially in the gun maintenance side. It’s on the opposite side of the room to keep and copper solvent from contaminating my brass and copper. I isolated my scales on the far right of my safe so they wouldn’t receive any vibration from the presses.
Last edited:
I am frugal, being a Scott. So this is my reloading room and our temporary house when we sold our old house in three days for cash. A when can you be out kind of deal....
The room is sheeted with 10' 3/8" flake board, with lattice for corners, painted white. Cabinets are birch, non finished, with two coats of sander sealer, counter tops are double 2x12s with 1x2 between screwed and glued on pipe clamps, then smother with a 4x24" belt sander, with sander sealer, back splash is a 2x8 screwed and glued to the counter top. They support a press or a dump truck. Window looks down the range and is barred. Blue tape was so I knew what I planned gor each cabinet, bullets on bottom, brass, powder and dies on top. Three shot shell presses on the base of the L.
The room is sheeted with 10' 3/8" flake board, with lattice for corners, painted white. Cabinets are birch, non finished, with two coats of sander sealer, counter tops are double 2x12s with 1x2 between screwed and glued on pipe clamps, then smother with a 4x24" belt sander, with sander sealer, back splash is a 2x8 screwed and glued to the counter top. They support a press or a dump truck. Window looks down the range and is barred. Blue tape was so I knew what I planned gor each cabinet, bullets on bottom, brass, powder and dies on top. Three shot shell presses on the base of the L.
Attachments


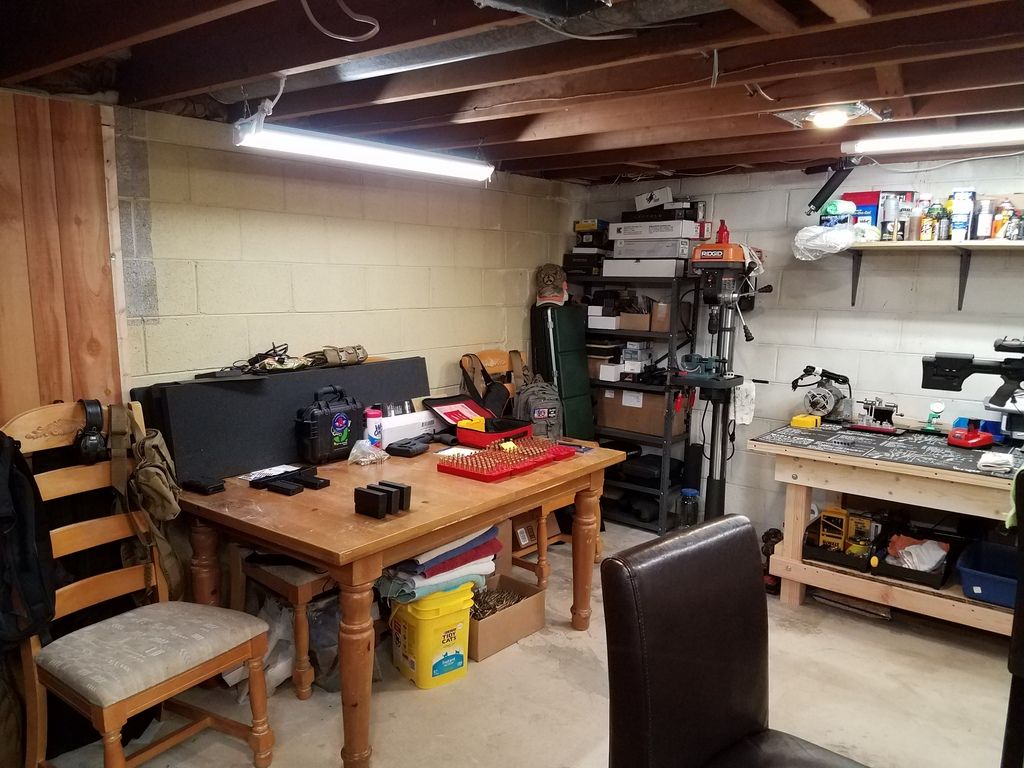
I finally finished my 4th bench in my reloading room which is a dedicated gun building bench. Just needs to be stained and cleared but that will have to wait till spring when I can leave the windows open.
1. Dillon XL650 bench
2. Co-Ax / Chargemaster bolt rifle bench
3. Roch Chucker depriming and brass prep bench
4. Gun building/cleaning bench
I went with Inline Fabrications Ultramount with Quick Change baseplate system. Its an amazing setup!! I have 5 baseplates with different tools mounted on each. They have a huge drop down of pre made plates for all kinds to tools, trimmers, presses, vises, etc. Waiting on a second shipment from them with my wall mounting system. Also have a nice sturdy old dinning room table as kind of a 5th bench for whatever I need it for.


I have 2 cabinets (1 for pistol & 1 for rifle). Wife says I need to build a dedicated build for gun storage and reloading. Hopefully, I'll take her up on that soon?
Attachments

Last edited:
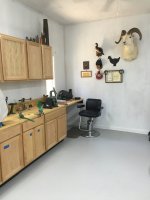
How did you come by that barbers chair? Any trick to getting one cheaper? Might be nice for my desk area in my room similar to how yours is.I am frugal, being a Scott. So this is my reloading room and our temporary house when we sold our old house in three days for cash. A when can you be out kind of deal....
The room is sheeted with 10' 3/8" flake board, with lattice for corners, painted white. Cabinets are birch, non finished, with two coats of sander sealer, counter tops are double 2x12s with 1x2 between screwed and glued on pipe clamps, then smother with a 4x24" belt sander, with sander sealer, back splash is a 2x8 screwed and glued to the counter top. They support a press or a dump truck. Window looks down the range and is barred. Blue tape was so I knew what I planned gor each cabinet, bullets on bottom, brass, powder and dies on top. Three shot shell presses on the base of the L.
I have used a few computer chairs over the past 20 years. You just have to suit the height of your work area and presses etc to the seat. Using a computer chair you have the added functionality of being able to roll around to where needed. It’s the only way to go for me.How did you come by that barbers chair? Any trick to getting one cheaper? Might be nice for my desk area in my room similar to how yours is.
Yeah I had planned on taking my worn out office chair and using that and getting the wife a new office chair. It's height adjustable but I'm not sure if it's quite tall enough for me to sit higher up over the bench at times like I would want to. I do like being able to roll.I have used a few computer chairs over the past 20 years. You just have to suit the height of your work area and presses etc to the seat. Using a computer chair you have the added functionality of being able to roll around to where needed. It’s the only way to go for me.
I start with the chair and make the work surfaces about desk high. That way a computer chair is adjustable to a working height. The first time I used a roller chair I was sold on the idea lol.Yeah I had planned on taking my worn out office chair and using that and getting the wife a new office chair. It's height adjustable but I'm not sure if it's quite tall enough for me to sit higher up over the bench at times like I would want to. I do like being able to roll.
Built a barrel rack this weekend and added wood runners on the adjacent wall to be able to mount inline fab quick change storage docks. Next up, mounting the storage docks and installing a board with 550 tool head holders mounted on in in the upper right then finishing off the space with some simple floor moldings.

Far from perfect. But at least working on efficient.

Where did you get that stool?
I've ordered this cart from grizzly that I hope I don't regret. It's supposed to fit under my tops in a space I made for this type of thing, similar to how you have that husky set up. I just wanted something I could put out of the way and had lots of little drawers to get some of the crap out of my safe. I hope it fits, I'm a little dubious about the measurements and grizzly wasn't super confidence inspiring in their confirmation of the overall height. We shall see.
You can see the space to the left of the shelves there under the top.
You can see the space to the left of the shelves there under the top.
Attachments
Viper makes a nice stool

 www.vyperindustrial.com
VYPER INDUSTRIAL: Buy Vyper, Get Quality.
Vyper Industrial is home of the highest quality industrial products, proudly made in the USA. Serving all countries worldwide.
www.vyperindustrial.com
Where did you get that stool?
It's a "Vyper" Stool. They are very overpriced. Not sure if we will do it again.
It's a nice stool, but not that nice, IMO.
I've ordered this cart from grizzly that I hope I don't regret. It's supposed to fit under my tops in a space I made for this type of thing, similar to how you have that husky set up. I just wanted something I could put out of the way and had lots of little drawers to get some of the crap out of my safe. I hope it fits, I'm a little dubious about the measurements and grizzly wasn't super confidence inspiring in their confirmation of the overall height. We shall see.
You can see the space to the left of the shelves there under the top.
Drawers are super important IMO. Mandrels, calipers/micrometers, comparator inserts......etc etc.
Yeah it is nice. The seat goes pretty high for a stool, which is nice. I have long legs so that's always an issue for me. That is pricey though.... Do you like it? Any issues with it being too wide at the bottom to get close enough to your work or anything like that?It's a "Vyper" Stool. They are very overpriced. Not sure if we will do it again.
It's a nice stool, but not that nice, IMO.
Yeah, that's why I wanted something like that. I have some drawers and will probably stick some silverware dividers in some but you can't have too many drawers with all the little tools we use and all the crap I ended up putting in my safe that doesn't belong there lime torque wrenches for scopes and rings, and small screw driver sets and bore scope, ect....Drawers are super important IMO. Mandrels, calipers/micrometers, comparator inserts......etc etc.
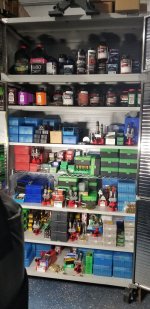
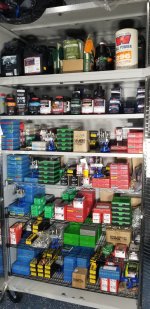
I want all that stuff out of my safe and organized in the new room and that Cart with those drawers will go a long way for that stuff. I'm also going to be losing my old bench (will go out to my shop) and the 4 drawers in it that hold all my comparator stuff, and modified cases and case lube ect.... so the plan is to put that stuff in the cart and use the cabinet drawers for larger stuff. I also have a bunch of metal shelves to go in my slot wall that I got from bed bath and beyond when they closed, which is where I got that slot wall with the metal inserts. I'm thinking about just attaching wood to each metal shelf though to make em look better and worn a little better and make em a little bigger.
This is pretty much IT.... without my presses mounted and all. Still have some paint touch up to do which is why the hvac unit is still covered. I will start the daunting task of moving everything and getting it all set up in the next day or so. I'm ready for this to all be over with....
I still have some fir shelves to make that will sit on the dark silver brackets but otherwise, I just need to move all my crap in there now, other than my TV.
I still have some fir shelves to make that will sit on the dark silver brackets but otherwise, I just need to move all my crap in there now, other than my TV.
Attachments

That looks awesome.This is pretty much IT.... without my presses mounted and all. Still have some paint touch up to do which is why the hvac unit is still covered. I will start the daunting task of moving everything and getting it all set up in the next day or so. I'm ready for this to all be over with....
I still have some fir shelves to make that will sit on the dark silver brackets but otherwise, I just need to move all my crap in there now, other than my TV.
You guys are gonna end up costing me a lot of $$ before it’s over. Really want to turn my office into something like that.
Yeah it's not cheap but it didn't actually cost me quite as much as it might others. I'm a custom builder so, a lot of the stuff I used was extra stuff and I made all the cedar stuff and tops and stuff in my shop which is directly behind the new loading room. Also the cabinets are some that my cabinet guy had already and I got cheap. I had to co figure them based on the units that he already had vs being able to design what I wanted but it worked out ok and saved me a lot of money. There's a guest bedroom and attached bath that's down there too that I also did at the same time so it was more of a matter of a little extra framing, sheet rock, and insulation, and another wall unit for hvac, vs adding a new roof line and all. I already added the whole area above all of this stuff years ago so. The loading room is above my sun room, and wasn't ever really intended to be finished under there but I raised the slab up and framed it in. It just happened that I had a space to do a dedicated room and was already doing the other so it worked out. I also did all the trim, set the doors, made a bunch of stuff and my guys did stuff for cheap because it's my personal house or it would have cost me a lot more money and I may not have even done it. I'm pretty happy with it though. I'm really ready to be done with everything.That looks awesome.
You guys are gonna end up costing me a lot of $$ before it’s over. Really want to turn my office into something like that.
I still have to pull up the crappy tile in the old part of the basement snd put the new floor down but all the other is done and the kids will have a playroom so I can get all their toys and crap out of the rest of my house! This was the main objective plus adding the new guest bed and bath
Yeah. The closet is also insulated for sound and has a solid door. It has power in it so I can put my tumbler and ultrasonic and stuff in there and shut the door and not hear al the noise. The closet is bigger than it looks with deep shelves I made so it will hold a lot but the cabinets will too so I hope it will be enough. The storage will go quickly for sure!Looks great! That closet storage is going to go fast. Powder, Primers, and gun storage has been my biggest challenge. I keep outgrowing it. Guess it's a nice problem to have, lol
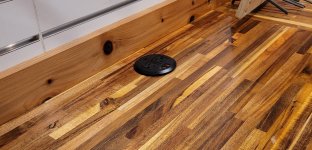
Yeah, I've got my power cleaner strip inside the lower cabinet too so I can run my scale power and stuff straight down through the top and plug it all in, inside the cabinet up on the wall of the cabinet. (Keep the wires off my bench) I have plugs inside of all of the lower cabinets on both sides of the room. I also did 26-1/2" wide tops with a 2" overhangs so I could clamp stuff easily and have a little more space than a normal 24" top or 25Pro move right there. I put my tumbler in the guest bedroom, bathroom to hide the sound from my wife late at night.
I tried to think of everything but I'm sure there will be some other stuff I wish I'd done.
I've got one more of the flush mount work station qc plates but I wasn't sure where I wanted it so I just kept the jig I made to route it out and will use the room for a little bit and then decide If or where I want the last one.
Yeah well I'm sure I will be right there with you very soon. That little cart with the drawers is supposed to be where I keep all the little crap but we all know half of it will just stay on the bench and be moved around until I clean it up 2x a yearI did 23" deep tops just to keep shit off the bench from collecting. I've failed majestically.
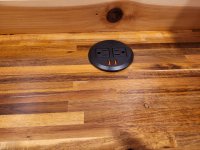
Any of you guys tried one of these for your bench? I have plugs insideal of the cabinets under my bench and on the wall under. I planned and will still have a power strip in a few spots to run all power cords through the top at the back so I minimize the cords on the bench. I thought a few of these might be handy to have though to charge my phone or plug in the occasional item without having to route a wire or use a drop cord or a cord wrap around ect... I have some grommets as well as 4 of these coming to put 2 on the long part and one in the middle of each shorter part of my top, just wondering if anyone else has used them?
Attachments
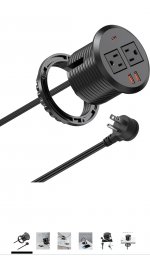
Any of you guys tried one of these for your bench? I have plugs insideal of the cabinets under my bench and on the wall under. I planned and will still have a power strip in a few spots to run all power cords through the top at the back so I minimize the cords on the bench. I thought a few of these might be handy to have though to charge my phone or plug in the occasional item without having to route a wire or use a drop cord or a cord wrap around ect... I have some grommets as well as 4 of these coming to put 2 on the long part and one in the middle of each shorter part of my top, just wondering if anyone else has used them?
No but I'm very interested. Care to share a link to it or a name so I can find it?
It's just a desktop power grommet. There's tons of different ones and different shapes ect.... Google that or look in Amazon and you will see the options. The charging ports for the phones are not all the same level of output so be mindful of that if you want to quick charge stuff.No but I'm very interested. Care to share a link to it or a name so I can find it?
It's just a desktop power grommet. There's tons of different ones and different shapes ect.... Google that or look in Amazon and you will see the options. The charging ports for the phones are not all the same level of output so be mindful of that if you want to quick charge stuff.
Thanks
It would be worthy.Any of you guys tried one of these for your bench? I have plugs insideal of the cabinets under my bench and on the wall under. I planned and will still have a power strip in a few spots to run all power cords through the top at the back so I minimize the cords on the bench. I thought a few of these might be handy to have though to charge my phone or plug in the occasional item without having to route a wire or use a drop cord or a cord wrap around ect... I have some grommets as well as 4 of these coming to put 2 on the long part and one in the middle of each shorter part of my top, just wondering if anyone else has used them?
I’d get plug caps though.
Get enough powder inside one than create a small arc it might be exciting.
Yeah that's a good idea. We have plenty from babies still so, I have those but good idea to put em in thereIt would be worthy.
I’d get plug caps though.
Get enough powder inside one than create a small arc it might be exciting.
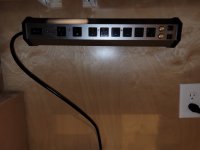
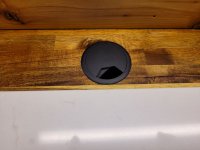
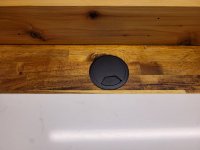
So I installed 3 of them today and a regular grommet. A 3" hole saw was barely too tight so I wrapped some sandpaper around the hole saw and spun her up a bit and that got it to go. I think the actual recommended size was a 3-1/8" but I got it to work and it fits well.No but I'm very interested. Care to share a link to it or a name so I can find it?
I needed to use a reg grommet to allow for my scale and scale stuff to go through the top to the power cleaner that's mounted inside the cabinet. It was pretty easy to do other than having to drill a little from the bottom since my tops are 2" thick and not the regular 1-1/4" inches. The hole saw I have wouldn't quite make it through but the pilot bit did so no biggie, just a lot of dust in the face. It went well and it's pretty nice to have. I will post some pics later.
Attachments
Last edited:
Being but an incapable white collar office dweller, your posts have shamed me into probably ripping out the carpet in my to-be 10’x7’ reloading closet and try leveling the floor so I can be proud of the prefab workbenches and shelving upon it.
Alternatively I have a 16’x16’ room available, but not the money or skill to refloor it professionally and furnish it.
Alternatively I have a 16’x16’ room available, but not the money or skill to refloor it professionally and furnish it.
Well, I'm a custom builder so I'm supposed to do this stuff ya know. My loading bench for years has been a harbor freight 6 foot work bench and I made a whole of great ammo on it too so...Being but an incapable white collar office dweller, your posts have shamed me into probably ripping out the carpet in my to-be 10’x7’ reloading closet and try leveling the floor so I can be proud of the prefab workbenches and shelving upon it.
Alternatively I have a 16’x16’ room available, but not the money or skill to refloor it professionally and furnish it.
If you can build shelves level on the wall then put legs on it you don't have to worry about an uneven floor. The storage aspect is the biggest thing that's helpful, shelves , ect... the rest looks cool but it doesn't do anything for loading. It's taken me a long time to get this finally done and I worked a whole lot to do it but I am happy with it.
That works just fine too and just about anyone can do it.I laid down cheap Home Depot floating synthetic flooring for $200 in an 11 x 22ft reloading room. Took less than a day.
I can’t build anything except Legos and assemble stuff per instructions.Well, I'm a custom builder so I'm supposed to do this stuff ya know. My loading bench for years has been a harbor freight 6 foot work bench and I made a whole of great ammo on it too so...
If you can build shelves level on the wall then put legs on it you don't have to worry about an uneven floor. The storage aspect is the biggest thing that's helpful, shelves , ect... the rest looks cool but it doesn't do anything for loading. It's taken me a long time to get this finally done and I worked a whole lot to do it but I am happy with it.

Bro I bet you could put laminate down. Buy a $100 chop saw from lowes and roll with it. Youtube will be your friend. But even if not, you can make a really nice set up out od a few harbor freight work benches and some shelves. Secure 2 of them to the wall and floor and you've got a good amount of bench with 8 felt lined drawers. Get a handy man to come in and put you some shelves up and help you. Just sketch out what you want to do so you can plan it out and so you aren't paying for standing around "figuring it out" . You could have a really good set up with that 10x7 room of yours and about $2k with labor included. If you can do the floors first even better but that's definitely not a necessity for loading.I can’t build anything except Legos and assemble stuff per instructions.
I already picked up two 6’ workbenches I’m going to put in L formation and a 48” heavy duty wire shelving for in-room storage. I also have a 7 drawer 28” tool cart to fit under as well, but no overhead storage planned and presently rocking some decrepit commercial low pile carpet. This setup gives me lots of tabletop space, but no place to put a vise on either end so the 16’x16’ room will need another bench and more heavy duty wire shelving.Bro I bet you could put laminate down. Buy a $100 chop saw from lowes and roll with it. Youtube will be your friend. But even if not, you can make a really nice set up out od a few harbor freight work benches and some shelves. Secure 2 of them to the wall and floor and you've got a good amount of bench with 8 felt lined drawers. Get a handy man to come in and put you some shelves up and help you. Just sketch out what you want to do so you can plan it out and so you aren't paying for standing around "figuring it out" . You could have a really good set up with that 10x7 room of yours and about $2k with labor included. If you can do the floors first even better but that's definitely not a necessity for loading.
Looking up laminate I’m not too fucked up thinking about doing it, probably, but do need to check the floor‘s flat with no water damage from an outdoor drain backup years ago.
Well, I'm a custom builder so I'm supposed to do this stuff ya know. My loading bench for years has been a harbor freight 6 foot work bench and I made a whole of great ammo on it too so...
If you can build shelves level on the wall then put legs on it you don't have to worry about an uneven floor. The storage aspect is the biggest thing that's helpful, shelves , ect... the rest looks cool but it doesn't do anything for loading. It's taken me a long time to get this finally done and I worked a whole lot to do it but I am happy with it.
Hopefully when you have time you'll be able to do something different than slatwall. That stuff ruins custom reloading/gun rooms.
What makes you say that?Hopefully when you have time you'll be able to do something different than slatwall. That stuff ruins custom reloading/gun rooms.
Slatwall, regardless of paint, venire, or edge trim, is cheap pressed wood and uses junky peg hooks. @BuildingConceptsllc built a beautiful reloading room, covering the walls in fiber board is like leaving the project 80% finished.What makes you say that?
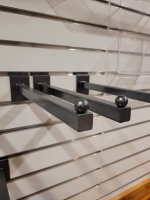
What are these colored slatwall brackets for and who makes them?Well, I got the inline Fab flush mount quick change plates all routes out. I haven't bolted them in yet. The floors are going in tomorrow so, thank goodness I'm almost done and can start getting all my crap set back up.
There are different slatwall materials available, especially for garages.Slatwall, regardless of paint, venire, or edge trim, is cheap pressed wood and uses junky peg hooks. @BuildingConceptsllc built a beautiful reloading room, covering the walls in fiber board is like leaving the project 80% finished.
I love that stuff. Mine has aluminum inserts in it and I have more plans for it. Once the shelves are up and all it will he perfect. Very happy with my slatwallHopefully when you have time you'll be able to do something different than slatwall. That stuff ruins custom reloading/gun rooms.
Those are for dillon toolheads. Dude I found on ebay made em for me. I love them. He color coded the calibers to match my existing color code for my dies in the 4 calibers I load. I just only have one tool head set up because I'm rearranging how all that's done and have new dies and stuff and haven't set it up yet.What are these colored slatwall brackets for and who makes them?
This is him, really nice guy and I think I paid a total of like $8 each. They also have the caliber embossed on them. Sorry it's a crappy picture but this is them.
sc27_designs on ebay. Highly recommend him.
Attachments

Like @Rimfire Jesus said, I too have a bit of a habit of putting too much in drawers and then forgetting I have some little tools or whatever. I want to have a lot out where I can see it but I want it to be kept organized.
I have these brackets o painted and will put thick fir boards I will make in my shop on them to make big shelves. 4 shelves around 28".
I also have a ton of those 4 or 5 inch straight slatwall hanger things but I kind of want to paint them too.
Then I have these plastic bins that hang but i dont really like that they are clear. I got a bunch of stuff from Bed Bath and Beyond when they closed and sold off stuff super cheap. I may paint those things too but I'm worried they'd get scratched and then look horrible.
Between those 3 methods I should be able to store and organize a lot but still be able to see it. I have my really small stuff in the roller cart thing I bought but it's full already so I'm going to need to move some stuff around.
I like the idea of some pull out bins for brass to be kept in a cabinet so I can have ready to load brass in them for each caliber. (Any Recs would be appreciated). The fires brass will probably go in the closet in some kind of Tucker tote thing or Tupperware.
Attachments

I love that stuff. Mine has aluminum inserts in it and I have more plans for it. Once the shelves are up and all it will he perfect. Very happy with my slatwall
Yeah, it's reinforced Lozier slatwall. It looks like a retail liquidation.
Yeah the Walmart Tupperware containers is probably what I will use too. I've been using whatever plastic container we had left over at home but I'd like them to be bigger first of all, and all to be the same size/stackable, and so I can label them. I'm trying to organize as much as is reasonable so I can limit how much it all grows and so it stays in the reloading room. Both of those things are very difficult tasks to achieve in the longer term, and I've yet to be successful successful at it. I'm hoping I can get there this time.I built my benches as floor cabinets with 5/8" plywood and topped it with butcher block. I left the cabinet facing off and sized the shelving (height x depth) very deliberately for two things. 8lb and 1lb powder bottles. Cheap Walmart tupperware containers for brass and bullets. But damn, that shit keeps growing. This last bench I built this summer was a required growth for the RL1100 I bought and a reproducing amount of brass bins that were accumulating in the garage without a storage location in the reloading room. I had a comfortable, Craig's list leather couch in the reloading room facing a TV that I had to sacrifice for more bench space and under cabinet storage. And I already need to expand again.
I’ve used my wife’s cricut machine to make lots of labels for different items in my gun room works great like you said.If you like organization, buying the Avery printable labels and pre-printing "dirty, fired", "cleaned, processed", and "6BR, 308, 223, etc" is a good way to stay up to midnight dicking around in the reloading room. You get all those bins lined up and looking uniform with labels on them and it's OCD heaven.
Similar threads
- Replies
- 66
- Views
- 3K
- Replies
- 103
- Views
- 5K
