JUST GOT MY SHIPPING NOTICE!
Long Action Right Hand - Order placed 2/11, Order shipped 8/11

Long Action Right Hand - Order placed 2/11, Order shipped 8/11

Follow along with the video below to see how to install our site as a web app on your home screen.
Note: This feature may not be available in some browsers.
jellyfish here!JUST GOT MY SHIPPING NOTICE!
Long Action Right Hand - Order placed 2/11, Order shipped 8/11
View attachment 8202844
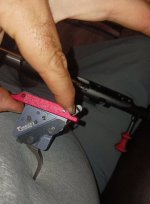
First step is to make sure it is properly orientated to the action.Anyone have hanger to trigger fitment issues? Never had an action with a hanger and this timney won't fit. Do I need a different hanger or would it be safe to remove some material from the hanger?
First step is to make sure it is properly orientated to the action.
First step is to make sure it is properly orientated to the ac
You need to remove the bolt release from the trigger, it's not needed with the CDG.
I dont think it has anything to do with the release, the hanger is hitting the shelf on the trigger.You need to remove the bolt release from the trigger, it's not needed with the CDG.
I dont think it has anything to do with the release, the hanger is hitting the shelf on the trigger.
There’s gotta be 1000’s if not 10s of thousands of different iterations of trigger body designs and revisions over the years. So it’s inevitable you’ll eventually run across one that they didn’t account for. The good news is you know where it’s interfering and looks like an easy 20 second fix with a hand file to get it working.I dont think it has anything to do with the release, the hanger is hitting the shelf on the trigger.
From the perspective of a manufacturer, I feel like I would want the first group of customers to be actual users, especially if the initial batch is billed as a pre-order. This would make it easier to iterate and improve the action based upon actual user feedback.
We have already seen evidence of ARC revising their designs in this thread right?
We are essentially opting in to beta test their pre-released product right? How useful is that if you are not beta-testing it, but selling a "to be revised" version of the action?
Everyone that's running a BnA trigger, what sear height are you using?
And what was the deal with being able to use one… You have to modify the trigger hanger?Everyone that's running a BnA trigger, what sear height are you using?
And what was the deal with being able to use one… You have to modify the trigger hanger?
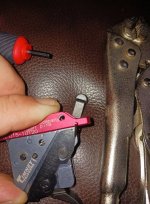
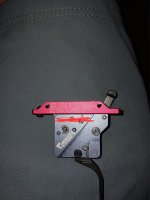
Exactly what I did. Got the dremel out and clearanced the hanger and ground the front edge of safety knob off, all good now with medium sear. Love me some BnA action!Original trigger hanger needs a bit of extra clearance made for the safety lever. It looks like the new hangers with the clearance cut will fit as is, but I don't have one to test fit.
You also need to remove material from the front of the thumb stud on the safety lever so it will fully disengage, it hits the action in the fire position and can hang up the sear in the trigger.
Edit: pic of safety lever and hanger mod
Did you watch this one? I wouldn't call it vague.Any tips on getting the bolt apart? I push the copper colored piece back and rotate the rear assembly area, but nothing comes apart. Yes, I watch the vague video multiple times.
Did you watch this one? I wouldn't call it vague.
Bolt facing away from you, handle to your left (right hand action), pull the little gold plunger back with your right finger nail, & while holding plunger in turn to right.Yeah can't get past step one. Mine doesn't just come apart after I press the plunger and twist.
First time I tried to take the bolt apart I turned the wrong way and it didn't come apart. You have to push the plunger in and turn it clockwise and it should turn maybe 1/8th turn and pull right out. Don't lose the plunger and spring.Any tips on getting the bolt apart? I push the copper colored piece back and rotate the rear assembly area, but nothing comes apart. Yes, I watch the vague video multiple times.
Ah clock wise.First time I tried to take the bolt apart I turned the wrong way and it didn't come apart. You have to push the plunger in and turn it clockwise and it should turn maybe 1/8th turn and pull right out. Don't lose the plunger and spring.
Yes looking at it from the back/bolt shroud end.Ah clock wise.
I only eat red crayons. I don't like veggies.Yes looking at it from the back/bolt shroud end.
Do not eat the Green Crayons before attempting disassembly.
Mine measures 2.026" & is std. Works perfect with AW & CDG.Anyone can mesure their Xylo mag latch ?
Just curious mine is at 2.025in and I wonder if I have the standard length or the +30 thou
Hmm 20 Moa you say..... are all of the LA's in circulation 20moa?.....this makes me sad lol....got all excited when I seen 2/11....but I went 30moa LAJust got my shipping notice. Ordered 3/1.
Long action 20 moa.
Any tips on getting the bolt apart? I push the copper colored piece back and rotate the rear assembly area, but nothing comes apart. Yes, I watch the vague video multiple times.
Did you watch this one? I wouldn't call it vague.
My LA was 30 moa, magnum bolt head, ordered on the first evening and ready to ship.Hmm 20 Moa you say..... are all of the LA's in circulation 20moa?.....this makes me sad lol....got all excited when I seen 2/11....but I went 30moa LA
Anyone can mesure their Xylo mag latch ?
Just curious mine is at 2.025in and I wonder if I have the standard length or the +30 thou
Carbon Six just lost any chance at my business in the future. If they don't want to make one they should not. But to characterize the cone print as "weird." It makes it seem that they are too dumb to read a print.
Are there any numbers on the side of the magazine latch?
1.10 and 0.34 are engraved on the side of the standard length latch. ARC measures the latch from the center of the pivot pin hole to the top of the latch where it impinges on the magazine.
View attachment 8205772
Mine measures 2.026" & is std. Works perfect with AW & CDG.
That’s exactly what they are. At least pretend to be a machinist.Carbon Six just lost any chance at my business in the future. If they don't want to make one they should not. But to characterize the cone print as "weird." It makes it seem that they are too dumb to read a print.
Carbon Six just lost any chance at my business in the future. If they don't want to make one they should not. But to characterize the cone print as "weird." It makes it seem that they are too dumb to read a print.
I agree. Not bad for a demonstration but IMO inadequate for an instructional video. Too fast, camera distance too far in a good bit of it, needs to be done in a studio (not on a fucking range with the wind blowing) with stops to show images of what is being discussed at that time sort of thing, etc.Its not vague per se, but its not specific either. Its definitely made by the guy who has done it 1000 times and isn't thinking necessarily about the guy with a heavy crayon diet who's never done it. I got it apart fine but not after watching it once. I also managed to launch my cocking piece into the unknown, but that was me being a dumbass. I ordered another one and figured as soon as I did I'd find it, which is exactly what happened. Not bad to have a spare as well as a few other spare parts which I also ordered. Sucks having hands that are getting clumsier by the day.
I don't watch it but it seems like all the brass ends up in the 3 o'clock area. 6.5CAnyone else have having their brass coming out forward? I’ve tried slow and tried fast and same result just distance from rifle changes
That’s what I’m use to but unfortunately it’s ending up between 1 and 230. Normally I wouldn’t worry about it but being a comp rifle I’ll lose more brass than I’m willing.I don't watch it but it seems like all the brass ends up in the 3 o'clock area. 6.5C
Yep my 308 is doing that. I have a new/spare ejector lever on the way from ARC. Nothing wrong with the original, but want to modify one to see If I can bring ejection pattern around to at least 3 oclock.That’s what I’m use to but unfortunately it’s ending up between 1 and 230. Normally I wouldn’t worry about it but being a comp rifle I’ll lose more brass than I’m willing.
At least I’m not the only one. What’s your plan on modifying the ejector? I’ve called ARC and left a voicemail today, so hopefully I’ll talk with someone tomorrow.Yep my 308 is doing that. I have a new/spare ejector lever on the way from ARC. Nothing wrong with the original, but want to modify one to see If I can bring ejection pattern around to at least 3 oclock.
I'll post results here.
Change the angle of the dangle. Small changes.At least I’m not the only one. What’s your plan on modifying the ejector? I’ve called ARC and left a voicemail today, so hopefully I’ll talk with someone tomorrow.
Gotcha. Keep me posted on what you figure out.Change the angle of the dangle. Small changes.
Mine only does it noticeably when on the clock running it pretty fast.
It ejects fine but there were like a dozen 308's shooting Tac class & I had to leave any brass laying till end of match if it ejected in front of the line.
My precious RWS brass.............oh the agony.
Seriously though, not that big a deal. Just figured I'd get a spare and see if I can tweak the pattern around a bit.
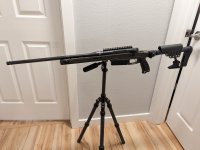
Does it close on a field gauge?I assembled my rifle after receiving my action in the mail - everything came together more or less alright.
- LA RH .535 bolt CDG
- preferred barrel blanks - 20 inch taperless .750 contour - chome moly blued blasted. 7mm PRC
- XLR Element 4 MG
- trigger tech primary
Torqued the action to 100 lb feet - extremely dismayed to see the action easily close on the no-go gauge (manson reamers). Has anyone else here had similar issues?