• Watch Out for Scammers!

    We've now added a color code for all accounts. Orange accounts are new members, Blue are full members, and Green are Supporters. If you get a message about a sale from an orange account, make sure you pay attention before sending any money!

Homemade Induction Annealer

I made one based on the build on Accurate Shooters Forum too. Works great and is quick and easy to setup.
I build mine into an old computer case and used the case power supply for the both 5 & 12vdc supply.
The white bits are Teflon bushes used to centre different size cases in the coil and with a big lead in taper I just drop them in the top of the coil and they fall in and centre nicely.


88E1B266-F60A-4805-B729-9C9104C698D0.jpeg


F5F9E854-58D3-4FE2-8EA5-74288E4C29B7.jpeg
 
Nice! Out of curiosity how long does it take to get a 223 neck/shoulder up to annealing temp with that size coil? I'm assuming the 12V supply is driving the induction board. If so, how many amps are you drawing?

Thanks!
Tim
 
Hey Tim. A 223 takes about 3.2 seconds. 6.5CM about 6.2 seconds. Current is around 11-12amps at 48vdc. I’m using a meanwell 750watt 48v supply. It’s the silver box right at the bottom of the bottom pic. Definitely the dearest part in the build. The rotary switch changes the amp output but so far I have it cranked up to the max.
 
That makes sense given the larger coil diameter. I'm hitting 3.5 s (1000F) for my 223 brass. This is at 26V/12.5A. Thanks for the info!
 
I will post pictures once I have everything bolted down but I have the 1/8” water cooled version up and running. The pump/reservoir, heat exchanger/80 mm fan, and DC to DC board were all obtained from Amazon. I had to get the 1/8” fittings from McMaster but they arrived in a day.

The small ID of the 1/8” tube does not allow for great flow rate but it is performing very very well even without the heat exchanger fan running.

I ran a 30 second cycle (no fan) and the coil was maybe a few degrees above ambient. Had I done that with the 8 AWG version it would be way too hot to touch. I could feel the return line warming up as it ran. My board is a bit busy now but that’s ok. It’s functioning flawlessly. Once I get everything locked down I’ll change the water to distilled and toss in a dash of water wetter.

Tim
 

Attachments

  • 7EAA74D2-4F89-4D38-B157-36FA77F503D7.jpeg
    7EAA74D2-4F89-4D38-B157-36FA77F503D7.jpeg
    420.4 KB · Views: 1,354
  • Like
Reactions: Vortex1
Is the cooler setup one from a liquid cooled computer setup?

They are likely intended for that use case but work very well here. The components were not part of a kit. I just picked what looked like it would do the job.
 
Pic with everything mounted properly.
 

Attachments

  • E51F19AD-1817-4963-B502-2AC9D78C127D.jpeg
    E51F19AD-1817-4963-B502-2AC9D78C127D.jpeg
    478.9 KB · Views: 1,473
  • Like
Reactions: uuolf
Wish I had seen this thread a few weeks ago.....just built an annealer identical to the one below. Now I have to wrap my head around NOT building an Induction Annealer


DAMN!!!
maxresdefault.jpg
 
I finally had some time to play with a new coil and fired it up. Unfortunately the power supply I have is not up to the task being 48v. The current draw is simply too high and causes it to trip running anything larger than .223. I did try adjusting the pot down and it allows me to reach 38.75v but I am still pulling over 12.5A and tripping. Switching frequency measures 131khz on my fluke. It has LC 09 brass cherry red in 2.5s and will melt RP .300 BLK in under 4s, so the potential for very rapid heat rise is there if I add a second power supply and run it in parallel. I built a second coil from 3/16 and will try it as well before changing the power supply.
 

Attachments

  • IMG_20191122_155908237.jpg
    IMG_20191122_155908237.jpg
    507.5 KB · Views: 569
  • IMG_20191122_155858369.jpg
    IMG_20191122_155858369.jpg
    457.3 KB · Views: 590
  • IMG_20191122_151129897.jpg
    IMG_20191122_151129897.jpg
    810.1 KB · Views: 560
Is everyone just using different inserts to hold the case in the coil and on top of the trap door? I have mine up and running great, the only thing I have left to do is figure out the trap door.
 
Is everyone just using different inserts to hold the case in the coil and on top of the trap door? I have mine up and running great, the only thing I have left to do is figure out the trap door.

On mine I just drilled the center of the wooden block for the specific caliber. If I need a new caliber I’ll just drill a new block appropriately.
 
On mine I just drilled the center of the wooden block for the specific caliber. If I need a new caliber I’ll just drill a new block appropriately.
I thought about doing that, I was just trying to figure out how to do that without having to reset the height on the solenoid for each case length also.
 
I gave the 3/16" x .75" id coil a test and with the 48v supply running at 39v it is not tripping with .308 and .260 Lapua brass. 204 Ruger brass and .223 is also working well. Now that is is working with my 12.5a current limit I can try raising the voltage and tempilaq testing to get each case dialed in and logged.
 

Attachments

  • IMG_20191122_203528970.jpg
    IMG_20191122_203528970.jpg
    319.5 KB · Views: 863
  • IMG_20191122_203926455.jpg
    IMG_20191122_203926455.jpg
    480.4 KB · Views: 918
  • IMG_20191122_203945487.jpg
    IMG_20191122_203945487.jpg
    512.8 KB · Views: 947
The missing link in my reloading process. also thinking of an auto feeder system for it.
 
Looks great! With that much power supply you should have a lot of flexibility. Is your coil staying relatively cool? I ran my 1/8” coil for minutes straight and it always remained relatively cool. With the flow rate you have with the 3/16” I would expect the same.
 
It does stay nice and cool with both 3/16 and the 1/8 coils.
 
It’s been a while since this thread was active but I thought I’d share a subtly that could be useful for some.

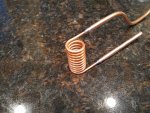
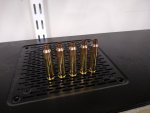
I recently picked up some class Z minus pin gauges from McMaster Carr for my 223 brass. My reloading flow is anneal, SS tumble, FL SB resize without expander ball, mandrel, corn cob polish, trim, load. What I noticed after using the .223 mandrel is that the .222 pin would enter as expected but then would hit a hard stop at the neck/shoulder boundary. This was across an entire batch of brass. I ran some brand new brass pieces of the same lot through the same flow (minus the annealing) and the same pin would pass like it should with not a hint of hang up at the neck/shoulder boundary.

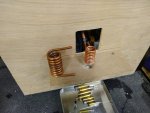
My target Tempilaq temperature is 1000F across the neck and shoulder regions. I started increasing the annealing time in 0.1s increments on the remaining fired pieces and found that a slight increase in annealing time completely eliminated the hard stop conditioning with the pin. Going too far and the pin would have little to no drag (ie. over annealed). This was all done at 26V. The optimum anneal would transition the 1000F Tempilaq about an 1/8” below the shoulder.

I then bumped the the supply to 28.5V and was able to achieve the same proper annealing at the neck/shoulder boundary in less time and with the Tempilaq transition right at the shoulder edge.

Summary of all of this...

- get some class Z minus pins appropriate for your brass if you are induction annealing and make sure the neck/shoulder boundary is consistent with the rest of the neck. New brass is consistent. If it hangs up you aren’t annealing that area sufficiently. The whole reason I stumbled upon this is my last outing had erratic velocities using a brand new FX-120i scale. I knew it wasn’t charge variance and everything was the same as far as process. I thought I was over annealing but that wasn’t the case.

- Don’t assume one setting (voltage/time) is appropriate for a given caliber. As your neck thickness decreases over time you may need to tweak the time. Different lots of brass may need to be tweaked. Tempilaq alone is not adequate. You need a pin to know the bullet has consistent tension across the bearing surface. The pin drag between new brass and your fired brass of the same lot should be comparable.

- I’ve stated this before but 750F is not the target temp here. You have to get around 1000F to achieve any annealing whatsoever. You will see a brief glow of the neck and shoulder and that is 100% OK. It doesn’t last long enough to impact the case body.

- If you want to know what over annealed is run a piece or two of brass a second longer and check with the same pin you use for the properly annealed brass. It will about fall through all on its own. The neck will have had no spring back.

The devil is in the details. I’m glad I had to chase this one down as it is something you wouldn’t catch by Tempilaq alone. An arbor press with pressure gauge might have caught it.

Tim
 
I put together an induction annealer based on the ginaerick design. My current coil is 4mm 8 turn 29.6mm ID.
I have found that the cases necks will start to glow before the 750F tempilaq indicates that the case neck & shoulder have reached that temperature.

For instance using hornady 6.5 creed cases, the annealer at 45v @ 10.7A it takes 5.6 seconds to get the 750F tempilaq indication 1/8" below the shoulder. I tested the same brass starting at 4.7 seconds to 6.0 seconds in 0.1 second increments.
The cases started to display a mild glow at 4.9 seconds and at 6.0 seconds they were glowing pretty good.

The necks glowing happens so fast and for so short a time that even in the dark it is hard to pick up, but if you video tape the annealing (in the dark) you can see the color change (glow). Try it for yourself.

Now as far as 1000F I would not disagree as I was SBA at 1050F. The thing is that with SBA the target temperature cannot be exceeded where with the induction annealer you are heating so fast by the time the tempilaq changes color (a chemical reaction to heat) has the brass exceeded the 1000F temperature and if so by how much.

I am making a shorter coil (7 turns) to see if it will concentrate the heat better than a taller coil.
 
The proper coil size is a function of coil diameter, number of turns, and diameter of the copper itself. The closer the coil diameter is to the diameter of the brass the more efficient it will be. The number of turns and diameter of the copper will dictate the inductance. This in turn combined with the capacitors will dictate the resonant frequency. I believe my resonant frequency measured out around 120 kHz. Too high and you will lose efficiency.

Short of paying for a metallurgy lab to analyze samples you have to test indirectly with the pins. It is very obvious with proper pin gauges when you have it dialed in correctly. Even if the temperature goes past 1000F it doesn’t mean you’ve over annealed. It’s all about time duration at that point. If it was only about peak temperature our brass would come out or the chamber annealed but it doesn’t. The temps are too brief. The advantage of induction annealing is you have a timer that is down to the tenth of a second and is repeatable. The brass will drop below annealing temps very quickly. Manual flame and salt simply can’t achieve the resolution on time needed to hit the right window. Glow present or not is worthless as a determination of proper annealing temp/time.
 
Last edited:
I'm surprised nobody has reverse engineered or even questioned just how the Aztec mode analyzes the brass for the "perfect" anneal.
 
@TSloper Another issue is the Tempilaq itself, directions state that it will liquefy at the target temperature but the 750F tempilaq just turns black and becomes waxy. How does the 1000F Tempilaq work as far as indicating target temp.
 
@TSloper are you using a bushing die? Why isn't the mandrel taking care of the tight spot?

No, I'm using a RCBS FL SB die without the expander ball. The mandrel is a 21st Century SS mandrel and made a huge difference in neck runout over the expander ball. The mandrel does take care of that spot when the mandrel is in the neck. However, the hardness of the brass is greater there at that junction than the rest of the neck and is springing back when the mandrel is removed. This brass had 4-5 firings and was annealed each time so I know that my annealing was not adequate. It was close but not close enough as indicated by the hard stop of the pin gauge at that location. The pin should pass with a light drag. To get it to pass I would have had to put considerable force on it. I tested multiple pieces of that same batch after tweaking the annealing time/voltage and they all passed the pin correctly with a drag comparable to brand new pieces of the same lot sized the same way (minus annealing).

As I mentioned in an earlier post... it is obvious when you have over annealed the neck. The same pin gauge that drags correctly on new brass will basically fall through on an over annealed neck after being run through the mandrel phase. The springback is gone which is not what you want.
 
Last edited:
  • Like
Reactions: skotydontno
@TSloper Another issue is the Tempilaq itself, directions state that it will liquefy at the target temperature but the 750F tempilaq just turns black and becomes waxy. How does the 1000F Tempilaq work as far as indicating target temp.

The 1000F Tempilaq has a brownish pinkish hue when it dries. When it transitions it does not turn black but it is definitely obvious where it transitioned and where it didn't. The 900F is white. I started with 750F originally but after reading as much as I could on C26000 brass I now believe 750F to be completely inadequate at the time scale we are working with when induction annealing.
 
Gotcha, I'm going to order a pin gauge now, I believe this might have been happening with my 6BRA. I may need to redo my coil, I dont remember the exact specs but iirc its a 4mm 7 turn, its pretty short.
 
Gotcha, I'm going to order a pin gauge now, I believe this might have been happening with my 6BRA.

For my 223 I ordered...

0.2200"
0.2205"
0.2210"
0.2215"
0.2220"
0.2225"
0.2230"
0.2235"

minus (NoGo) Class Z

I'm still waiting for the 0.0005" variants to arrive.

Tim
 
  • Like
Reactions: skotydontno
For now im looking at getting all the ones from 0.2410-.2430". Are the 0.0005 taking quite a bit longer to get?
 
For now im looking at getting all the ones from 0.2410-.2430". Are the 0.0005 taking quite a bit longer to get?

I haven't called McMaster to see what is going on but I suspect they don't keep the 0.0005" on the shelves. 0.0010" should be more than adequate for verifying the annealing compared to new pieces of brass of the same lot.
 
  • Like
Reactions: skotydontno
Two words: dwell time. Increase to minimize spring back.

I ran some new brass I fired today and checked with the pin gauge. Literally 0.1 seconds made the difference between under annealed and just right on the tension/drag of the pin compared to a new piece of sized brass.

This is peak glow. The entire glow phase is about 0.4 seconds.
 

Attachments

  • 01D7FDA4-2136-4D63-AA29-574E46EAE508.png
    01D7FDA4-2136-4D63-AA29-574E46EAE508.png
    1.9 MB · Views: 640
Figure it couldn't hurt to cross-link related material here: http://forums.accuratereloading.com/eve/forums/a/tpc/f/2511043/m/5931089822

I know this guy. He's been playing with a variety of these DIY annealers but more on the tank circuit/work coil end and less on the timer/control part. He's had a few custom circuit boards printed to accommodate his designs. I have one of his "manual" annealers and I've stress-tested the blazes out of it and have run thousands of cases through it without any failures. They're very compact and have been used on everything from .22 Hornet to .700 Nitro Express. Typical power draw is around 600w on a 24vDC supply, though larger cases (WSM/PRC etc.) draw the most current.
 
@TSloper Question, how about some type of non contact temperature detection. I guess IR or laser.
If you can point it at the case neck and get back accurate data we could throw our smelly tempilaq away.
 
I have found that an IR thermometer is not reliable for this measurement. They do not work well on reflective surfaces. They also do not have a pinpoint measurement location, but more of a cone that gets larger as the sensor gets further. All of that combined with the extreme speed that the brass heats and then cools gives poor results for this specific job.
 
The temperature measurement itself is irrelevent. You just want a consistent condition to turn the annealer off at the appropriate time. Calibrate with tempilaq, just like you would with a timer, and anything you put in the coil that hits that temperature should turn off the work coil.

 
The temperature measurement itself is irrelevent. You just want a consistent condition to turn the annealer off at the appropriate time. Calibrate with tempilaq, just like you would with a timer, and anything you put in the coil that hits that temperature should turn off the work coil.


Use 1000F Tempilaq not 750F as it isn’t high enough. Also, I'm finding stopping the timer exactly when the Tempilaq converts is not always sufficient. After my second firing of 223 I had to add 0.2 seconds to bring the brass back to close to new on neck tension and shoulder setback. Unless you anneal sufficiently from the start the work hardening will be additive over time and will require a slightly longer anneal time. Fortunately it only takes a sample or two each firing to dial it in if needed. This is quite the learning process. The metallurgy literature out there is lacking in the realm of flash annealing cartridge brass.
 
Last edited:
This still working out? Any changes from your original parts list?

I'm looking at putting one together.
 
This still working out? Any changes from your original parts list?

I'm looking at putting one together.

Mine is still doing well although my parts are a bit more crude. It's an awesome project that yields consistent results. For now I have decided to skip the auto feed as it doesn't take long to do the low volume that I am loading.

For my specific build my main change would be that I did not get a power supply with enough current capacity. I have 600w on tap but only 12.5a max. It will trip if I put too much of a larger case in the coil. I have found the sweet spot is to run it at minimum voltage, about 39v. I should have gone with a 48v 20a supply from the start.
 
  • Like
Reactions: 2aBaC̶a̶
Got mine up and running. Need to mount it in some kind of computer case. Il lwait til I find one for cheap/free in a while. I played around with it til I got a 308 case to barely glow in the dark for about .2 seconds. I need some 1k°F tempilaq as described earlier.

It seems that the 750 stuff crosses the liquid point straight to burnt very rapidly.

Also, I figured out why you water cool these things. The coil got pretty toasty while I was testing things out. Not going very fast at all, but I'm going to get something to pull the case out of the coil with. Or drop it straight through the board into some water.

Thanks for the idea Sloper
 
Last edited:
My experiance with the 750 tempilaq has not been without issues, trying to decipher the change of solid to liquid state seems almost impossible.
 
I'm going to try and put mine in a 50 cal can I don't like having it all exposed. A few computer fans and hopefully it stays cool that way. May water cool the coils later, not sure yet


20200225_144028.jpg