Join the Hide community
Get access to live stream, lessons, the post exchange, and chat with other snipers.
Register
Download Gravity Ballistics
Get help to accurately calculate and scope your sniper rifle using real shooting data.

Install the app
How to install the app on iOS
Follow along with the video below to see how to install our site as a web app on your home screen.
Note: This feature may not be available in some browsers.
You are using an out of date browser. It may not display this or other websites correctly.
You should upgrade or use an alternative browser.
You should upgrade or use an alternative browser.
Building the Perfect Reloading Room
- Thread starter sirhrmechanic
- Start date
Orkan,
Did you use any of the pine with the beetle infestation.
I saw a kitchen done with that wood and thought it looked awesome.
Yup. If you look closely at my walls and various things, you can come across a beetle track here and there. Not sure if it's due to the beetles, but there's blue streaks all throughout too. So much character. I love it!
I think my favorite thing about the pine is that there can be cracks, holes, dings, and knots everywhere and it just adds to the look! Obviously the pieces used for trim and what not were a little more "selected," but as a whole, working with knotty pine is so easy because the more F'd up it is, the better it looks! I think that's what makes it so fun to work with.
That is incredible. I thought I was getting ready to build a cool space, but now its shit.
Don't low-rate your plans. There are some reloading areas in this thread (and a few that we lost when Scout augered-in) that are first rate and in really small areas.
The thing that has been great about this thread are the fantastic little details from so many people's builds that can translate into a giant room... or a small cubby-hole.
You can see what I've lived with for a reloading area on an earlier page. Now THAT's sh**...
Any space you have can be made amazing with a little work. And the smaller the space, the more creativity you can put at it.
Post your space and thoughts! I am sure there are some folks here who can help you make it as good as anything out there.
Cheers,
Sirhr
Ill be perfectly happy with what I am building as it will be 10x better than anything I have ever had, it was just more of compliment to how much space/ time/ dedication some of you guys commit to shooting. Its pretty badass.
So many awesome ideas in this thread, Im definitely stealing some and drawing up plans for a new bench with some inline fabrications accessories. I'll post up when I eventually get around to building it
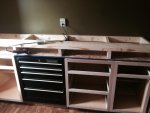
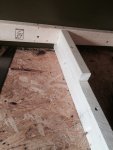
Just finished my bench. Wish I could have a complete shop as above, but no room, yet. The top is 96"x36"x2" and the base is 84"x30"x37". Giving a nice 39" height. I inlet the top for the T track. I really like that as I can move and adjust the presses if need be. I wanted to use a quick release wing nut setup, but order the wrong size. So I'll just stick with
Attachments
-
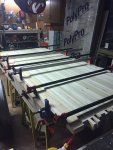 photo56269.jpg82.7 KB · Views: 938
 -
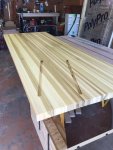 photo56270.jpg82.4 KB · Views: 942
 -
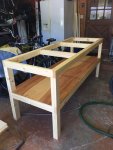 photo56271.jpg74.2 KB · Views: 912
 -
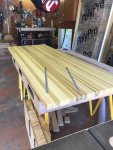 photo56272.jpg77.9 KB · Views: 946
 -
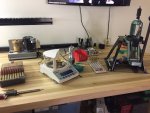 photo56273.jpg82.2 KB · Views: 1,006
 -
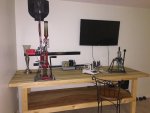 photo56274.jpg62.8 KB · Views: 980
 -
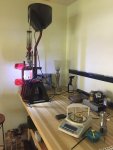 photo56275.jpg71.5 KB · Views: 959
 -
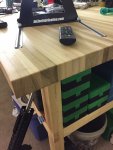 photo56276.jpg81.9 KB · Views: 901
 -
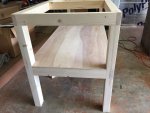 photo56277.jpg78.1 KB · Views: 930
MPK, great bench there! I was going to do something similar, but got lazy and just layered up 3" of plywood and threw some formica on top. ")
Big thumbs up to Dan @ Inline Fabrication. Lot's of guys benches are cleaned up and running sweet thanks to his innovations. If you guy's haven't seen it, have a look at the review on his stuff I did recently.
http://www.primalrights.com/reviews/inline-fabrication
Big thumbs up to Dan @ Inline Fabrication. Lot's of guys benches are cleaned up and running sweet thanks to his innovations. If you guy's haven't seen it, have a look at the review on his stuff I did recently.
http://www.primalrights.com/reviews/inline-fabrication
MPK, great bench there! I was going to do something similar, but got lazy and just layered up 3" of plywood and threw some formica on top.
Big thumbs up to Dan @ Inline Fabrication. Lot's of guys benches are cleaned up and running sweet thanks to his innovations. If you guy's haven't seen it, have a look at the review on his stuff I did recently.
http://www.primalrights.com/reviews/inline-fabrication
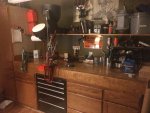
Thanks. some of it was a woodworking project, as I wanted to try a glued up laminate top. I really like the look of it. I am building a set of cubbys for my bins of brass and some storage for powder and bullets. Then I plan on building a "blanket chest" to house my range bags. One it will be a fun project to build, and two it will keep my range bags out of the corner of the room, so hopefully clean things ups some. I really like your tool mounting solution for the Giraud trimmer, so I may build something like that if you don't mind me copying your design.
I do like the inline fab mounts. and the one with the single stage is the quick change so I can mount other stuff in that area if necessary. I have a "woodworking" vice coming as well. I saw the guys at Exodis rifles (Joe Walls) using them. they glued some leather to a piece of wood that they mounted on the vice jaws. it works great for being able to grab onto barrels to work on actions/triggers and the like without messing up the barrel. and then just pull the wood off (i'll attach a magnet to the other side) and be able to clamp onto AR tools or whatever else I need. much nicer to do all of that in the AC down here in FL.
Just finished my bench. Wish I could have a complete shop as above, but no room, yet. The top is 96"x36"x2" and the base is 84"x30"x37". Giving a nice 39" height. I inlet the top for the T track. I really like that as I can move and adjust the presses if need be. I wanted to use a quick release wing nut setup, but order the wrong size. So I'll just stick with
Very nice!
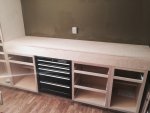
In a somewhat marathon day... I got all my benches and most of my shelves in today. Ran out of lumber before completing the shelves. But most of the reloading side of the room is done, even including trimming window and door. I'll urethane the benches with their first coat of satin tomorrow. No stain. Just going to put on urethane -- a couple of coats of clear satin. And let them keep their natural Luan color.
I may start moving stuff in before I build the last couple of shelves/racks. As I get things sorted out, I think I will have a better idea of how I want to arrange some last shelves.
I don't think I am going to set up all my presses. But I am going to put in one dedicated to priming. And a modified one I have with a very long lever, a BMG press and a standard single-stage. Then the two progressives. Before I put them in, though, I am going to cut a bunch of pieces of 1/8" steel to use as backers for the bolts that will hold the presses down. That will ensure they will be solid on the benches.
Pictures coming tomorrow as I try and get the floor into the other side... But it's getting really close to being done! Can't thank all you guys enough for the input and ideas.
Then off to Lowes to get my hydraulic workstool and if I get into Best Buy... a nice TV for the wall! Though I think I may just use a cheap tablet on a speaker set. Lets me move it around.
Cheers,
Sirhr
So here is where I was in Feb....

A long way to go....
But as of this morning, things are definitely looking up!
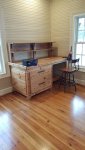
Here is what will be the office/model shop/mini-machine shop.

Need to replace one window, do the floors and the benches, etc.
But if you go through the door on the right... you get to the reloading room. As of these pictures, the urethane on the benches is drying. Two more coats, I think.

The benches are solid core doors on 2 x 6's and 4 x 4 cedar beam feet. They are all glued and screwed together. The only thing that will dismantle this place is fire. Because tools and implements of destruction will have no effect. These benches are simply not going anywhere.

Another view of the benches. I may put another shelf or two at the back of the main bench. But I also have a 'Wurth' bin set which has a bunch of cubby's. And I may use that for holding small items and some of the little goodies. And I have to put in another free-standing pine shelf under the window to hold powder.

I did all the benches and shelves yesterday. Did I mention... marathon session? My old oak desk, BTW, I bought in North Carolina in the late 1980's and stripped/refinished. It was a dog when I got it. Now it follows me around. I think this will be its final resting place. It will be a great desk for the reloading room. Pegboard above it will hold tools.
More to come as I start to populate it with presses and supplies! But I am pretty happy with it.
Cheers,
Sirhr
A long way to go....
But as of this morning, things are definitely looking up!
Here is what will be the office/model shop/mini-machine shop.
Need to replace one window, do the floors and the benches, etc.
But if you go through the door on the right... you get to the reloading room. As of these pictures, the urethane on the benches is drying. Two more coats, I think.
The benches are solid core doors on 2 x 6's and 4 x 4 cedar beam feet. They are all glued and screwed together. The only thing that will dismantle this place is fire. Because tools and implements of destruction will have no effect. These benches are simply not going anywhere.
Another view of the benches. I may put another shelf or two at the back of the main bench. But I also have a 'Wurth' bin set which has a bunch of cubby's. And I may use that for holding small items and some of the little goodies. And I have to put in another free-standing pine shelf under the window to hold powder.
I did all the benches and shelves yesterday. Did I mention... marathon session? My old oak desk, BTW, I bought in North Carolina in the late 1980's and stripped/refinished. It was a dog when I got it. Now it follows me around. I think this will be its final resting place. It will be a great desk for the reloading room. Pegboard above it will hold tools.
More to come as I start to populate it with presses and supplies! But I am pretty happy with it.
Cheers,
Sirhr
That's looking great. One thing I didn't catch months ago that I just noticed: how'd you "get away with" not having headers above those windows?
The windows are in a curtain wall.... no load there. The barn is all carried by huge beams and the wall with the windows has no load on it at all. And get away with? Vermont in the 1970's? Boowah ha ah ahha ah ahah ah haa......
As for today, there is no problem with loads. This place is so over-built as to be practically Meteorite-proof. But building codes? Seriously? In rural VT in the '70s?
Cheers,
Sirhr
P.S. I'll add that even now, the headers may not have two 2x dimensionals... but does have screwed/glued boards as part of the cosmetics. No sheetrock or vinyl siding on pressboard here. All real lumber, screwed and glued. Did I mention that this place won't come to the ground except by fire? ;-)
I also just put a beam in the lower level to remove a few columns. W14... This barn was built to hold 40 tons of hay every fall. Two tractor-trailer loads. I know, because as a kid, I was the one who had to unload the truck and put the hay in the attic. The area you see walled off and turned into reloading room and model shop... is 1/3rd of the area that was designed to take 2 side-by-side tractor trailer loads of winter horse hay. If that didn't bring the place down... a reloading room and single headers over windows... ain't a problem. Though big city building code inspectors may whine about it. That's why I have a backhoe and a chipper.
Awesome. From that pic I couldn't tell. You've got to love the old buildings where over-building was the only way to do things.
Thanks for the enjoyable journey Sirh! It's looking great, and I have to admit, I'm jealous. Really nice, and I can appreciate all the hours of work. I've been there.
Those old structures are built hell for stout! Do you happen to have a picture of the exterior of the building that you're ok with posting? I'd love to see it.
Those old structures are built hell for stout! Do you happen to have a picture of the exterior of the building that you're ok with posting? I'd love to see it.
No pictures... but 4 trips with the pickup later.... most of the stuff is down there. One more trip. Full disclosure... I was carrying small loads, mostly a 'tailgate full' and not a full bed. But damn I have a lot of reloading stuff!
Need a few more Akro bins.... But the room is coming together brilliantly. I think by the end of next weekend, I'll have everything set up and I'll be ready to dial in the progressive presses.
Still have to finish the 'other side' with floor, benches, shelves and trim. But it's all coming together! Pictures when it's neat and tidy!
Cheers,
Sirhr
This thread is a goldmine. Buying a house in a few weeks, and once I'm done fixing it up for the impending baby, I'll be scheming the backyard shop. Y'all are making me all fidgety to get going on it.
Well funny you should ask that... because this afternoon (other than moving in a few things), I finished the reloading room! I even 'timed' the Dillon's for 9mm and .223. And sized about 200 .50 BMG's, primed 100... and got them ready for loading on the big press!
Not sure why the pictures are so washed out... must be sawdust on my phone lens!
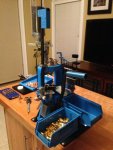
 My two progressives. A Square Deal B and an RL550B. The bins under the Square Deal are full of links, BTW. Note Snipers Hide on the phone/video player Vibrator (corn) is under the bench with separator. Vice is for... whatever. Machinist vice. Goes every direction. Extra one I had lying around.

Showing my stainless tumbler and more presses. The long-armed one is a Herters that I got from a 'Hider, but I added 18" to the handle by welding on an extension and a buttress to make a very powerful press. The body of this monster will let me resize .300WM and similar with little effort. One of the guys either above or on Scout gave me the tip on the Kobalt stool. And isn't that the
tits as far as a place to reload. Best investment ever!

All the presses. The Bonanza at the end (red one) is my first press, bought at age 18.... when I started reloading. I can't count how many rounds I've loaded on that press. Now it's my 'priming' press and runs an RCBS strip primer. Those strip primers are absolutely fantastic! A bit of time to get them up and running smoothly. But they are great. Though I am looking at a 'metered' primer tool for precision rounds. There are some interesting options out there. Steel pin tumbler on the right. Boolits, cases and primers on shelves at the back right.

Sucks that this picture is so washed out... But shows all the presses and the pegboard of tools. I went to eBay and spent about $100 to buy some 'dedicated' reloading shop tools that will never leave the place. Allens, adjustable wrenches, screwdriver set. But my barrel wrench, linkers, AR-tool, etc. all hang here.
I am still making some small shelves and little racks. Things like my Little Dandy Powder Measure rotors, etc. May do something for Dillon dies as well. I am going to get a couple more cal conversions soon for the Square Deal and more dies for the 550.
But, basically I am done! And I even turned out some BMG cases today.
I still have to do the other side of the project -- the mini-machine shop. That should be done next weekend. As I got the floor down this weekend. I have to do the benches and window/door trim. But it's about done. Then I can start reloading! I can't wait to work in a space that is not cramped, full of trash and kindling wood... and smelling like cat piss. This is an absolutely dream space for my reloading. I am over the moon pleased with how it came out.
And am really happy to have shared with folks here... and more importantly picked the brains of so may who did amazing stuff that gave me the ideas! So hopefully this is just one of the many reloading spaces/rooms that folks will post here and will help others. And even help me improve mine!
Cheers and, again, thanks to all who contributed. This was an amazing group effort.
Sirhr
P.S. I have some more bins coming for under benches. And need about 30 more ammo cans... for finished product! So probably some more pictures to come...
Not sure why the pictures are so washed out... must be sawdust on my phone lens!
Vibrator (corn) is under the bench with separator. Vice is for... whatever. Machinist vice. Goes every direction. Extra one I had lying around.
Showing my stainless tumbler and more presses. The long-armed one is a Herters that I got from a 'Hider, but I added 18" to the handle by welding on an extension and a buttress to make a very powerful press. The body of this monster will let me resize .300WM and similar with little effort. One of the guys either above or on Scout gave me the tip on the Kobalt stool. And isn't that the
tits as far as a place to reload. Best investment ever!
All the presses. The Bonanza at the end (red one) is my first press, bought at age 18.... when I started reloading. I can't count how many rounds I've loaded on that press. Now it's my 'priming' press and runs an RCBS strip primer. Those strip primers are absolutely fantastic! A bit of time to get them up and running smoothly. But they are great. Though I am looking at a 'metered' primer tool for precision rounds. There are some interesting options out there. Steel pin tumbler on the right. Boolits, cases and primers on shelves at the back right.
Sucks that this picture is so washed out... But shows all the presses and the pegboard of tools. I went to eBay and spent about $100 to buy some 'dedicated' reloading shop tools that will never leave the place. Allens, adjustable wrenches, screwdriver set. But my barrel wrench, linkers, AR-tool, etc. all hang here.
I am still making some small shelves and little racks. Things like my Little Dandy Powder Measure rotors, etc. May do something for Dillon dies as well. I am going to get a couple more cal conversions soon for the Square Deal and more dies for the 550.
But, basically I am done! And I even turned out some BMG cases today.
I still have to do the other side of the project -- the mini-machine shop. That should be done next weekend. As I got the floor down this weekend. I have to do the benches and window/door trim. But it's about done. Then I can start reloading! I can't wait to work in a space that is not cramped, full of trash and kindling wood... and smelling like cat piss. This is an absolutely dream space for my reloading. I am over the moon pleased with how it came out.
And am really happy to have shared with folks here... and more importantly picked the brains of so may who did amazing stuff that gave me the ideas! So hopefully this is just one of the many reloading spaces/rooms that folks will post here and will help others. And even help me improve mine!
Cheers and, again, thanks to all who contributed. This was an amazing group effort.
Sirhr
P.S. I have some more bins coming for under benches. And need about 30 more ammo cans... for finished product! So probably some more pictures to come...
Sir you've done a helluva job there. Totally impressed with the entire set up. I'm certain the pics are not doing it justice unfortunately. I'm telling ya, I'd have a recliner and a cot in there and camp. Thanks for sharing this experience buddy.
The handloading room looks excellent!
WRT washed out photos, did you stitch together these pics as panoramas? Regardless, if you have software for editing, try adding saturation and contrast (balance with brightness) and they should pop.
WRT washed out photos, did you stitch together these pics as panoramas? Regardless, if you have software for editing, try adding saturation and contrast (balance with brightness) and they should pop.
The washout was that I had my camera phone set on some wide angle outdoor setting... and it really FUBAR'd the picture. So here are some better ones....

[IMG2=JSON]{"alt":"Image may contain: indoor","data-align":"none","data-size":"full","src":"https:\/\/scontent-iad3-1.xx.fbcdn.net\/v\/t31.0-8\/18739268_1161140254032620_4029476329928199879_o.jpg?oh=a3042e6fe6d42f5e4b824f0de7e605ef&oe=59A950A2"}[/IMG2]


Cheers,
Sirhr
[IMG2=JSON]{"alt":"Image may contain: indoor","data-align":"none","data-size":"full","src":"https:\/\/scontent-iad3-1.xx.fbcdn.net\/v\/t31.0-8\/18739268_1161140254032620_4029476329928199879_o.jpg?oh=a3042e6fe6d42f5e4b824f0de7e605ef&oe=59A950A2"}[/IMG2]
Cheers,
Sirhr
Some really nice setups in here. Sirhrmechanic... major space envy going on over here And very organized, love it!
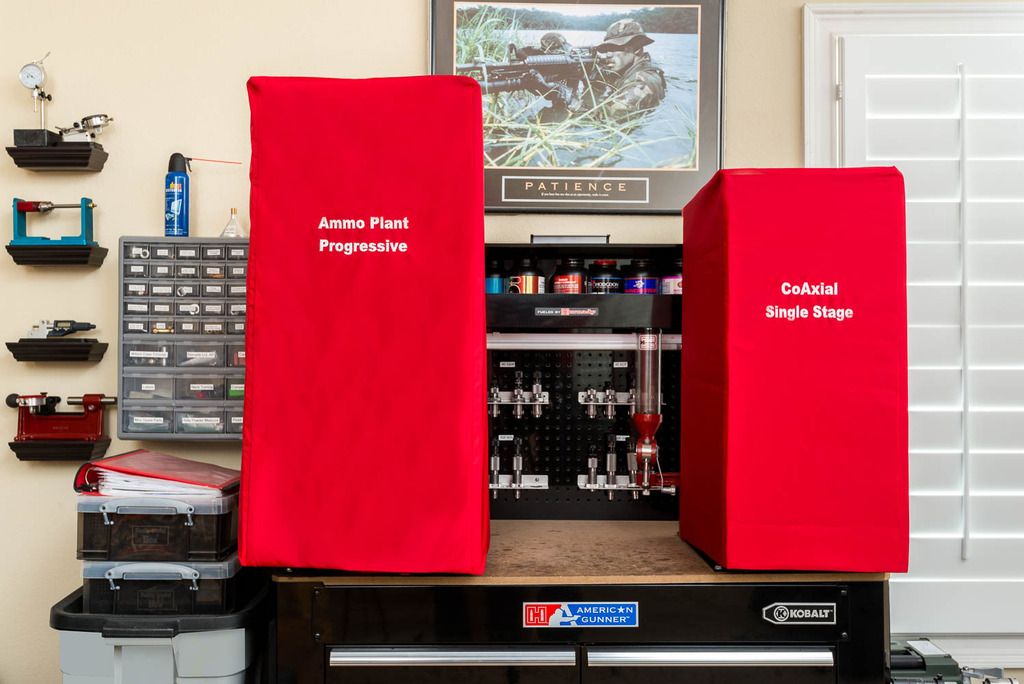
Unfortunately I have been relegated to a 10 foot space in my office, so I had to be creative and organized to fit everything. My saving grace has been the Inline Fab mounts & die mounting brackets. All of my presses, vises, and tools have custom plates so I can switch back and forth with ease. I also have a touch of OCD, so everything has a specific place & has to be labeled. Here is what I am working with:
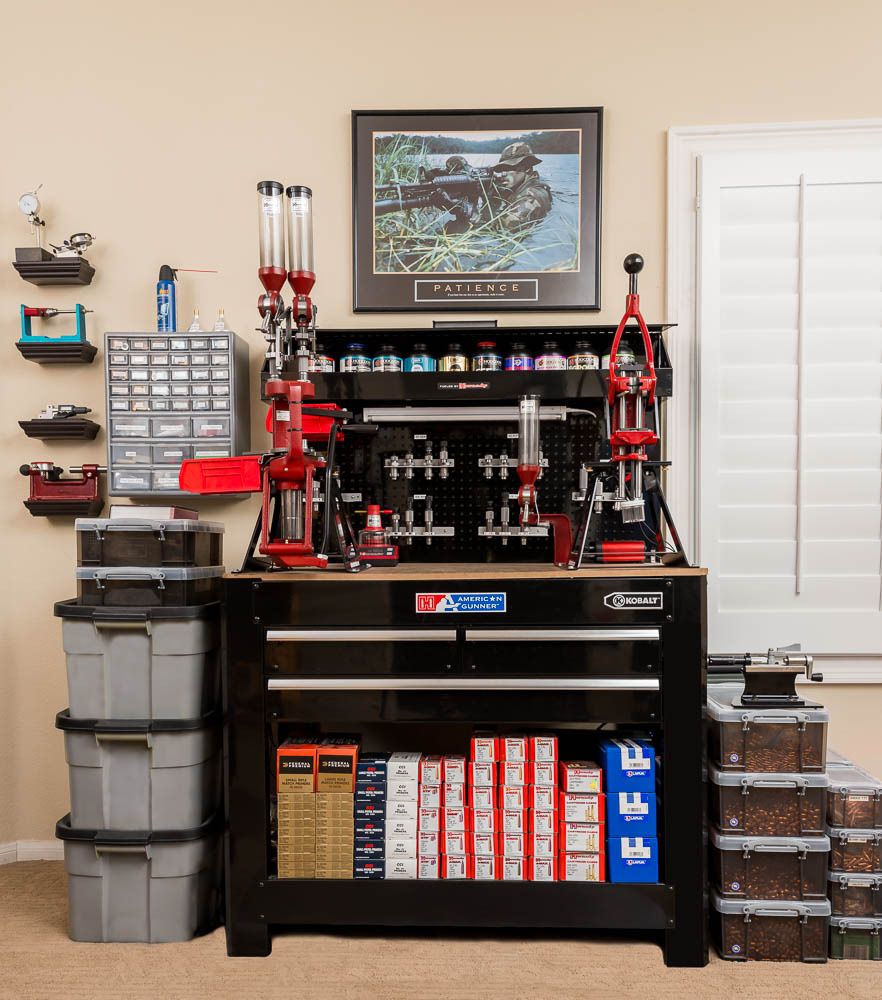
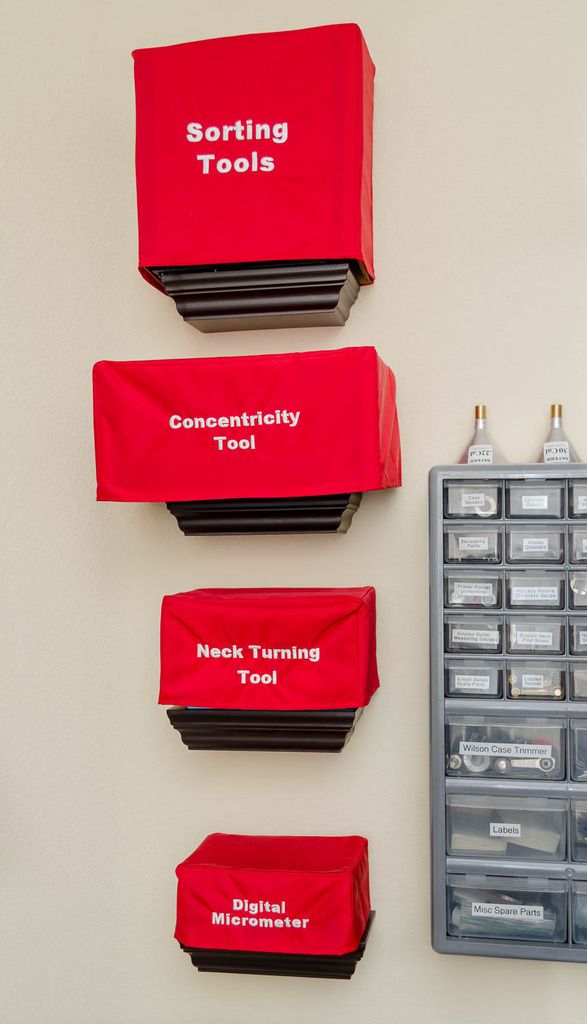
And just because I like to waste money on reloading crap, I had custom embroidered cases made:
And very organized, love it!Unfortunately I have been relegated to a 10 foot space in my office, so I had to be creative and organized to fit everything. My saving grace has been the Inline Fab mounts & die mounting brackets. All of my presses, vises, and tools have custom plates so I can switch back and forth with ease. I also have a touch of OCD, so everything has a specific place & has to be labeled. Here is what I am working with:

And just because I like to waste money on reloading crap, I had custom embroidered cases made:


Now that.s way better Sir. Excellent my friend. You got it going on big time and everybody wants to know your name, get it?
Mike, I've seen your setup a number of times and every time I see it I'm like damn, that guy makes it work. And it looks awesome as well. Very nice job. Go with what ya got, bottom line.
Mike, I've seen your setup a number of times and every time I see it I'm like damn, that guy makes it work. And it looks awesome as well. Very nice job. Go with what ya got, bottom line.
Some really nice setups in here. Sirhrmechanic... major space envy going on over here
Unfortunately I have been relegated to a 10 foot space in my office, so I had to be creative and organized to fit everything. My saving grace has been the Inline Fab mounts & die mounting brackets. All of my presses, vises, and tools have custom plates so I can switch back and forth with ease. I also have a touch of OCD, so everything has a specific place & has to be labeled. Here is what I am working with:
And just because I like to waste money on reloading crap, I had custom embroidered cases made:
Mike, you take OCD to a new level
. Seriously though, that is really nice! The washout was that I had my camera phone set on some wide angle outdoor setting... and it really FUBAR'd the picture. So here are some better ones....
[IMG2=JSON]{"alt":"Image may contain: indoor","data-align":"none","data-size":"full","src":"https:\/\/scontent-iad3-1.xx.fbcdn.net\/v\/t31.0-8\/18739268_1161140254032620_4029476329928199879_o.jpg?oh=a3042e6fe6d42f5e4b824f0de7e605ef&oe=59A950A2"}[/IMG2]
Cheers,
Sirhr
Sirh, your hard work and time certainly has paid off. That's incredible!
All I have to say is Wow! Y'all have some great stuff. Here is my humble setup.

Sent from my SAMSUNG-SM-G890A using Tapatalk
Sent from my SAMSUNG-SM-G890A using Tapatalk
Nothing wrong with that, Houston. I turned out tons of rounds on a single stage Bonanza press that I bought in 1986... for $18.99. And I think my .357 Magnum carbide dies (I shot IPSC at the time.. with a wheelgun) cost me $24.
You can make a lot of very, very nice ammo on a single stage press!
Great setup! And a lot better than I had most of my life!
Cheers,
Sirhr
You can make a lot of very, very nice ammo on a single stage press!
Great setup! And a lot better than I had most of my life!
Cheers,
Sirhr

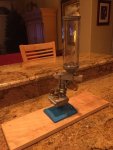
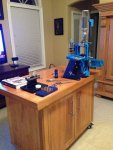
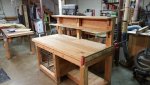
There are some awesome benches here......definitely will flag this for future reference. I wish I had the space in my house in Florida.......makes me miss the basement we had in New Hampshire! I had to build a mobile bench since it gets far too hot in the garage during the summer. This is my bench......sitting in the family room because it is too blasted hot outside!
Attachments

What would you all recommend for wood type to make the top of my new bench?
Im looking at building something that will last. Im thinking it should only take a mild amount of abuse as I use a Lyman cover to protect my bench/firearms when working on them, but also want something that will still look decent after many years of use.
i have pictures from the old site of someones setup that I'm going to try and copy.
Attachments
Hard maple is tough, as is oak, so you can go that way if you want a very durable bench. The downside is cost and especially for maple, it's not the easiest wood to work with. If you use something softer, get an oil-based polyurethane and do multiple coats as it will make the surface tougher. I use it for all furniture.
My gun benches are 3x layered Baltic birch plywood with a hardwood frame around it. I know the plywood is not nearly as durable as solid wood, but I'm worried more about dinging the legs and the edge of the table top and plywood is mucho cheaper.
My gun benches are 3x layered Baltic birch plywood with a hardwood frame around it. I know the plywood is not nearly as durable as solid wood, but I'm worried more about dinging the legs and the edge of the table top and plywood is mucho cheaper.
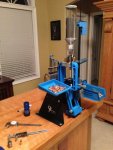
Would 2x sheets of 3/4 plywood be sturdy enough for a reloading bench setup? Press is on a Inline Fabrications Mount.
Some people just use a single 3/4" sheet. It depends in part on how you support it. Lamination experts would tell you to do 3 x 1/2" rather than 2 x 3/4" but I doubt you'd notice the difference. My bench is 3 x 3/4" because overkill.
I have 4 benches in my reloading room that I built. Two were built using 4'x8' sheets of 3/4" Oak glued and screwed to 3/4" MDF to make a rock solid 1.5" thick top. The last bench I built is dedicated for gun building and I took the suggestion of others in this thread and used a 32" solid core door for the top. Its one heavy, rock solid top.
Looks like Im late to the party with the new Photobucket pay for 3rd party hosting of images change so here they are again since they are gone in this thread.
Here's the last bench I built over the winter for gun building with the solid core door top. Now that we are into warm weather I need to get around to staining and getting 8 or so coats of oil poly on it....
[IMG2=JSON]{"data-align":"none","data-size":"full","src":"http:\/\/i.imgur.com\/0N88hRK.jpg"}[/IMG2]

Here's the two benches built previously with the 3/4" Oak and MDF tops
Dillon XL650 Bench
[IMG2=JSON]{"data-align":"none","data-size":"full","src":"http:\/\/i.imgur.com\/M7WIFOK.jpg"}[/IMG2]
[IMG2=JSON]{"data-align":"none","data-size":"full","src":"http:\/\/i.imgur.com\/LtPDD91.jpg"}[/IMG2]
Forster Co-Ax Bolt Gun Bench
[IMG2=JSON]{"data-align":"none","data-size":"full","src":"http:\/\/i.imgur.com\/HJclL8S.jpg"}[/IMG2]
[IMG2=JSON]{"data-align":"none","data-size":"full","src":"http:\/\/i.imgur.com\/w1SLgg0.jpg"}[/IMG2]
Looks like Im late to the party with the new Photobucket pay for 3rd party hosting of images change so here they are again since they are gone in this thread.
Here's the last bench I built over the winter for gun building with the solid core door top. Now that we are into warm weather I need to get around to staining and getting 8 or so coats of oil poly on it....
[IMG2=JSON]{"data-align":"none","data-size":"full","src":"http:\/\/i.imgur.com\/0N88hRK.jpg"}[/IMG2]
Here's the two benches built previously with the 3/4" Oak and MDF tops
Dillon XL650 Bench
[IMG2=JSON]{"data-align":"none","data-size":"full","src":"http:\/\/i.imgur.com\/M7WIFOK.jpg"}[/IMG2]
[IMG2=JSON]{"data-align":"none","data-size":"full","src":"http:\/\/i.imgur.com\/LtPDD91.jpg"}[/IMG2]
Forster Co-Ax Bolt Gun Bench
[IMG2=JSON]{"data-align":"none","data-size":"full","src":"http:\/\/i.imgur.com\/HJclL8S.jpg"}[/IMG2]
[IMG2=JSON]{"data-align":"none","data-size":"full","src":"http:\/\/i.imgur.com\/w1SLgg0.jpg"}[/IMG2]
Last edited:
No reloading room is complete without some ammo can drawers though.


Last edited:
Finally after catching up on farm work, mowing and myriad other projects... finished my first reloading project in the room today.
.14/221 Eichelberger's. Start small, I guess.
Rather than re-type, here is the whole story.
.14/221 Eichelberger's. Start small, I guess.
Rather than re-type, here is the whole story.
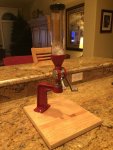
I got to read these pages but for now this is my bench. I use a 2x10 to mount the presses to. Not pictured is I have multiple plates with a mec loader a plate with a vise and blank plates of wood I can screw down to the bench
Attachments
No reloading room is complete without some ammo can drawers though.
Bro, that is positively brilliant, and a badass use of that shop you have. Amazing idea and execution. It's like a Pinterest project for heterosexuals.


where do you get those press stands?
Inline fabrication!
http://www.primalrights.com/library/reviews/inline-fabrication
Thanks.. I was just searching on your website and couldn't find it.. I could have swore I read a review of them a while back.
Similar threads
- Replies
- 66
- Views
- 3K
- Replies
- 103
- Views
- 5K
