Your worst nightmare.
Join the Hide community
Get access to live stream, lessons, the post exchange, and chat with other snipers.
Register
Download Gravity Ballistics
Get help to accurately calculate and scope your sniper rifle using real shooting data.

Install the app
How to install the app on iOS
Follow along with the video below to see how to install our site as a web app on your home screen.
Note: This feature may not be available in some browsers.
You are using an out of date browser. It may not display this or other websites correctly.
You should upgrade or use an alternative browser.
You should upgrade or use an alternative browser.
How to build a Jeep CJ7 bug out vehicle.
- Thread starter Daddyusmaximus
- Start date

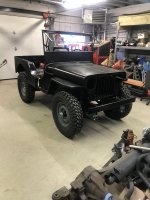
Got the seat bracket back all welded up. They did good. I took in all the pieces I had cut, told them what I wanted, and that's what I got. I'm happy. Should hold up pretty well. I can undo 4 bolts to pull the seat, and sliders, leaving the bottom plate in the tub if need be. Got the army style anti-theft chain welded to the plate so I can run it through the steering wheel and lock it up too. Also got a couple packages in. My shifter, and the brake lines. I'll spare you the unboxing, but will post photos later.


Your worst nightmare.
Fleeing family's car breaks down between two armies
For your average family... with zero military aptitude whatsoever... that has to be an absolute nightmare. I spent a lifetime in uniform, and if I was faced with defending my family against an encroaching army, I would be worried.
Got the pintle hitch finished up, and mounted today. I had to order the plate for the safety chains to maintain that military look. Once I got the bar shortened, (yes BAR, not tube... that's a solid 2" square bar) and drilled a new hole in it (not something you do with just one battery) I put the safety chain bracket on and mounted it up. Much more like an original off a military jeep. Just have to wait for a warm day to paint it. (and the seat bracket) Gives it that proper military look from the rear end.


Then I got to opening my boxes. New brake lines, and a shifter. Hope they fit, and work as planned...


@Daddyusmaximus With your posts in this thread it's always fun playing Find the Dog in the Background. The dog isn't always there but often enough that it is fun to play.
She's always paying attention to what I do... unless I'm doing something noisy like running the grinder. Maybe I'll start paying attention to my photos, and wait till she's in the frame. It'll be like where's Waldo, but "Where's Brandy?"@Daddyusmaximus With your posts in this thread it's always fun playing Find the Dog in the Background. The dog isn't always there but often enough that it is fun to play.
Loving the nice weather. Spent some quality time out in the garage with "two seven" last couple days. Don't have any new parts to slap on real easy, but I did get some stuff done with parts on hand that had been taking way too long to finish. Gas tank for one. I never did finish the process of doing all the chemical treatment required to do the Eastwood Fuel Tank Liner, and couldn't really work with the chemicals out in freezing weather. Here's all the crap required according to the instructions on the bottle. During the process I'm required to flush the tank out with water, so I took the chance to see how many gallons it holds... Just over 17, with some spillage between containers.
Then the liner itself.
Now... instructions say to insert an air hose with it set to 2 to 4 psi. it take 48 hrs to fully dry. OK, this is weird, but I'll do it. Don't want any troubles with a gas tank out in BFE some day. I walk out in the garage next morning. OMG the fumes!!


For those of you playing along at home...

Then the liner itself.
Now... instructions say to insert an air hose with it set to 2 to 4 psi. it take 48 hrs to fully dry. OK, this is weird, but I'll do it. Don't want any troubles with a gas tank out in BFE some day. I walk out in the garage next morning. OMG the fumes!!
For those of you playing along at home...
Next up, paint the newly modified trailer hitch. Rather "Army" looking.

As long as it was spray painting weather, I hit the seat mount with a coat, and mounted the main seat belt. This is a racing belt that came on the '79 CJ5 I got the engine, and axles out of. It has shoulder straps and a anti-dive belt too. Not sure I'll use them. That other Jeep had plastic seats mounted on the cage.


I started looking at the lines I got not long ago. Some of them are very close to the originals.
Front one probably is too, having a Dana 44 from a full size Dodge truck doesn't help matters. It is, however, close enough that I could modify it to work.
The rear... well that's another story. I can't make heads or tails out of what they labeled as the right and left rear axle lines. even IF I had a stock axle. (and a Chrysler 9.25 is NOT) Furthermore what came with is was just hanging from the frame, and calipers... I'll need to make my own here.
By the way... anyone got tips on the power brake set op on a YJ? Neither the '79 CJ5, or the '80 CJ7 I took apart had power brakes. I want to use the power set up that came with the YJ tub. The CJ5 (I got the axles from) has a manual master cylinder, with a Willwood proportioning valve to adjust for the 4 wheel disc conversion.
Started in on what is without a doubt going to probably be one of the more challenging parts of the entire build. The windshield. Now this doesn't seem like a particular interesting part of a Jeep CJ, but I have a certain idea on this I'm gonna try to implement if I can. When you're in a vehicle, it's the driver's seat where you spend all that time. That's why I didn't think twice about going all out on making an old seat from a Mitsubishi Montero fit. Yeah sure, I already had it... but it's also a much newer, and more comfy, and adjustable seat than is normally found in a CJ. The fact that the color is close to what I need was just a fluke, a bonus, a sign that God loves me. (Just kidding. I knew that already.) This CJ7 will get a tilt wheel too. And just what do you look through all those hrs spent driving your vehicle? The windshield of course.
As mentioned before. I am a military veteran, and this is a military tribute build. Regardless of your job (or even branch) if there's any vehicle anyone ever drove in any military service back in my day, (and 28 years covers a lot of days) it was either a Jeep, or a deuce and a half. Damn near everyone drove one, or both of these at one time, or another. Lots of fond memories behind the wheel of a 151 (Jeep) but the deuce was always my favorite for some reason. Big, noisy, and slow... yeah, but also very fun, and pretty capable for it's size and weight given aired down tires, and a good driver.
One real fond memory is cruising down the interstate in convoys with all the civilians waving at us as they drive past. (I did mention they were kinds slow right?) If it was nice weather, I always had the windshield tilted open. No AC, but with 50 mph wind coming in straight at you from under the windshield, it was almost like being on a bike. And with no cupholders... my canteen sat right out on the hood under the glass, the only flat surface available to me.
I want that windshield tilted up feel (and look) for this build. I want to remember those times as I tool down the road in this thing. "Bla, bla... old man living in the past..." The trick is gonna be to make my NOS deuce & a half windshield, fit into where a CJ windshield used to. It only has to be narrowed a couple inches once you get the extra side brackets off, but once done I'll also need to figure out how to do the same to both driver's, and passenger's windshield sides... PLUS figure out a windshield wiper system that mounts from the top... but isn't a stupid vacuum operated deal. Memories aside, I ain't going through THAT anymore. Of course the doors, and my very hard to find old school aluminum top will need to fit...
If I can manage to pull this off without just ending up buying a new Jeep windshield... I'll truly have a one of a kind CJ7.
Forgot what it was like to work outside in 80 degree temps...
I didn't last long today, but I did finally get the fuel tank in for what I hope is the last time.
One step closet to dropping the tub on in any case.

I didn't last long today, but I did finally get the fuel tank in for what I hope is the last time.
One step closet to dropping the tub on in any case.
Nice day. Warm, but not hot. Got a lot of crap cleaned out in the garage. Always leaves blowing in when I'm out there with the door up... and I had about a year or more worth of clutter to clear out of the tub that has been serving as a catch all.

Next was coating the inside of the frame to prevent it from rusting out once I get it all done. Took about a can, and a half.

Next was coating the inside of the frame to prevent it from rusting out once I get it all done. Took about a can, and a half.
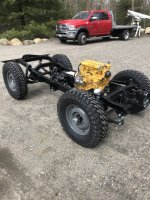
Gave the frame a final coat, and shot the transmission, and transfer case with high temp engine paint as close to the same color as I could find. Once I get the nasty engine out, cleaned, painted, and back in... I can put the tub on, and start on thing like wiring, and pluming. Plan is to have the tub on within the next couple weeks. (God willing)


Outstanding! Thats going to be enjoyable as hell when you take it out.
Took a nap, went out, and set the tub. Gonna make doing the engine harder, but I got impatient. I didn't bolt it down, do I can always lift an end up to make things easier if need be. Besides, I'm real sick of it being on those rickety old saw horses, plus now I have more room in the garage.


How to deal with the whole full size axles sticking out thing.

Sure they're stronger, and they even kinda look cool if your into that sort of thing. However, first trip through the mud, and you get covered. Can't see out your mirrors, got it all over the vehicle, the windshield. If it's nice weather, and you have the doors off... Sweet Lord, what a mess! Same for snow & slush. Well, except you most likely won't have the doors off.
Sorry boys & girls, I'm too old for that crap.
Enter, the trailer fender.

Not 100% on the fronts yet, but I'm thinking just have two sets (yes, I have them) put together for one wider version. This, however will have to be done by somebody at a body shop, or with much better welding skills than mine. Funny how I keep putting off practicing to get better when I need it to be right... lol.
Sure they're stronger, and they even kinda look cool if your into that sort of thing. However, first trip through the mud, and you get covered. Can't see out your mirrors, got it all over the vehicle, the windshield. If it's nice weather, and you have the doors off... Sweet Lord, what a mess! Same for snow & slush. Well, except you most likely won't have the doors off.
Sorry boys & girls, I'm too old for that crap.
Enter, the trailer fender.
Not 100% on the fronts yet, but I'm thinking just have two sets (yes, I have them) put together for one wider version. This, however will have to be done by somebody at a body shop, or with much better welding skills than mine. Funny how I keep putting off practicing to get better when I need it to be right... lol.
Not too hip on working outside when it's ninety-eleven degrees, but had to get something done this week on her. decided to fab up the exhaust stack shrouds. Yes, you read that right... Stacks. That's the red-neck in me coming through a bit sure, but more important, any veteran who's ever driven a Deuce-and-a-half, at some point in the last 50 years can surely identify these things... Difference is this thing has a bit of a hot rod Mopar 360, so it's getting one on each side. They bolt right through the tub at the bottom, then I made a little bracket to hold them at the top.


Not too hip on working outside when it's ninety-eleven degrees, but had to get something done this week on her. decided to fab up the exhaust stack shrouds. Yes, you read that right... Stacks. That's the red-neck in me coming through a bit sure, but more important, any veteran who's ever driven a Deuce-and-a-half, at some point in the last 50 years can surely identify these things... Difference is this thing has a bit of a hot rod Mopar 360, so it's getting one on each side. They bolt right through the tub at the bottom, then I made a little bracket to hold them at the top.
View attachment 7869738View attachment 7869739View attachment 7869740
Good plan!!
Sirhr
Again with the doing what I can with what I have on hand without any new parts... Today I worked a bit on fitting the military radio / sub enclosure to the tub. Mock up looks to be just about right. Probably be putting the finishing touches on that before too long. At least I'm pretty sure I have the stuff I need to do so already on hand, so that's one thing I could get knocked out.


Been spending some time out in the garage last few days. I did get SOME of one order in. My front shocks. No rear shocks, or limit straps yet. I did run into a problem however... I have been using an old Fox Racing 2.0 shock I got used as a mock up. Seems they have changed their design in the last few years. The mock up shock is exactly like the ones I had on my 1999 F-250, and I was expecting this style. My order was shocks that had to fit according to the collapsed, and extended length I need, but the ends are not the same.

Old style fits fine...

New style... yup... ever so slightly... too wide.

As if that's not enough, they upped the bolt size to 9/16. Soooo, I have to drill the holes bigger. If you go back to that first photo you can see the holes are not the same.

Long story short, drilling out these mounts wasn't easy for my little 20v DeWalt, and I had to take a grinder to my bran-new $173 apiece shocks to narrow the bushing sleeve that little bit on each end. In the end, I got them on like e true red-neck.

Old style fits fine...
New style... yup... ever so slightly... too wide.
As if that's not enough, they upped the bolt size to 9/16. Soooo, I have to drill the holes bigger. If you go back to that first photo you can see the holes are not the same.
Long story short, drilling out these mounts wasn't easy for my little 20v DeWalt, and I had to take a grinder to my bran-new $173 apiece shocks to narrow the bushing sleeve that little bit on each end. In the end, I got them on like e true red-neck.
I also did some work with some of the Army parts I have already.
Toolbox will mount over the left rear fender like a sponson box on a tank, and the taillights went on.
Next, fenders came off to be undercoated, and got the first coat of paint.


Toolbox will mount over the left rear fender like a sponson box on a tank, and the taillights went on.
Next, fenders came off to be undercoated, and got the first coat of paint.
Of course then as I was looking at it from the front end admiring my new shocks... I noticed something. Thinking back to how I got the engine out of a sand toy Jeep, that had been stripped down, I didn't have a heater. I'll have to unplug the holes where the heater hoses go once I get to that point.

Toyota diesel.In the process of building a cj2a with a kubota diesel.
Kubota is Toyota.
Never heard that where’s the connection? Not arguing just asking. Toyota doesn’t list it as a subsidiary.Toyota diesel.
Kubota is Toyota.
Last edited:
How to deal with the whole full size axles sticking out thing.
View attachment 7864164
Sure they're stronger, and they even kinda look cool if your into that sort of thing. However, first trip through the mud, and you get covered. Can't see out your mirrors, got it all over the vehicle, the windshield. If it's nice weather, and you have the doors off... Sweet Lord, what a mess! Same for snow & slush. Well, except you most likely won't have the doors off.
Sorry boys & girls, I'm too old for that crap.
Enter, the trailer fender.
View attachment 7864165
Not 100% on the fronts yet, but I'm thinking just have two sets (yes, I have them) put together for one wider version. This, however will have to be done by somebody at a body shop, or with much better welding skills than mine. Funny how I keep putting off practicing to get better when I need it to be right... lol.
I wouldn't weld those to the tub because the first thing you hut will fold them and your tub up into a wad.
Consider them consumables
You need to get your breather lines figured out soon before they become impossible.
If it were me I'd get the front of the jeep built and start thinking about balancing the Jeeps.
You are going to be really ass heavy right now with just the hitch and rear tire carrier.
It adds up quickly.
They're bolted with 1/4" bolts.I wouldn't weld those to the tub because the first thing you hut will fold them and your tub up into a wad.
Consider them consumables
Those brake lines on the front axle.....put them on the rearward side of the axle housing.
If not, they will be the first thing to get tweaked when going offroad.
I circled the clamp you should be using, ignore the one on the diff cover, and make a metal strap one that bolts to the upper diff cover bolts.
Don't want to saunter down a road, get into some rocks, and end up with a smashed brake line.
I've been considering that. I have to make some up anyhow because using the YJ tub got me power brakes, and these axles aren't an exact fit to the standard Jeep ones. I'm hoping to be able to reuse some of this line.Those brake lines on the front axle.....put them on the rearward side of the axle housing.
If not, they will be the first thing to get tweaked when going offroad.
I circled the clamp you should be using, ignore the one on the diff cover, and make a metal strap one that bolts to the upper diff cover bolts.
Don't want to saunter down a road, get into some rocks, and end up with a smashed brake line.
View attachment 7874425
I don't see why not.I'm hoping to be able to reuse some of this line.
Probably use all of it and not need anything else save those you mention that are different.
I assume you still have the funky vent bolt for the brass tee in that pic ?
If I remember right it's a hollow 3/8 fine thread with a plastic vent cap that snaps on the top, brass crush washers above and below fitting....some were a barb and used a 3/8 line for the vent and clipped to the frame rail with spring clip and with a plastic capped end for venting.
I still have a lot of work to do on the jeep, and here I go getting sidetracked with yet another new project...

Yes, that's a new Predator 420. It all started when I saw a video on youtube. (Yeah, 'cause that always ends well.) I subscribe to Jay Leno's Garage, and he recently did a video on a 1916 Autocar coal truck.

I absolutely love the vehicles from that era. They're so simple, yet so rugged. Kinda like the Jeep... This one looks sorta like a big Kawasaki Mule, something I've always wanted to tool around in, and to carry stuff in. Well, I do have a old riding lawnmower sitting around with a blown motor. Good wheels, tires, steering gear, battery... I have some scrap steel... Just need a few things like a new engine... I can build the bed with lumber I have... I got on Powerpoint, and did some cutting, and pasting. (no photoshop)

So far, just one evening in, this is what I got. My ancient yard sale Milwaukee hand held ban saw needs a blade real bad, and it is really starting to wander. Also you can feel the weld bump it's way through the material with every rotation. That, in combination with my horrible welding skills have me thinking I'll probably be dropping the frame off at the machine shop to be finished. Everything that goes on it will be bolted, so I can handle the easy stuff.

Yes, that's a new Predator 420. It all started when I saw a video on youtube. (Yeah, 'cause that always ends well.) I subscribe to Jay Leno's Garage, and he recently did a video on a 1916 Autocar coal truck.
I absolutely love the vehicles from that era. They're so simple, yet so rugged. Kinda like the Jeep... This one looks sorta like a big Kawasaki Mule, something I've always wanted to tool around in, and to carry stuff in. Well, I do have a old riding lawnmower sitting around with a blown motor. Good wheels, tires, steering gear, battery... I have some scrap steel... Just need a few things like a new engine... I can build the bed with lumber I have... I got on Powerpoint, and did some cutting, and pasting. (no photoshop)
So far, just one evening in, this is what I got. My ancient yard sale Milwaukee hand held ban saw needs a blade real bad, and it is really starting to wander. Also you can feel the weld bump it's way through the material with every rotation. That, in combination with my horrible welding skills have me thinking I'll probably be dropping the frame off at the machine shop to be finished. Everything that goes on it will be bolted, so I can handle the easy stuff.
You have a problem, finish the damn jeepI still have a lot of work to do on the jeep, and here I go getting sidetracked with yet another new project...
View attachment 7878513
Yes, that's a new Predator 420. It all started when I saw a video on youtube. (Yeah, 'cause that always ends well.) I subscribe to Jay Leno's Garage, and he recently did a video on a 1916 Autocar coal truck.
View attachment 7878514
I absolutely love the vehicles from that era. They're so simple, yet so rugged. Kinda like the Jeep... This one looks sorta like a big Kawasaki Mule, something I've always wanted to tool around in, and to carry stuff in. Well, I do have a old riding lawnmower sitting around with a blown motor. Good wheels, tires, steering gear, battery... I have some scrap steel... Just need a few things like a new engine... I can build the bed with lumber I have... I got on Powerpoint, and did some cutting, and pasting. (no photoshop)
View attachment 7878515
So far, just one evening in, this is what I got. My ancient yard sale Milwaukee hand held ban saw needs a blade real bad, and it is really starting to wander. Also you can feel the weld bump it's way through the material with every rotation. That, in combination with my horrible welding skills have me thinking I'll probably be dropping the frame off at the machine shop to be finished. Everything that goes on it will be bolted, so I can handle the easy stuff.
View attachment 7878516

You related to my wife?You have a problem, finish the damn jeep
I get wild hair ideas too...
Swapped out electric motor on buddies huntin buggy, when done we looked at each other and said well what are we gonna do with the old motor?
Looked at a tweaked out '48 Indian frame sitting in a corner and said 3 wheeler!
horse shoes are for foot boards.


Swapped out electric motor on buddies huntin buggy, when done we looked at each other and said well what are we gonna do with the old motor?
Looked at a tweaked out '48 Indian frame sitting in a corner and said 3 wheeler!
horse shoes are for foot boards.
Bigger version of this?I get wild hair ideas too...
Swapped out electric motor on buddies huntin buggy, when done we looked at each other and said well what are we gonna do with the old motor?
Looked at a tweaked out '48 Indian frame sitting in a corner and said 3 wheeler!
horse shoes are for foot boards.
View attachment 7878739
View attachment 7878740
Bigger version of this?
More offroad, no pavement out here.
looks like fun tho
Remember way back when I showed a photo of a NOS deuce-and-a-half windshield, and said I wanted those safari-style windows? Well, I still do. And, a while back, I dropped it off, with the windshield frame from this tub at a local machine shop so they could make it easy for me to relive those memories of driving behind them. I had to stop in with a big sheet of steel for them to sheer for me for the go cart-truck, and they showed me the progress so far. (working in between their big contracts) I wish I had that level of fabrication skills. Man, I'm so stoked...! I probably won't be once I get the bill, but I'll have a one-of-a kind CJ7 for sure.


First off, hot weather, and I are old enemies, so I limit my exposure.
Secondly, the wife is out of work during the summer (teacher's aid) and I'm on VA disability,
so limited funds to start, plus now down a check... no new Jeep parts.
To top it all off, I've been sick. No solid poop in last 2 months. (what a pretty picture that was huh?) They're still trying to figure it out, but long story short... been very tired, and weak as of late. If you're the praying type, I could use a mention to the good Lord.
Speaking of being thankful... Got the windshield frame back today! Not sure when I'll be able to go have glass put in it, but I just had to slap it on for a test fit. They messed up one screw on one of the hinges, so looks like I'm hitting scrap yards looking for another M35A1 to scrounge off, but it's otherwise done. Already had the cash to pay the bill, thank God. (had sold a gun) 28 hrs of machine shop work... but it will be the signature piece of the vehicle.
better to get it running on biodiesel or something you can learn to create on your own soon enough it will be cheaper to buy a car than get a gallon of gas to fuel it . your not going to get much bug out with no fuel .might have been better to invest in walls or walls and moats .
They have really nice kits to swap tesla motors and batteries into old land rovers.
I have solar at the house and BOL.
Back of the napkin math said a solar panel roof rack would be good for 15 miles a day.
Just my BOV musings.
I do have a cybertruck on order.
I have solar at the house and BOL.
Back of the napkin math said a solar panel roof rack would be good for 15 miles a day.
Just my BOV musings.
I do have a cybertruck on order.
Still been feeling weak, and the heat doesn't make things better, but I did finally get back out to the garage. Did some tinkering on a new dash today. The one I ordered online just wasn't gonna work. None of the holes lined up. I mean, they were way off. Wobbling them out wouldn't even have worked. Had to start over. These weren't right either, but they were close enough that wobbling them out will work... Decided to add a glovebox, (from a deuce and a half) so the data plates are gonna have to be adjusted, but as I've stated before, this isn't a reproduction of a military vehicle, it's a tribute to the military, and has touches of more than one vehicle from my service added, as well as off road mods, and a bit of hot-rod flair.


Work continues, slowly as usual. I've been working on several parts of the Jeep at once, but that's just because I think I have some form of AFHD, and I always seem to (Oh look, a squirrel) jump on a different thing each time I go out to the garage...
A week or so back, I started in on Brandy's seat.


A week or so back, I started in on Brandy's seat.
Yay! Dog pics.Work continues, slowly as usual. I've been working on several parts of the Jeep at once, but that's just because I think I have some form of AFHD, and I always seem to (Oh look, a squirrel) jump on a different thing each time I go out to the garage...
A week or so back, I started in on Brandy's seat.
View attachment 7952486View attachment 7952487
A few days later I decided it was time to build me a new battery box. I'm no expert, but I think the metal I'm using is like 14 gage...? Anyhow, whatever it is, looks strong enough. It was strong enough to be an absolute bear to bend with my little Harbor Freight brake. In fact, I started bending the little handles, and even thought I was going to rip a bite out of the front of my workbench. Once I got the big bend done, I went back to the old method of hammer and vice.


Similar threads
- Replies
- 41
- Views
- 2K
- Replies
- 53
- Views
- 3K
