Not cool but replaced the bottom jack plate on a trailer. No finished pictures though

Join the Hide community
Get access to live stream, lessons, the post exchange, and chat with other snipers.
Register
Download Gravity Ballistics
Get help to accurately calculate and scope your sniper rifle using real shooting data.

Install the app
How to install the app on iOS
Follow along with the video below to see how to install our site as a web app on your home screen.
Note: This feature may not be available in some browsers.
You are using an out of date browser. It may not display this or other websites correctly.
You should upgrade or use an alternative browser.
You should upgrade or use an alternative browser.
Maggie’s The Welding and Metalworking Thread
- Thread starter bogeybrown
- Start date
fucking blab away, Bogey got his welding cert today...
good job
good job
So there is metalworking in this... and will be some soldering tomorrow... But mostly it's me and stonework! Something I love to do on the farm.
This is a Thunderbird stone 'totem' that I built on the high part of my hay fields. It's 17 feet tall before the copper lightning rod goes on tomorrow. Four pieces of stone... With some re-rod and a concrete base anchored to ledge. It's not going to go anywhere short of another ice age!

Form built into the ledge. There is a 4' x 5' pad six inches thick and anchored to ledge below the 'socket' that is going to hold the vertical stone. Has to be big and strong. That hilltop takes 60 MPH winds and sometimes higher. And the vertical stone is 15 feet tall! And weighs about 4,000 lbs.

With the socket in the ground, the stone was hoisted vertically and set into a bed of concrete inside the socket. Only 20" of the 15 foot stone were bedded into the concrete... all that was needed given the size/weight of the base. Which was re-barred into ledge and weighs a ton by itself!

Since the top of the vertical rock was not flat, I needed to pour concrete on the top of the rock to level it. So I hauled a generator and a rock drill to the top of the pasture and drilled the rock to take re-bar and the threaded rod that was going to hold the wings and head of the thunderbird. So I built a form 13 feet in the air and strapped it around the vertical rock. Sealed it with expanding foam and poured in 2 x 80 pound bags of mixed up colored concrete (colored to match the vertical stone.) This was leveled so that the wings would sit flat. The re-rod was covered and the threaded rod stuck up 30" to create a guide for the next stones, a place to thread a big securing nut. And a 'post' on which the head could be lowered and secured.
The wings, Ruff and head were all rock drilled through with a 3/4" hole. These were lowered over the threaded rod and nutted down. The head then went on the remaining threaded post with industrial epoxy and a bed of mortar. All the three pieces were mortared together... bedded. Balance was so good that I was able to wiggle the 500 pound 'wings' back and forth on the mortar with just light hand pressure.

Before putting the wings up, I carved this on the top of the wing. This is an Algonquin symbol for a Thunderbird and while that tribe was a bit North of Schloss Nitrocellulose, there is no doubt that Algonquins did come through this area whether for raids or trading. This symbol was used on the Treaty of Montreal when "my people" swindled the Algonquins out of Canada for a case of Jim Beam, some beads and a Wampum Card for use at the local casino.

All the pieces on... waiting for the mortar to set up. Tomorrow I will put the lightning rod in place with melted lead. The hole is drilled in the head to take a 4 foot copper rod that is pointed to a needle tip... Molten lead will be poured around the rod to secure it into the rock and create a great ground path. Hope I get a strike someday!

This gives an idea of how big it is... and shows the eyes, which will be completed with a pair of polished rock Crystal spheres, connected with a lucite 'light pipe' rod. So the eyes will transmit light from side to side and will 'glow' in the sunlight or moonlight. My people understand fiber optics!

Another picture showing the sheer scale of it. Without lightning rod it is 17 feet tall! With lightning rod, over 20 feet! Massive in scale and really fun to build. I still have to fit a couple more stones to the base and landscape around it. The whole reason I built this was to use some rocks I found on the farm. And because it's built on ledge that I kept bending mower blades on... so I was looking for a way to avoid the ledge. That's my story and I'm sticking to it!

One last picture showing the head and ruff and wings. As I mentioned, I used materials and tools of my people. But since my people were %$#@ing Scottish, that means that I used re-bar, concrete, large tractors, winches, ratchet straps, threaded rod, nuts, industrial epoxy and solder. WTF, you think I'm Elizabeth Warren? My people built this place!
I know @Maggot spent his career as a stone mason before becoming a philosopher.... Any comments, maestro? And as for the welding... well, tomorrow, I'll be putting in the lightning rod with molten solder, pouring it in while standing in a tractor bucket well above the field. This is why women live longer than men. But no actual welding on this. Just lots of tying re-bar together with wire.
Now it's back to building little cannons and model artillery and car engines and motorcycles and air raid sirens and knives and whatever else keeps my hands from going to the devil! But I think this goes down as probably one of the coolest things I've ever built. Rather chuffed!
Cheers,
Sirhr
This is a Thunderbird stone 'totem' that I built on the high part of my hay fields. It's 17 feet tall before the copper lightning rod goes on tomorrow. Four pieces of stone... With some re-rod and a concrete base anchored to ledge. It's not going to go anywhere short of another ice age!
Form built into the ledge. There is a 4' x 5' pad six inches thick and anchored to ledge below the 'socket' that is going to hold the vertical stone. Has to be big and strong. That hilltop takes 60 MPH winds and sometimes higher. And the vertical stone is 15 feet tall! And weighs about 4,000 lbs.
With the socket in the ground, the stone was hoisted vertically and set into a bed of concrete inside the socket. Only 20" of the 15 foot stone were bedded into the concrete... all that was needed given the size/weight of the base. Which was re-barred into ledge and weighs a ton by itself!
Since the top of the vertical rock was not flat, I needed to pour concrete on the top of the rock to level it. So I hauled a generator and a rock drill to the top of the pasture and drilled the rock to take re-bar and the threaded rod that was going to hold the wings and head of the thunderbird. So I built a form 13 feet in the air and strapped it around the vertical rock. Sealed it with expanding foam and poured in 2 x 80 pound bags of mixed up colored concrete (colored to match the vertical stone.) This was leveled so that the wings would sit flat. The re-rod was covered and the threaded rod stuck up 30" to create a guide for the next stones, a place to thread a big securing nut. And a 'post' on which the head could be lowered and secured.
The wings, Ruff and head were all rock drilled through with a 3/4" hole. These were lowered over the threaded rod and nutted down. The head then went on the remaining threaded post with industrial epoxy and a bed of mortar. All the three pieces were mortared together... bedded. Balance was so good that I was able to wiggle the 500 pound 'wings' back and forth on the mortar with just light hand pressure.
Before putting the wings up, I carved this on the top of the wing. This is an Algonquin symbol for a Thunderbird and while that tribe was a bit North of Schloss Nitrocellulose, there is no doubt that Algonquins did come through this area whether for raids or trading. This symbol was used on the Treaty of Montreal when "my people" swindled the Algonquins out of Canada for a case of Jim Beam, some beads and a Wampum Card for use at the local casino.
All the pieces on... waiting for the mortar to set up. Tomorrow I will put the lightning rod in place with melted lead. The hole is drilled in the head to take a 4 foot copper rod that is pointed to a needle tip... Molten lead will be poured around the rod to secure it into the rock and create a great ground path. Hope I get a strike someday!
This gives an idea of how big it is... and shows the eyes, which will be completed with a pair of polished rock Crystal spheres, connected with a lucite 'light pipe' rod. So the eyes will transmit light from side to side and will 'glow' in the sunlight or moonlight. My people understand fiber optics!
Another picture showing the sheer scale of it. Without lightning rod it is 17 feet tall! With lightning rod, over 20 feet! Massive in scale and really fun to build. I still have to fit a couple more stones to the base and landscape around it. The whole reason I built this was to use some rocks I found on the farm. And because it's built on ledge that I kept bending mower blades on... so I was looking for a way to avoid the ledge. That's my story and I'm sticking to it!
One last picture showing the head and ruff and wings. As I mentioned, I used materials and tools of my people. But since my people were %$#@ing Scottish, that means that I used re-bar, concrete, large tractors, winches, ratchet straps, threaded rod, nuts, industrial epoxy and solder. WTF, you think I'm Elizabeth Warren? My people built this place!
I know @Maggot spent his career as a stone mason before becoming a philosopher.... Any comments, maestro? And as for the welding... well, tomorrow, I'll be putting in the lightning rod with molten solder, pouring it in while standing in a tractor bucket well above the field. This is why women live longer than men. But no actual welding on this. Just lots of tying re-bar together with wire.
Now it's back to building little cannons and model artillery and car engines and motorcycles and air raid sirens and knives and whatever else keeps my hands from going to the devil! But I think this goes down as probably one of the coolest things I've ever built. Rather chuffed!
Cheers,
Sirhr
Attachments
Last edited:
Sirhr,
You sir need a damn job!
You do some pretty neat stuff but a damn stack of rocks up on a hill?????? Looks great and hopefully you get that lightening strike
Maybe set up a game camera or something to capture the moment it happens
You sir need a damn job!
You do some pretty neat stuff but a damn stack of rocks up on a hill?????? Looks great and hopefully you get that lightening strike
Maybe set up a game camera or something to capture the moment it happens
I had a job.Sirhr,
You sir need a damn job!
You do some pretty neat stuff but a damn stack of rocks up on a hill?????? Looks great and hopefully you get that lightening strike
Maybe set up a game camera or something to capture the moment it happens
I was good at it.
Now I get to do vertical rock stacking whenever I want!
Cheers,
Sirhr
So there is metalworking in this... and will be some soldering tomorrow... But mostly it's me and stonework! Something I love to do on the farm.
This is a Thunderbird stone 'totem' that I built on the high part of my hay fields. It's 17 feet tall before the copper lightning rod goes on tomorrow. Four pieces of stone... With some re-rod and a concrete base anchored to ledge. It's not going to go anywhere short of another ice age!
View attachment 7162389
Form built into the ledge. There is a 4' x 5' pad six inches thick and anchored to ledge below the 'socket' that is going to hold the vertical stone. Has to be big and strong. That hilltop takes 60 MPH winds and sometimes higher. And the vertical stone is 15 feet tall! And weighs about 4,000 lbs.
View attachment 7162387
With the socket in the ground, the stone was hoisted vertically and set into a bed of concrete inside the socket. Only 20" of the 15 foot stone were bedded into the concrete... all that was needed given the size/weight of the base. Which was re-barred into ledge and weighs a ton by itself!
View attachment 7162388
Since the top of the vertical rock was not flat, I needed to pour concrete on the top of the rock to level it. So I hauled a generator and a rock drill to the top of the pasture and drilled the rock to take re-bar and the threaded rod that was going to hold the wings and head of the thunderbird. So I built a form 13 feet in the air and strapped it around the vertical rock. Sealed it with expanding foam and poured in 2 x 80 pound bags of mixed up colored concrete (colored to match the vertical stone.) This was leveled so that the wings would sit flat. The re-rod was covered and the threaded rod stuck up 30" to create a guide for the next stones, a place to thread a big securing nut. And a 'post' on which the head could be lowered and secured.
The wings, Ruff and head were all rock drilled through with a 3/4" hole. These were lowered over the threaded rod and nutted down. The head then went on the remaining threaded post with industrial epoxy and a bed of mortar. All the three pieces were mortared together... bedded. Balance was so good that I was able to wiggle the 500 pound 'wings' back and forth on the mortar with just light hand pressure.
View attachment 7162386
Before putting the wings up, I carved this on the top of the wing. This is an Algonquin symbol for a Thunderbird and while that tribe was a bit North of Schloss Nitrocellulose, there is no doubt that Algonquins did come through this area whether for raids or trading. This symbol was used on the Treaty of Montreal when "my people" swindled the Algonquins out of Canada for a case of Jim Beam, some beads and a Wampum Card for use at the local casino.
View attachment 7162385
All the pieces on... waiting for the mortar to set up. Tomorrow I will put the lightning rod in place with melted lead. The hole is drilled in the head to take a 4 foot copper rod that is pointed to a needle tip... Molten lead will be poured around the rod to secure it into the rock and create a great ground path. Hope I get a strike someday!
View attachment 7162384
This gives an idea of how big it is... and shows the eyes, which will be completed with a pair of polished rock Crystal spheres, connected with a lucite 'light pipe' rod. So the eyes will transmit light from side to side and will 'glow' in the sunlight or moonlight. My people understand fiber optics!
View attachment 7162383
Another picture showing the sheer scale of it. Without lightning rod it is 17 feet tall! With lightning rod, over 20 feet! Massive in scale and really fun to build. I still have to fit a couple more stones to the base and landscape around it. The whole reason I built this was to use some rocks I found on the farm. And because it's built on ledge that I kept bending mower blades on... so I was looking for a way to avoid the ledge. That's my story and I'm sticking to it!
View attachment 7162382
One last picture showing the head and ruff and wings. As I mentioned, I used materials and tools of my people. But since my people were %$#@ing Scottish, that means that I used re-bar, concrete, large tractors, winches, ratchet straps, threaded rod, nuts, industrial epoxy and solder. WTF, you think I'm Elizabeth Warren? My people built this place!
I know @Maggot spent his career as a stone mason before becoming a philosopher.... Any comments, maestro? And as for the welding... well, tomorrow, I'll be putting in the lightning rod with molten solder, pouring it in while standing in a tractor bucket well above the field. This is why women live longer than men. But no actual welding on this. Just lots of tying re-bar together with wire.
Now it's back to building little cannons and model artillery and car engines and motorcycles and air raid sirens and knives and whatever else keeps my hands from going to the devil! But I think this goes down as probably one of the coolest things I've ever built. Rather chuffed!
Cheers,
Sirhr
Beautiful work. My only comment less than 100% is that you may find the colored concrete will fade over time. Maybe not. Reminds me a bit of this work on the campus of UVA. Thats quite a compliment, BTW.
The sculpture is a bronze statue commissioned in honor of University alumnus, James Rogers McConnell’s heroism and courage in World War I, as a member of the Lafayette Escadrille.
It was designed by Gutzon Borglum and dedicated in 1919. The sculpture measures 12 feet high and 8 feet, 6 inches wide.[1]
It is located in front of Clemons Library on the grounds of the University of Virginia. Due to the library's abundant 24-hour study space available for students, The Aviator is a fixture in everyday life at the University.[2]
It is an athletic male nude with his
Congrats to Bogey,
Save your coupons, I'm sure you will have more and they each represent a lot of time and effort learning a new skill.
Sir,
I love the thunderbird even if it is barely metalworking. I appreciate craftsmanship in different forms.
Save your coupons, I'm sure you will have more and they each represent a lot of time and effort learning a new skill.
Sir,
I love the thunderbird even if it is barely metalworking. I appreciate craftsmanship in different forms.
so the only real metalworking was taking a
3 foot 3/8” copper rod and putting it in a lathe and cutting a taper in it to a needle point. Not easy on gum-soft metal that bends if you look at it cross eyed.
Then fitting it into a socket drilled in the top with molten lead. To stop it from all hardening too fast. I heated a steel rod red hot and stuck it in the hole. Repeated this a few times to heat the rock. Then melted 4 ounces of lead in a ladle and heated the base of the copper rod red hot. Pulled the steel out of the preheated hole, put the copper rod in and then poured the lead.
Worked like a charm. Which was a good thing becauseI was standing on a ladder raised up in a tractor bucket with a torch set and molten metal. No place for an oopsi
And got the dirt moved around and most of the leveling done around it.
Now, for a lightning to strike.
In the mean time... tomorrow will be mounting up a cannon into its new carriage. That was some metalworking!
Lightning... maybe someday! Thunder? Tomorrow, perhaps!
Cheers, Sirhr
Love the smell of kroil. Wife can't stand it though.Pick up that can of Kroil!
Tell her it is the smell of fidelity. Because guys who smell of kroil, wd40, motor oil, gunpowder.... are too busy and too broke to come home smelling of perfume and other women. They always know where to find us, too. In the garage or the shop.Love the smell of kroil. Wife can't stand it though.
that will give her an appreciation for Kroil!!!
cheers,
sirhr
Having the shop apprentice help me lower the barrel into place! Not something most high school tech students get to participate in!
Now to lock down
it will dry here tomorrow and then join Battery A, Schloss Nitrocellulose field artillery.
This barrel was badly pitted and took a lot of grinding and filling to bring back. And re-machining trunnions.
not bad for brush painting! 24 hours to dry and this one is done. Started in fall 2016, this was finished after three others I acquired after it. But it came out great!!
need make implements for 3 cannons over the winter. But have a few other fall projects to wrap up first... before it snows.
cheers, Sirhr
Two of the most consistent welders I know  Both of them are flat out all day, and haven't asked for a raise since they got here.


They do get weekends off, though.
Both of them are flat out all day, and haven't asked for a raise since they got here.They do get weekends off, though.
Living in the PNW my wife and i are active all year long, and intend to bring our (currently) 4 month old daughter with us. Picked up a tow behind bike trailer for her, and decided to make ski attachments from my old DIY split board. Finished pics tomorrow.


Can’t wait to see you do a good Mogul run with this!!!Living in the PNW my wife and i are active all year long, and intend to bring our (currently) 4 month old daughter with us. Picked up a tow behind bike trailer for her, and decided to make ski attachments from my old DIY split board. Finished pics tomorrow.
View attachment 7163466
View attachment 7163467
View attachment 7163468
View attachment 7163470
View attachment 7163471
nice job!!
sirhr
@sirhrmechanic
Knuckle-draggers on moguls? ???
Some can do it well though and dang is it impressive.
@mzvarner
That looks good.
I had the Chariot version until mine turned 5. She loved touring around behind me on skis and the bike and used to yell “faster” all the time.
Glad someone in your family is firing on all cylinders and has dynafits!.... ?
Its not moguls, but close and inspirational.Can’t wait to see you do a good Mogul run with this!!!
nice job!!
sirhr
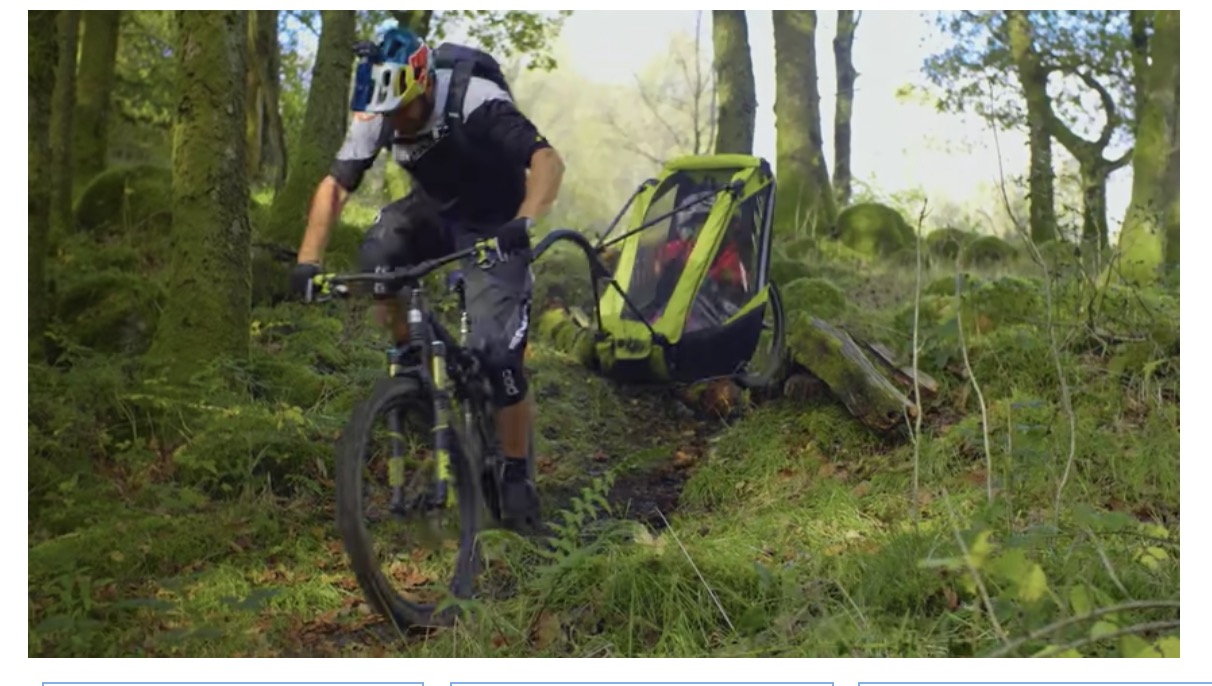
Danny MacAskill Takes His 'Kid' On A Wild Ride Through The Scottish Countryside | Digg
Ah, yes, let me just barrel roll with a kiddie carrier connected to my bike.
 digg.com
@mzvarner
That looks good.
I had the Chariot version until mine turned 5. She loved touring around behind me on skis and the bike and used to yell “faster” all the time.
Glad someone in your family is firing on all cylinders and has dynafits!.... ?
Good eye! My wife switched years ago to skis.... im a slow learner, but there is something to be said about riding a real split board. I bought a Jones Solution and IT...IS...AWESOME!!!. But still slowest to transition, lots of flex, and the boots.... dont get me started.
For the stunts they used a dummy.Its not moguls, but close and inspirational.
Danny MacAskill Takes His 'Kid' On A Wild Ride Through The Scottish Countryside | Digg
Ah, yes, let me just barrel roll with a kiddie carrier connected to my bike.
Good eye! My wife switched years ago to skis.... im a slow learner, but there is something to be said about riding a real split board. I bought a Jones Solution and IT...IS...AWESOME!!!. But still slowest to transition, lots of flex, and the boots.... dont get me started.
For the stunts they used a dummy.
I am aware. Thank you. It was a humorous reply comparing mountain biking to mogul skiing.
just so you know I have decided I hate you. I don’t even know you.
@mzvarner
Well, they are smarter than us frequently. Apparently yours is for sure!!??
Have you tried the Spark R&D bindings? My good buddy has a pair. Pretty light and fast transitions.
Except I pop my skins off without removing my skis.... ?
Enjoy the tours. I took my daughter starting around 6-7 months, though running and biking started much sooner.
Now she is 7.5 and skis on her own and I follow along trying to keep up and not scream when she starts skiing in the trees and off jumps.
just so you know I have decided I hate you. I don’t even know you.
Don’t worry, you’d probably still hate me if you knew me.
@mzvarner
Have you tried the Spark R&D bindings? My good buddy has a pair. Pretty light and fast transitions.
Except I pop my skins off without removing my skis.... ?
Enjoy the tours. I took my daughter starting around 6-7 months, though running and biking started much sooner.
Now she is 7.5 and skis on her own and I follow along trying to keep up and not scream when she starts skiing in the trees and off jumps.
Im rocking a pair of Sparks. Love them, so light and fast. They mount so low compared to the DIY kit. Ultimately just a better experience in the hills.
Thanks for the feed back. Im so excited to get my girl(s) out. Cant wait to be shown up!!!
Electro polishing... I think ours is from Oz!
cheers, Sirhr
Weird stuff we see in backup cameras around here....

Need some advice from you more engineering savvy types. As posted previous, i welded some axle brackets to mount a split board to a tow behind kids chariot for winter use.
I need to build a support brace for the front to secure too. Should i build an arc roughly following the 5 gallon bucket? Im thinking heat gun to mold PVC? Will it be too brittle in cold? PVC may also act as some "suspension"

Or do I build a bracket roughly following the red tracing? 45* miters or 90*but joints? Pocket holes and glue?

Or something else? Needs to hold up to a 40# child (thats what the chariot is rated to). Id rather use materials on hand (PVC, 1/2 and 3/4 plywood). There wont be any extreme forces, just XC trail bumps.
Thanks all!!
I need to build a support brace for the front to secure too. Should i build an arc roughly following the 5 gallon bucket? Im thinking heat gun to mold PVC? Will it be too brittle in cold? PVC may also act as some "suspension"
Or do I build a bracket roughly following the red tracing? 45* miters or 90*but joints? Pocket holes and glue?
Or something else? Needs to hold up to a 40# child (thats what the chariot is rated to). Id rather use materials on hand (PVC, 1/2 and 3/4 plywood). There wont be any extreme forces, just XC trail bumps.
Thanks all!!
Last edited:
Need some advice from you more engineering savvy types. As posted previous, i welded some axle brackets to mount a split board to a tow behind kids chariot for winter use.
I need to build a support brace for the front to secure too. Should i build an arc roughly following the 5 gallon bucket? Im thinking heat gun to mold PVC? Will it be too brittle in cold? PVC may also act as some "suspension"
View attachment 7168425
Or do I build a bracket roughly following the red tracing? 45* miters or 90*but joints? Pocket holes and glue?
View attachment 7168426
Or something else? Needs to hold up to a 40# child (thats what the chariot is rated to). Id rather use materials on hand (PVC, 1/2 and 3/4 plywood). There wont be any extreme forces, just XC trail bumps.
Thanks all!!
The front of the ski tips are meant to flex, so I wouldn't connect there. It is already going to be a rigid ride, could you connect from side to side. For instance, stand the bucket on end and connect where the pins are in an arc? Almost like a front bumper on a car. Not sure what the pins are connected too though or how all of that works.
Transverse leaf springs front and rear. Like an old model t Ford! They went anywhere because they flexed.

That's not Photoshopped, that is a real Model T.
Or just engineer it the way sleighs were originally engineered. Rigid runners, but the body suspended from springs by leather (use nylon) straps. Sometimes with springs, as in the claeche below, sometimes without.

that said, in the old days they didn’t put much suspension on sleighs because they ran in frozen tracks and ecause the tracks tended to be smooth, the sleighs had very smooth rides. Buggies and carriages had elaborate suspensions because the dirt roads were rutted and very choppy.
So if your rubber baby buggy bumper is going to be for x-c skiing and not Dorn mogul runs, just rigid up the skis, suspend the cabin and gtg!
of course at 40 lbs... time to buy the kid a first set of skis anyway! But you said 'up to' 40 lbs!
cheers, Sirhr
That's not Photoshopped, that is a real Model T.
Or just engineer it the way sleighs were originally engineered. Rigid runners, but the body suspended from springs by leather (use nylon) straps. Sometimes with springs, as in the claeche below, sometimes without.
that said, in the old days they didn’t put much suspension on sleighs because they ran in frozen tracks and ecause the tracks tended to be smooth, the sleighs had very smooth rides. Buggies and carriages had elaborate suspensions because the dirt roads were rutted and very choppy.
So if your rubber baby buggy bumper is going to be for x-c skiing and not Dorn mogul runs, just rigid up the skis, suspend the cabin and gtg!
of course at 40 lbs... time to buy the kid a first set of skis anyway! But you said 'up to' 40 lbs!
cheers, Sirhr
Last edited:
Need some advice from you more engineering savvy types. As posted previous, i welded some axle brackets to mount a split board to a tow behind kids chariot for winter use.
I need to build a support brace for the front to secure too. Should i build an arc roughly following the 5 gallon bucket? Im thinking heat gun to mold PVC? Will it be too brittle in cold? PVC may also act as some "suspension"
View attachment 7168425
Or do I build a bracket roughly following the red tracing? 45* miters or 90*but joints? Pocket holes and glue?
View attachment 7168426
Or something else? Needs to hold up to a 40# child (thats what the chariot is rated to). Id rather use materials on hand (PVC, 1/2 and 3/4 plywood). There wont be any extreme forces, just XC trail bumps.
Thanks all!!
I would cable down from the rear uprights to the skis. Assume you're pulling this not pushing while it's on skis correct?
Big ??, whats going to happen when you do get a lighting strike?View attachment 7162803
so the only real metalworking was taking a
3 foot 3/8” copper rod and putting it in a lathe and cutting a taper in it to a needle point. Not easy on gum-soft metal that bends if you look at it cross eyed.
Then fitting it into a socket drilled in the top with molten lead. To stop it from all hardening too fast. I heated a steel rod red hot and stuck it in the hole. Repeated this a few times to heat the rock. Then melted 4 ounces of lead in a ladle and heated the base of the copper rod red hot. Pulled the steel out of the preheated hole, put the copper rod in and then poured the lead.
Worked like a charm. Which was a good thing becauseI was standing on a ladder raised up in a tractor bucket with a torch set and molten metal. No place for an oopsi
And got the dirt moved around and most of the leveling done around it.
Now, for a lightning to strike.
In the mean time... tomorrow will be mounting up a cannon into its new carriage. That was some metalworking!
Lightning... maybe someday! Thunder? Tomorrow, perhaps!
Cheers, Sirhr
Not sure what the pins are connected too though or how all of that works.
Assume you're pulling this not pushing while it's on skis correct?
Pins are where I was going to connect the pvc poles for towing. On the other end they attach to the hip belt of my back pack. The issue is PVC over 6 feet has more sag then i planned so the carriage rides nose down. I am trying to copy a pulk sled design where it pulls up from the front of a sled. Having the carriage on raised axles kinda fucks all that up and I may just scrap them all together. And just secure it directly to the boards.
This is not really intended for big pow days so it really dosnt need to sit up as high as it does.
Transverse leaf springs front and rear. Like an old model t Ford! They went anywhere because they flexed.
View attachment 7168555
Or just engineer it the way sleighs were originally engineered. Rigid runners, but the body suspended from springs by leather (use nylon) straps. Sometimes with springs, as in the claeche below, sometimes without.
View attachment 7168560
So if your rubber baby buggy bumper is going to be for x-c skiing and not Dorn mogul runs, just rigid up the skis, suspend the cabin and gtg!
of course at 40 lbs... time to buy the kid a first set of skis anyway! But you said 'up to' 40 lbs!
cheers, Sirhr
Leaf springs spanning the 2 planks with the carriage attached to both. I like it, but sounds heavy.
And yes at 40# or whatever she weighs this time next year, she will be on skis.
Pins are where I was going to connect the pvc poles for towing. On the other end they attach to the hip belt of my back pack. The issue is PVC over 6 feet has more sag then i planned so the carriage rides nose down. I am trying to copy a pulk sled design where it pulls up from the front of a sled. Having the carriage on raised axles kinda fucks all that up and I may just scrap them all together. And just secure it directly to the boards.
This is not really intended for big pow days so it really dosnt need to sit up as high as it does.
Leaf springs spanning the 2 planks with the carriage attached to both. I like it, but sounds heavy.
And yes at 40# or whatever she weighs this time next year, she will be on skis.
Springs do not have to be steel... what about springs made out of some kind of fiberglass... like the flat stuff they use to make driveway poles or the roadside markers. Those flex and are light. Only has to last a couple of seasons. Might even find a PVC or a Polystyrene sheet you can use. Stack enough up and you have spring leaves!
Cheers,
Sirhr
I like the way the little ball seems to run round and around inside the ear like a racecar in a tight track!Overhead while laying down has got to be my favorite.... slag in the ear is the best!!?
Had that happen to me once, when I was working in the sawmill. I was actually under a machine, and that little bastard 'pinball-bounced' between me and the base of the machine (which was about 6" above me all the way up from my waist INTO my left ear-hole.I like the way the little ball seems to run round and around inside the ear like a racecar in a tight track!
Never in a gazillion years could I think such a thing was possible.... seriously. We had to use "spark-watchers" whenever we were doing "Hot Work" and they had to stay on site for at least 45 mins after we completed our jobs.
And the amount of times something actually started up/started to smoulder in that time was incredible in itself. And yes, that IS with both 'cleaning' the area as well as wetting it down before commencing said 'hot work'.
After too many of these experiences I will not strike an arc without ear plugs.Had that happen to me once, when I was working in the sawmill. I was actually under a machine, and that little bastard 'pinball-bounced' between me and the base of the machine (which was about 6" above me all the way up from my waist INTO my left ear-hole.
Never in a gazillion years could I think such a thing was possible.... seriously. We had to use "spark-watchers" whenever we were doing "Hot Work" and they had to stay on site for at least 45 mins after we completed our jobs.
And the amount of times something actually started up/started to smoulder in that time was incredible in itself. And yes, that IS with both 'cleaning' the area as well as wetting it down before commencing said 'hot work'.
I can deal with slag in my sleeve or a smouldering beard, but one trip to the ER helped to define priorities more clearly.
I always try to pass the wisdom on, but it seems that some lessons are only learned by experience. Yes you have to be tough to do ironwork, but you don't need to take the risk of a permanant injury that is totally avoidable.
To anybody doing any kind of steel erection or heavy fabrication remember one thing, it's not IF you get hurt, it's when and how badly.
I learned the hard way, because I'm tougher than I am smart, and didn't believe it would catch up to me.
You get one body and it has to last your whole life. DON'T FUCK IT UP FOR NO REASON!!!
Sorry for the rant, but I meant every word.
you are correct on every point there Dave. There is enough shit in an industrial environment that you don't have control over to not watch your ass on the things you can control. I once had a slagball get through my sleeve somehow and ran down and attached itself to my metal watchband on my wrist, lot of confusion as to why I could not sling that hot bastard outta there before ripping glove and watch off and slinging it. no more metal watchband for me. Also danced many a jig when one would slip somehow into the top of my boot! lol. sometimes shit just happens.After too many of these experiences I will not strike an arc without ear plugs.
I can deal with slag in my sleeve or a smouldering beard, but one trip to the ER helped to define priorities more clearly.
I always try to pass the wisdom on, but it seems that some lessons are only learned by experience. Yes you have to be tough to do ironwork, but you don't need to take the risk of a permanant injury that is totally avoidable.
To anybody doing any kind of steel erection or heavy fabrication remember one thing, it's not IF you get hurt, it's when and how badly.
I learned the hard way, because I'm tougher than I am smart, and didn't believe it would catch up to me.
You get one body and it has to last your whole life. DON'T FUCK IT UP FOR NO REASON!!!
Sorry for the rant, but I meant every word.
Fun little project I worked on back in the day...

P.S. I can't weld worth a damn!
P.S. I can't weld worth a damn!
Last edited:
Beautiful work. My only comment less than 100% is that you may find the colored concrete will fade over time. Maybe not. Reminds me a bit of this work on the campus of UVA. Thats quite a compliment, BTW.
The sculpture is a bronze statue commissioned in honor of University alumnus, James Rogers McConnell’s heroism and courage in World War I, as a member of the Lafayette Escadrille.
It was designed by Gutzon Borglum and dedicated in 1919. The sculpture measures 12 feet high and 8 feet, 6 inches wide.[1]
It is located in front of Clemons Library on the grounds of the University of Virginia. Due to the library's abundant 24-hour study space available for students, The Aviator is a fixture in everyday life at the University.[2]
It is an athletic male nude with his
View attachment 7162438
Thats a great piece of art.
Its important culturally.
It will be a shame if it succumbs to the current "hysteria" regards symbols in this country.
Fun little project I worked on back in the day...
P.S. I can't weld worth a damn!
looks familiar to me too, but i do know the shop i am thinking of is closed.
shop was in ybor city and specialized in ship prop shafts, crazy cool
We’ve been around since 1979 and are still going strong. That’s the ram for a car crusher BTWlooks familiar to me too, but i do know the shop i am thinking of is closed.
shop was in ybor city and specialized in ship prop shafts, crazy cool
Similar threads
- Replies
- 0
- Views
- 533
- Replies
- 10
- Views
- 2K
- Replies
- 13
- Views
- 2K
