Join the Hide community
Get access to live stream, lessons, the post exchange, and chat with other snipers.
Register
Download Gravity Ballistics
Get help to accurately calculate and scope your sniper rifle using real shooting data.

Install the app
How to install the app on iOS
Follow along with the video below to see how to install our site as a web app on your home screen.
Note: This feature may not be available in some browsers.
You are using an out of date browser. It may not display this or other websites correctly.
You should upgrade or use an alternative browser.
You should upgrade or use an alternative browser.
Maggie’s The Welding and Metalworking Thread
- Thread starter bogeybrown
- Start date
Yup. Worked fine. As long as one piece puts shoulder pressure on the other, doesn’t matter which way you rotate them! Cheers, sirhr
So wanted a couple of Bowie's to complement a pair of Colt SAA's... But since custom Bowie's are expensive... I decided to make 'em!
I think they came out rather nice!

Ivory scales, german silver guard, and pommel to go with the ivory and silver-plate engraved SAA.

Ebony scales, damascus, German Silver guard a coffin-handle to go with the Blue/Case SAA.
v
v
v
v
v
v
v
v
v
Of course, as usual, not all is as it appears. The SAA's and the knives... are half-scale!

By way of full-disclosure... I bought the blades from Wayne Driskill... but did all the other metal/ivory/wood work myself on Saturday.
Cheers,
Sirhr
I think they came out rather nice!
Ivory scales, german silver guard, and pommel to go with the ivory and silver-plate engraved SAA.
Ebony scales, damascus, German Silver guard a coffin-handle to go with the Blue/Case SAA.
v
v
v
v
v
v
v
v
v
Of course, as usual, not all is as it appears. The SAA's and the knives... are half-scale!
By way of full-disclosure... I bought the blades from Wayne Driskill... but did all the other metal/ivory/wood work myself on Saturday.
Cheers,
Sirhr
So I got my lazy ass out of bed early this morning... and this happened!

Full story in Vintage ;-)
Cheers,
Sirhr
Full story in Vintage ;-)
Cheers,
Sirhr
No pictures to show but I started a new job and they stick weld everything. Holy shit, I am out of practice. Some of my uphill looks good and others it really bad lol. I have to do some practicing when it warms up a little. It's been 7 years since I did any and about 20 since I was really good at it.
So I got my lazy ass out of bed early this morning... and this happened!
View attachment 7022085
Full story in Vintage ;-)
Cheers,
Sirhr
With all due respect... you can say a lot of things about your ass, but lazy is not one of them! ??? Very cool stuff you do there. Care to give us a tour of your shop? I’ll do the same once it’s cleaned up and presentable for photography.
Dad’s ‘66 ElCamino he bought in ‘74 and used as a daily driver for 30 years. Need to get the bed finished and in primer. Time to go to work now that the kids are in bed.

Welded this up to prevent employee consumption.
3/32 electrode, 15cfh

3/32 electrode, 15cfh
Had some time to kill, machined up a 1 stick mini cigar ash tray


Nice! I need one of those.Had some time to kill, machined up a 1 stick mini cigar ash tray
View attachment 7042942
View attachment 7042943
Another post of something slightly different we have been fabricating.
This is one of two identical canopies headed to the new St. Petersburg Pier development. These canopies are of a “folded plate” architectural design. The columns are 8” pipe in a v-configuration. Every column is different lengths, leaning at different angles with different compound slopes at the cap plates. The main girder frame atop the columns are large rectangular tubes with small square tube purlins (not shown in the photos) running atop the girders. Think really expensive pergola. All steel is AESS and is galvanized and then coated with a 3-coat paint system.
Due to the complexity of the structure and the fact that we cannot have any gaps in the completed structure, we had to build the canopy in place to ensure fit up. The girders actually bolt to the column cap plates, not weld.......so the tolerances were pretty tight for everything to line up. We then disassemble it and weld it out and send it for coatings. As you can see, the canopy pretty much fills one one bay in our second shop. The canopy is so tall that we had to build the canopy girders separately from the v-columns or our overhead cranes wouldn’t be able to move. Essentially it was build the columns in place (with temporary shoring) and then build the girder level (with its own temporary shoring also). The purlins were built in our main shop.
My little project this weekend, making gates dog proof , the neighbors dogs come and chase my cows and horses
Untill I get a shot at them I figured this is the perfect job for my son to start learning how to tack weld, it was nice sitting and watching him and not having to do it myself") he is 13 years now and we are stepping up his learning of life skills like welding, using a chainsaw and general mechanical jobs.
he is 13 years now and we are stepping up his learning of life skills like welding, using a chainsaw and general mechanical jobs.

Untill I get a shot at them I figured this is the perfect job for my son to start learning how to tack weld, it was nice sitting and watching him and not having to do it myself
he is 13 years now and we are stepping up his learning of life skills like welding, using a chainsaw and general mechanical jobs.Nice taste in watches as well
So wanted a couple of Bowie's to complement a pair of Colt SAA's... But since custom Bowie's are expensive... I decided to make 'em!
I think they came out rather nice!
View attachment 7013620
Ivory scales, german silver guard, and pommel to go with the ivory and silver-plate engraved SAA.
View attachment 7013621
Ebony scales, damascus, German Silver guard a coffin-handle to go with the Blue/Case SAA.
v
v
v
v
v
v
v
v
v
Of course, as usual, not all is as it appears. The SAA's and the knives... are half-scale!
View attachment 7013622
By way of full-disclosure... I bought the blades from Wayne Driskill... but did all the other metal/ivory/wood work myself on Saturday.
Cheers,
Sirhr
There are a handful of us here in SH who appreciate RE Actual’s handiwork!Nice taste in watches as well
Cheers and good eye!
Sirhr
I ran a mechanics truck and a lube truck on the pipeline. I did a dig up and repair in Virginia, pretty cool to see hot cuts and tie ins. First time was a real WTF experience since nobody told me what to expect. We had our compressor for the air mover run out of fuel and give us a real scare working in the yard at a pump station. Needless to say it was fueled twice a day from then on.

My 1915 Ford Model T Armored car (polish Pattern) built entirely from scratch. Ready for paint now... Yes, it's been a 10-year project
Cheers,
Sirhr
I ran a mechanics truck and a lube truck on the pipeline. I did a dig up and repair in Virginia, pretty cool to see hot cuts and tie ins. First time was a real WTF experience since nobody told me what to expect. We had our compressor for the air mover run out of fuel and give us a real scare working in the yard at a pump station. Needless to say it was fueled twice a day from then on.
Yeah, they’ll wake you up for sure the first go round. Lol. It’s fun work though, especially with big heavy wall pipe.
First coat of paint... still have to radius a lot of edges but a thin coat of paint doesn’t prevent that.

Need one weekend of nice weather and I’ll have both carriages done and mounted with their barrels.
Cheers, Sirhr
Need one weekend of nice weather and I’ll have both carriages done and mounted with their barrels.
Cheers, Sirhr
Well, that's just a challenge and not a very tough one.Welded this up to prevent employee consumption.
3/32 electrode, 15cfh View attachment 7022555
In shops I worked in, that bottle would be swapped out for Yoo-hoo or Pedialyte pretty quick.
not sure if this has been brought up, im starting on page 1, but 6010/6011 or any other celluose based rod does not belong in the oven. the only rod that needs it is 7018 if you are doing coded work. keeps a 7018 weld from developing hydrogen cracks. at the temps necessary to keep 7018 fresh you have started baking off the coating on celluose based rods.I picked up this beaut not long ago and it's filled to the brim with 6010 and 7018, plus some cast-iron rods, and aluminum sticks. Not too shabby for the price. View attachment 6918712View attachment 6918713
Howdy yall. Another full time welder to add to the conversation here. Started my business when I was 20
I do all kinds of stuff mostly in the commercial market

 9
9


I do all kinds of stuff mostly in the commercial market
I've known a few welders to keep '10s and '11s in water. simply because they dry out so bad, that the flux falls off in use. As in, the rod is only burned 1/2 to 2/3's of the way, and there's no flux left. Gotta keep 'em moist.
I've heard of people wetting them before use but never keeping them in water...because they will fall apart lol. Paper and water doesn't mix, ask my open can I accidentally left in the rainI've known a few welders to keep '10s and '11s in water. simply because they dry out so bad, that the flux falls off in use. As in, the rod is only burned 1/2 to 2/3's of the way, and there's no flux left. Gotta keep 'em moist.
This thread is amazing. I am now hearing a u tuber in my head... he said that he does not get hurt with metal, like he does with wood.
With wood projects, you carry a lot by hand and your back, knees and such hurt.
When doing projects with steel and welding, the expectation is for mechanical movement due to the increased weight....
keep on posting these great project pictures....
With wood projects, you carry a lot by hand and your back, knees and such hurt.
When doing projects with steel and welding, the expectation is for mechanical movement due to the increased weight....
keep on posting these great project pictures....
been wanting a nice bit screw driver......had an hour to kill.....turned up this little guy

Or some spiral 'micro-fluting'.....haaaaaaaaaaaYou need a knurling tool.
I’ve got one... but the body of the handle is a curve...so it’s not easy to knurl....You need a knurling tool.
Plus it’s got that cool 1950’s retro space vibe to it.
I’ve got a few more screw driver shanks I’ve gotta make gandles for... I’m gonna make a stubby driver and knurl that
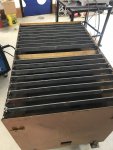
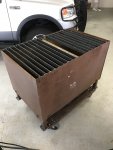
So I got tired of slag, metal spatter etc ending up on the floor of my shop.
It would burn the epoxy paint on the floor and make a general mess while cutting.
I repurposed a hydraulic tank, put it on casters and installed replaceable slats for my work surface.
I hope everyone has a safe and productive Friday!
It would burn the epoxy paint on the floor and make a general mess while cutting.
I repurposed a hydraulic tank, put it on casters and installed replaceable slats for my work surface.
I hope everyone has a safe and productive Friday!
Attachments
Did some casting with the kids... casted this guy as an example

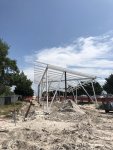
Here are a couple of pics from the site. This is the same steel from my 3-15-19 post above.
The first canopy is going up, and according to the erector....it fit like a dream. That’s always a crapshoot with geometry like this......hence the reason we spent the extra time to shop assemble both canopies in our shop. The footings and the anchor bolts were right, which plays a huge part in our steel fitting. We did have some significant issues with the coating system. The steel (after we fabricated it) was sent off to be hot-dip galvanized, then abrasive blast cleaned, primed with a high build epoxy and then sprayed with an intermediate coat of high-dollar polyurethane. After erection it will be touched up and receive one more finish coat of polyurethane. Painting over galvanizing is never a good idea, but the design team wanted what they wanted and it is our job to help make their vision a reality. The finish when it arrived to the site was less than perfect and we will be spending some extra time (money) to correct it. With this being a category 4 AESS structure, special care has to be taken with the surface prep and coatings and it just didn’t live up to our expectations, so we will fix it to make it right. However, you can see from the pics that the final product looks pretty cool.


The first canopy is going up, and according to the erector....it fit like a dream. That’s always a crapshoot with geometry like this......hence the reason we spent the extra time to shop assemble both canopies in our shop. The footings and the anchor bolts were right, which plays a huge part in our steel fitting. We did have some significant issues with the coating system. The steel (after we fabricated it) was sent off to be hot-dip galvanized, then abrasive blast cleaned, primed with a high build epoxy and then sprayed with an intermediate coat of high-dollar polyurethane. After erection it will be touched up and receive one more finish coat of polyurethane. Painting over galvanizing is never a good idea, but the design team wanted what they wanted and it is our job to help make their vision a reality. The finish when it arrived to the site was less than perfect and we will be spending some extra time (money) to correct it. With this being a category 4 AESS structure, special care has to be taken with the surface prep and coatings and it just didn’t live up to our expectations, so we will fix it to make it right. However, you can see from the pics that the final product looks pretty cool.
Attachments
I guess I could throw this up here. Probably around a $75,000 weld job. Well what we made instead of getting towed back to Dutch Harbor. We snapped a steering ram on the fishing boat in the middle of the bearing sea this last season. The shaft broke off flush at the block so had to weld on a bold to screw it out and got it replaced so we could finish the trip. My excuse for the shitty weld is I was using pieces of a broken hood and we were rocking around dead in the water in some nasty weather. (Plus I suck)
The nut size is 1 1/4” for reference.
The picture of the ram is from when we got back to port and was able to get it into a machine shop.


The nut size is 1 1/4” for reference.
The picture of the ram is from when we got back to port and was able to get it into a machine shop.
So a recent range outing prompted me to modify my cigar ashtray so that it mounts to the rail in my truck...

Now I can stage out of my truck and have a spot for my sticks
Now I can stage out of my truck and have a spot for my sticks
With my first kid on the way i figured how hard could building a crib be? Holly F@#k was I ignorant. The most frustrating thing i have ever done. Black walnut, ambrosia maple, wedged through mortise and tenon, bridal joints. I need a stiff drink.


So, you shop at IKEA too, do you?
(I had to)
Good job.
(I had to)
Good job.
I was actually about to build a crib also. This is not encouraging. I was planning on doing wrought iron spindles though.With my first kid on the way i figured how hard could building a crib be? Holly F@#k was I ignorant. The most frustrating thing i have ever done. Black walnut, ambrosia maple, wedged through mortise and tenon, bridal joints. I need a stiff drink.
View attachment 7056863
View attachment 7056864
View attachment 7056866
I was actually about to build a crib also. This is not encouraging. I was planning on doing wrought iron spindles though.
The iron sounds really cool. My issue is i tried to run before crawling. Up until this build the only joinery i used was pocket holes. My 2nd issue was not building the parts, but assembling them all together. My plans just did not work out cause wood moves so much, even after letting it rest.
My excuse for the shitty weld is I was using pieces of a broken hood and we were rocking around dead in the water in some nasty weather. (Plus I suck)
=
View attachment 7055840
That's not Nasty.... and isn't a job done by someone who sucks! It's utilitarian, strong and got you home!
Anyone can weld in perfect conditions... (well, almost anyone). That right there saved a tow.
Hope you got a bonus for it! And well done!
Cheers,
Sirhr
Not just "didn't need a tow" but seeing as this is/was in the Bering Sea, you're just lucky you didn't have to call Kevin Costner!
Getting the job done, without creating more job/havoc in the doing so, is what progress is. Had you welded the threads of the ram to the boss, then it'd have been a different story. So yeah, what SirHR said is exactly correct.
Some say "it don't need to be good, just 'good enough'" and there is some truth to that. But, the professionals always try to "be better" and that's what sets ya'll apart!
Similar threads
- Replies
- 0
- Views
- 533
- Replies
- 10
- Views
- 2K
- Replies
- 13
- Views
- 2K
