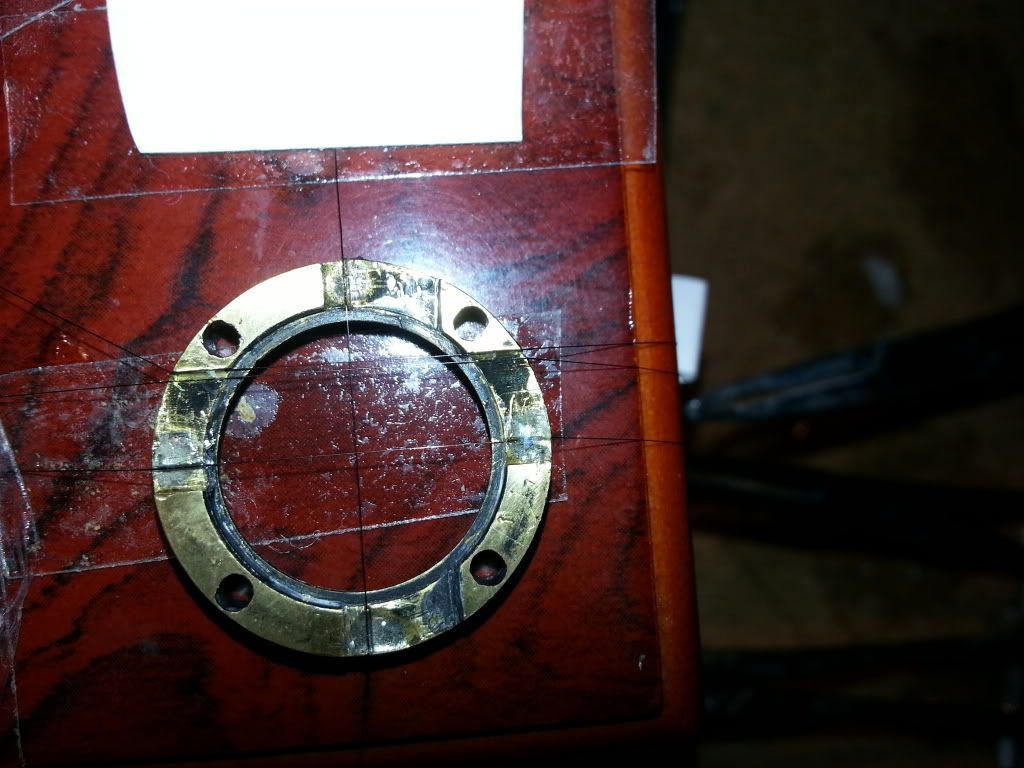
• Watch Out for Scammers!

    We've now added a color code for all accounts. Orange accounts are new members, Blue are full members, and Green are Supporters. If you get a message about a sale from an orange account, make sure you pay attention before sending any money!

Converting a commercial crosshair Redfield to an M40 accurange Redfield

The "Holy Grail" of color... I think I'm going to try a Brown/Gold mix to try and achieve this.....


My first run at duplicating this..... Many of you said "too gold..." I think the brown will blunt it some...


Too gold maybe, but you're getting there. I like it better than the OD green, which I think, is too green.

I'm thinking about sending one of my Redfields to you. But only after you get the right color ;)
 
Too gold maybe, but you're getting there. I like it better than the OD green, which I think, is too green.

I'm thinking about sending one of my Redfields to you. But only after you get the right color ;)

The price doubles...... ;)

Actually, the right color would be doing the OD Green and then placing it in a sunny area for a month or two. I'm waiting for the summer sun to do this...
 
Here is the tombstone I've created from an image of a real one. I just need to measure the overall length. About a 1/4" top to bottom... Tried printing it with all the highest end setting on an inkjet, it comes out a bit better but not good enough. Not sure if anyone has any secrets to trying to do this....

 
Last edited:
Do a seach on Lexan Labels (Polycarbonate Labels). Small transparent labels that you can print on. Probably requires a special printer though.. Most printing shops can do it.

Lexan Labels, Hard Hat Decals, Prototype labels - Performance Labels and Graphics -

Update: made some progress. What I actually did to improve it was to not use the image I created, but actually try pure font, Trebuchet 1pt and 1.5 font. Much, much, better but not perfect. Printed it to plain old transparency. Cut it out and glued into a ring for a test. I would say 60% of the way there need a better printer and plastic medium. The transparency sheets they make for everyday printing is no good because they add a rough finish onto it that really isn't suitable for print this small. I am going to go to a print shop to see what they say.
Guys, if I can perfect this, it will be a major breakthrough. I can then convert ANY vintage Redfield to an Accurange.
 
try a laser jet printer they seem to print more accurate in my experiences
 
Been going back and forth with Nate Smith, from Kingscote Chemical. They provide anodizing dyes. This guy responded to countless emails, and has now provided me with some samples of a "military OD Green" that they don't list, and an application method after sending him numerous pictures of authentic M40 Redfields. He also gave me some advice on a more effective oxidizing process. Will keep you all tuned...
 
Update on the tombstone cloning:
Aurora145 put me in contact with a firm that does laser engraving and etching. I emailed them and told them what I am trying to do. Right now, they have two versions (gen 1 and gen 2) tombstone designs I put together, and they are going to do a test run. I should be hearing back from them in a couple of days.
 
Guys... Just some suggestions when asking me to work on your scopes..

1. If you say you are sending a scope for service, and then change your mind, please tell me. It just delays other people who really want their scopes done.
2. Tell me if you are sending DAMAGED scopes, or scopes that need repair or parts.
3. Please put a note in your package with what work I am doing, what forum we PM'ed on and your forum account name.

Thanks,
Toki

Any headway with the laser engravers?

My mock up looked good. Can't wait to get the action back from the gunsmith!

foP9p93.jpg
 
Last edited:
Here is the tombstone I've created from an image of a real one. I just need to measure the overall length. About a 1/4" top to bottom... Tried printing it with all the highest end setting on an inkjet, it comes out a bit better but not good enough. Not sure if anyone has any secrets to trying to do this....


I would try creating this in a eps format using a drawing package like illustrator and then printing it with a laser


Sent from my iPad using Tapatalk
 
Any headway with the laser engravers?

My mock up looked good. Can't wait to get the action back from the gunsmith!

foP9p93.jpg

They did a first pass. The top three numbers are a bit blurry, so they are going to make an adjustment to the laser. I should be getting the 2nd prototype in the next day or two.

 
I was referring specifically to your craft.
This thread you have created is excellent.
 
Well, this laser stuff was a waste of time. I kept asking them to use the right dimensions for the image I sent them. .20" x .004"
For some reason it went in one ear and out the other. Kinda confirmed this when they sent me the image in the post above and I thought if that's the guy's thumb, then that is about an 1" long. Emailed him again and he said "Oooops... Yep, you're right, no way we can do this"

Can someone explain to me why it's next to impossible to reproduce something that was done in the "digital dark ages" of the 60's? Anyone have any ideas? Senich's book has NOTHING with regards to how the tombstone was produced.
 
Its a difficult one, - I'm not familiar with the process but how did they go about producing "micro dots" back in the day? could you use that photographic reduction technique for the graduations/ text onto a transparent plastic backing of some sort. Again not at all familiar with how it was done - just thinking aloud about what old school applications existed for work of such tiny scale?

All the best.
 
Damn, sucks the laser printer guys didn't work out.

Maybe someone could hire those guys that will write your name on a grain of rice at the mall?
 
Thumbscrew fabrication. Top
Real one bottom.
Trimmed and hand turned it to soften the diamond knurl pattern a bit. I searched high and low for suitable base screws to use, and this was the closest I can find unless I fabricate my own. If you have a lathe I would be happy to give you all dimensions.
Knurling different, but I'm not paying $50 for a hand knurling tool. Blackened with an annealing process Where I dunk red hot stainless steel piece into carbon oil.

These scopes will be for sale soon. A little disappointed as I added the stadia lines to these reticles in anticipation for these laser guys being able to make me tombstones, but no go. I can't find any info on producing something this small. Must be some photo engraving process.


Started out like this...
 
Last edited:
I'm excited about some new dyes I've finally acquired. Found the company that sold me OD, and discovered they also have an Olive EG. You guys who've had your scopes done in the
last few months, this is the OD Green I used. The ones above are the Caswell OD Green, which is a bit too dark, hence the sale. You can't keep anodizing (maybe twice), but the etching process ends up eroding the threads so I have quite a few parts that no long screw down. Once in a while they will work on other scopes.

Unfortunately minimum order size is a pound of each, don't even want to tell you how much that cost.
Anyway, I think I'm coming to the end of my anodizing days. After this round of chemicals is exhausted, I'm done for a while. It's a lot of work, probably why Celtic charges so much.

This inability to make a tombstone is disappointing, and I'm going to get busy with some travel for work and my daughter's college search in the next couple of months, so I would recommend if you are planning on having me do your anodizing, let me know soon.

 
Last edited:
I'll tell yah... I came up with this template to use for adding the stadia lines when I first started, but got to a point where I can do it just by eye, light and the reflective nature of the wire, and it's much better.
 
Ok lads...
Couple of things... Bought a vintage portable microfilm camera. I know, I'm nuts. I gotta do this. If it works I can convert any cross hair redfield to Accurange.

Gotta a couple of Greenies for sale soon if anyone is interested. Right after I try and make these tombstones.
Picked up another broken Gen 1 for a bargain. $49. I'm hoping its an Accurange. We will see.
 
If you can do Art 1s and Art 2s you will be in the money. They are pricey to do and expensive.

I do have a Accurange I would love to have done in green, whenever you have have the color close. Actually I have 2 but I will risk only one as both are near new and one is a F prefix.

If you want to branch out into WW2 optics, and they are almost simple enough for me, you can stay pleasantly busy and make some money too.
 
Nice! What did you do to it exactly? Refurb/re-anodize? Is that a repro or original base?
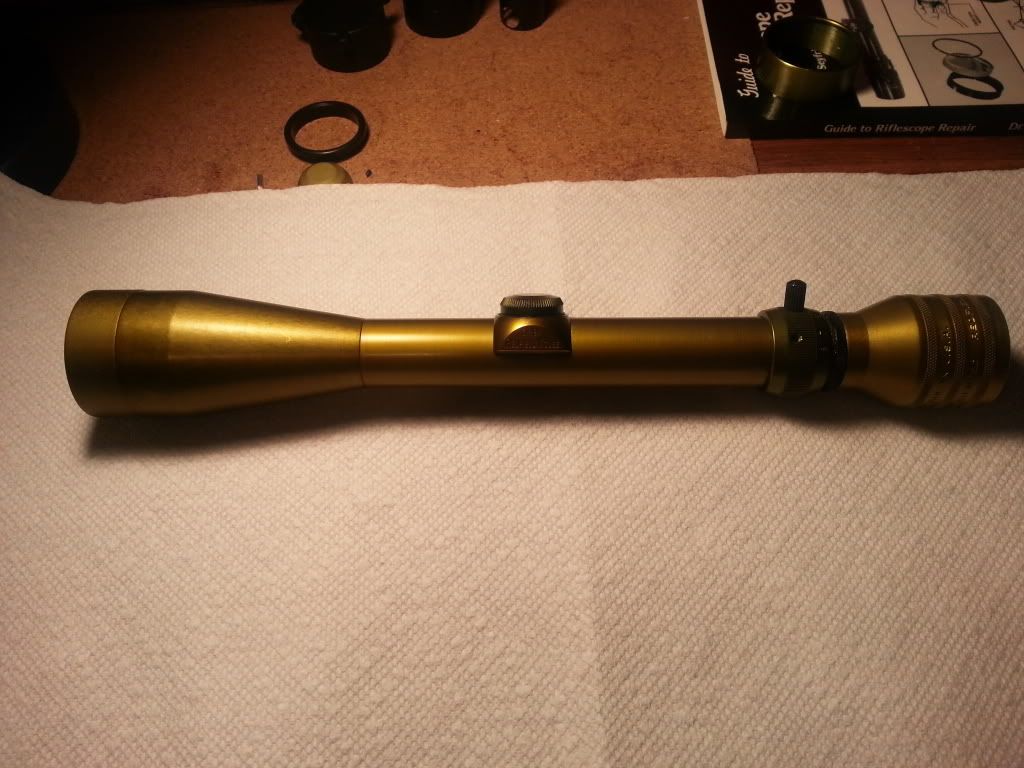
Nope, NOS Base I picked up for a few hundred bucks. My scope. I bought it real cheap ($800) change the glass, fixed the thumbscrew and now re-anodized it. Brand new now. The original base I have has a little play in it, so I picked this one up. Have original R marked lens caps and a carry case that I will strip and repaint when I have the time. I want to get the right paint.
 
If you can do Art 1s and Art 2s you will be in the money. They are pricey to do and expensive.

I do have a Accurange I would love to have done in green, whenever you have have the color close. Actually I have 2 but I will risk only one as both are near new and one is a F prefix.

If you want to branch out into WW2 optics, and they are almost simple enough for me, you can stay pleasantly busy and make some money too.

Nah, don't want to bother with ART IIs. Don't have and cannot get parts. Ironsights has those. AR TELs are just generation 2 Redfields, so lots of parts out there.
The green color I have is the final color. It's OD Green, a bit dark, but I don't have the time to experiment anymore. This is a hobby, not a career, so it is what it is.
Happy to do your scope if you want it done. I'm already doing Weaver K2.5s and Lyman Alaskans.
 
Thanks toki, You seem to enjoy it and that is the most important thing. If you retire from a real job, which I am glad I did, there is a real demand for scope repair, cleaning and refurb.
 
Thanks for doing my scope while you were in it. It looks great and fulfilled my dream of a commemorative M40. Cheers sir!
 
Pre Gen1 (Bear Cub) Zoom Ring: For those interested, this is what a part looks like once it's anodized. You can see the a titanium like hue to the part.
I know right away if I pull a part out of the electrolyte tank if the connection went bad.
The cap behind it isn't anodized.

 
Last edited:
Would you be willing to try this on a more complicated scope? Say, one that has an adjustable objective?
 
"tokiwartooth,"

Your microfilming replication of the "Accu Range" scale is another milestone in your art and certainly worth waiting to see what your efforts and testing bring. I'd love to have you do your "forced oxidation" on my Gen.1 and add the scale and stadia wires, when everything pulls together and meets with your satisfaction. In anticipation and at your convenience, kindly send me a PM with your name and mailing address. In earlier PM's you outlined your pricing, which you can certainly update and finalize at a later time. Thanks!!
 
Ok, contacted another microfilm outfit today as the first guys never got back to me. Received the machine I bought yesterday. Ugh... No documentation, so it's a boat anchor.

Nice, long conversation, and I am happy to report about 15 test images have been sent. They will produce my test tombstones on 35mm polyester film with a .05 mm thickness (thickest stock) from digital images. They actually take a photograph of the digital image. What people may not realize is that photographed images on film (movies, photos) are actually much more higher definition than any digital image, as long as they are in focus. Once I receive them back, I will test mount them. Given a 24:1 reduction ratio, and an actual documented tombstone length of .2", I sent images at 4.8", 5" and 5.25". What I don't know with Senichs documented length is if it included the non viewable portion of the tombstone that allows it to be glued to the ring, or if his measurement starts at the black base of the tombstone.
 
Last edited:
test films complete!! They are on their way to me.... Keep your fingers crossed.

You know, it's such a pleasure dealing with people who don't live in NY. I'm shocked by how nice and accommodating people really are. When NY'ers are nice to me, I think I'm either going to get hit over the head or served legal documents....
 
Last edited:
Test films received. Rough mount up.

Gentlemen, we have success...
I have to adjust spacing and font size (make it bigger) but it's clear as the day is long and this is how they did the originals.
I also have to make it one image per frame and remove the borders. These guys turn around quick too.