Join the Hide community
Get access to live stream, lessons, the post exchange, and chat with other snipers.
Register
Download Gravity Ballistics
Get help to accurately calculate and scope your sniper rifle using real shooting data.

Install the app
How to install the app on iOS
Follow along with the video below to see how to install our site as a web app on your home screen.
Note: This feature may not be available in some browsers.
You are using an out of date browser. It may not display this or other websites correctly.
You should upgrade or use an alternative browser.
You should upgrade or use an alternative browser.
Maggie’s The Welding and Metalworking Thread
- Thread starter bogeybrown
- Start date
")
Would love to have one of those. Used to run a tl1 at 1 old job and a tl3b (25" front 4 jaw chuck with a 25" back scroll chuck both with 8" bore).I just picked this up for my shop last week. I just got it off the trailer and it will take a minute before I can get it wired up. Then tooling and setting it up how I want will be more time but eventually I'll have a bad ass lathe set up.
Except that 4" 1/2 wall would probably be almost $1k a stick! Needed 12' of 4" 1/4 wall square tube and went to local supplier yesterday hoping to find a drop. Nope, full 20' stick only - $388 + tax. I knew steel prices were up but damn!I wouldn't laugh at you if you'd used 4" 1/2" wall tube.
want to learn 60, tilt that thing almost vertical, turn it down a little, run uphill, learn to keyhole it on a slant with two plates and you'll be money. 60 is so sweet to use but damm those sparks. your welds look fine, most important thing is to be comfortable in the position you are in prior to goign hot.Here's some pics from a few weeks ago learning to pad beads using stick in all positions. GhastlyView attachment 6918604View attachment 6918603
Scaly, rusty base metal, not allowed to clean before welding and just turned loose with electrodes and told to burn them to the numbers
I made a new control panel for my lathe last weekend.
A peice of 1/8" aluminum stock, roughed out on the bandsaw, edges straitened on the belt grinder. Cerakoted in Cobalt to match the headstock top and engraved with a diamond drag tool. I added the 4 way joystick on the left to control fw/rev directions @ full and low rpm jog. Thought it might be a neat way to cut threads:


It came out pretty good.
A peice of 1/8" aluminum stock, roughed out on the bandsaw, edges straitened on the belt grinder. Cerakoted in Cobalt to match the headstock top and engraved with a diamond drag tool. I added the 4 way joystick on the left to control fw/rev directions @ full and low rpm jog. Thought it might be a neat way to cut threads:
It came out pretty good.
At my old shop, I had a 20' I-beam hung from cross members with a trolley hoist. Given steel prices I took it down and brought it with me to my new place last year. But the structural steel in my new, more recent construction, shop just isn't as heavy as the old and the span is much greater so I wasn't comfortable hanging the I-beam as before. I've been missing my hoist though and a post a couple months ago on another thread about lifting mowers to replace blades got me thinking and this is what I came up with. 180deg pivot off new post that carries the weight set in front of structural beam which just provides some lateral stability. Already had all the steel except 10' of 3/16 wall 2x2 square for a brace - $100!! Not an engineer but I have stayed a lot of nights at Holiday Inn Express so I think I'm good.

he even painted it, I never get that far...At my old shop, I had a 20' I-beam hung from cross members with a trolley hoist. Given steel prices I took it down and brought it with me to my new place last year. But the structural steel in my new, more recent construction, shop just isn't as heavy as the old and the span is much greater so I wasn't comfortable hanging the I-beam as before. I've been missing my hoist though and a post a couple months ago on another thread about lifting mowers to replace blades got me thinking and this is what I came up with. 180deg pivot off new post that carries the weight set in front of structural beam which just provides some lateral stability. Already had all the steel except 10' of 3/16 wall 2x2 square for a brace - $100!! Not an engineer but I have stayed a lot of nights at Holiday Inn Express so I think I'm good.
View attachment 7630653
I got that lathe panel finished up:


and started one for my milling machine. 3d printed plastic handles.


and started one for my milling machine. 3d printed plastic handles.
I do some hobby, farm stuff. From cattle chutes to repairing old target stands.


Old Bronco rotting away?I do some hobby, farm stuff. From cattle chutes to repairing old target stands.
View attachment 7630781View attachment 7630782View attachment 7630783
Just rattle can red primer to match existing exposed beams.he even painted it, I never get that far...
Two farriers rasps I drew out. Right has a horseshoe guard and a shed my mom found when I was a kid. The left has an African Blackwood handle, forge welded cabled Damascus guard. Blades are roughly a foot long, lots of filing and hand sanding. I need to invest in a grinder. I need to rebuild my forge after my carport collapsed. I have a lot to learn and work on. Blades were quenched in P50 Quick Quench.


I had paid a guy a LOT of money to restore it while I was deployed. He had medical issues and gave it to another guy to finish. In the process an engine was stolen along with my money (a lot) by one builder to make a hotrod that he sold and my other rear axle to replace the broken axle was stolen and this is what I received after my deployment. It sucks every time I see it!Old Bronco rotting away?
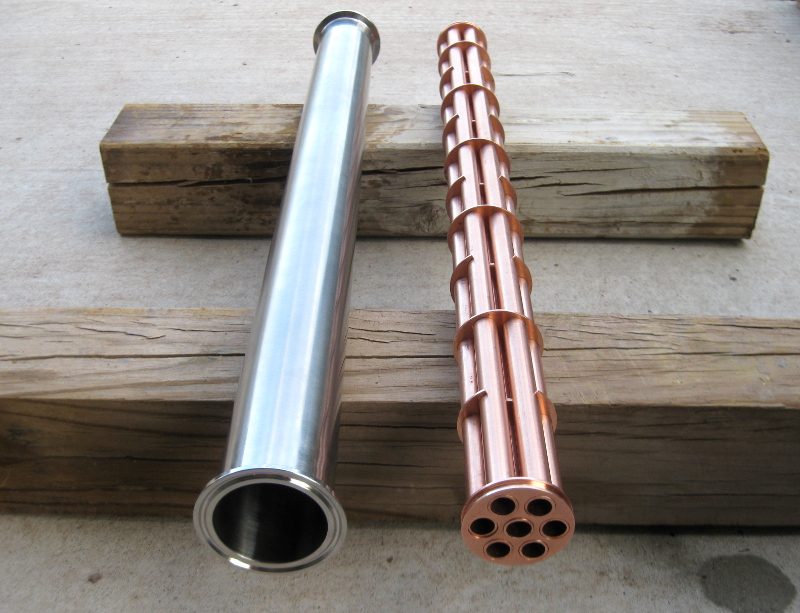
I've been fabbing up someone's science project. I gather it's some sort of heat exchanger. It's been a few different design revisions along the way, and I only ruined a couple parts when the copper grabbed onto the cutting tool and it wrenched it out of the fixture, so I count that as a win. As depicted here it just needs some solder and a couple fittings on the stainless pipe to hold some coolant.
Copper is not my favorite material to work with, but I'm happy I got decent surface finishes where it counted.
Copper is not my favorite material to work with, but I'm happy I got decent surface finishes where it counted.
I've been fabbing up someone's science project. I gather it's some sort of heat exchanger. It's been a few different design revisions along the way, and I only ruined a couple parts when the copper grabbed onto the cutting tool and it wrenched it out of the fixture, so I count that as a win. As depicted here it just needs some solder and a couple fittings on the stainless pipe to hold some coolant.
Copper is not my favorite material to work with, but I'm happy I got decent surface finishes where it counted.
Fantastic work. I'd be very happy with those results. The way copper absorbs heat and aluminum sheds it, and all that surface area, I expect it's going to work quite well.
Been welding and doing quite a bit of metal working on this gem. 1964 Impala SS, it was the owners first car.

One would almost think that was a 'shotgun condenser' but I wouldn't know about such things.I've been fabbing up someone's science project. I gather it's some sort of heat exchanger. It's been a few different design revisions along the way, and I only ruined a couple parts when the copper grabbed onto the cutting tool and it wrenched it out of the fixture, so I count that as a win. As depicted here it just needs some solder and a couple fittings on the stainless pipe to hold some coolant.
Copper is not my favorite material to work with, but I'm happy I got decent surface finishes where it counted.
Nice job. I've made many a tube-sheet and baffle set for the assembly department in Industrial Refrigeration industry. Made lots of brine chillers for ice rinks, and our claim-to-fame was the Calgary '88 Olympic bobsled run. From the movie Cool Runnings.

Not near as clean as most of the work here. Here's a tire carrier I built for the wifes jeep


Not too much metalworking involved... so far. But found this rock while building a retaining wall. So yesterday drilled for eyes and then bedded them in molten lead. I’ll be making a wood frame to hang it... with some interesting brackets.

It’ll make a good weather rock
Sirhr
It’ll make a good weather rock
Sirhr
I've been fabbing up someone's science project. I gather it's some sort of heat exchanger. It's been a few different design revisions along the way, and I only ruined a couple parts when the copper grabbed onto the cutting tool and it wrenched it out of the fixture, so I count that as a win. As depicted here it just needs some solder and a couple fittings on the stainless pipe to hold some coolant.
Copper is not my favorite material to work with, but I'm happy I got decent surface finishes where it counted.
Iranian centrifuges? Sure...just a science project.......
Not too much metalworking involved... so far. But found this rock while building a retaining wall. So yesterday drilled for eyes and then bedded them in molten lead. I’ll be making a wood frame to hang it... with some interesting brackets.
View attachment 7637312
It’ll make a good weather rock
Sirhr
Looks like a map of your home state......
That's a great idea. That's going to look very cool.Not too much metalworking involved... so far. But found this rock while building a retaining wall. So yesterday drilled for eyes and then bedded them in molten lead. I’ll be making a wood frame to hang it... with some interesting brackets.
View attachment 7637312
It’ll make a good weather rock
Sirhr
When I get time and if I don't forget, lol, I'd like to steal your idea. We only have limestone here, but oh well
Nothing fancy but here's a air dryer I made for the compressor yesterday.
Cool steel projects are in the works, pics to follow


Cool steel projects are in the works, pics to follow
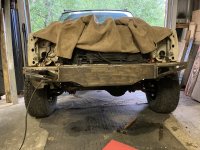
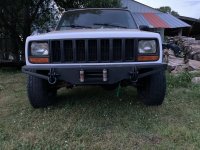
Been working on my 79 Chevy K30 Crawler since late 2020. Got almost all the fab work done. On the list next is to pull the body off the frame and do the finish welding. Aiming for 142-143" wheelbase if I measured right. Rocking a built 12v/NV4500/205 w/ Magnum Box on 41.5s PBRs, walker evans & 4.88s.


Nice start to a crawler. Wish there were places closer to me for that kind of thing. They shut everything down or idiots got the trails shut down. Take you pick.
Good luck!
Good luck!
We've been building another business and we're just plugging along...
Today I finished installing the steel sch 80 hydraulic lines. Only, the pipe and fittings are only tack welded together. I'll disassemble tomarrow and weld it completely.
Side note, the west side of that building is murder to work next to.
So after this welding thread opened, till now, me, mike the welder as I have gone by since the early 90s, has never shown any damn welding, lol...
My hopper and delivery systems I start on next will be more dramatic looking vs these hyd lines.
When I built my building I should have built an additional structure for the air compressor as when that thing comes you cant think or hear the music. And a bathroom; figured we could walk down to the barn, but a bathroom in the building would have been clutch.
I am not a welder by trade but decent enough pass off I know what I am doing.
I am not a welder by trade but decent enough pass off I know what I am doing.
Attachments
Question, have any of you guys run ballistol/water mix as a coolant?
Were looking for new lathe coolant and our regular suppliers havent gotten back to us on quotes, and the quotes we've gotten so far have been astronomical.
Were looking for new lathe coolant and our regular suppliers havent gotten back to us on quotes, and the quotes we've gotten so far have been astronomical.
How did you bend the tubing and pipe.
Very clean, nice job
Very nice! Buggies are so nice on the trails. Never had the chance to build one and really we have nowhere within 4-5 hours to play anymore. Everything has been shut down years ago.
Who did your suspension design? It looks like it's stout.
Nice build, very nice.
How did you bend the tubing and pipe.
Very clean, nice job
Rogue fab bender
My friend who owns iron duck fab did it. I don’t ride anymore but it was fun to build. I wouldn’t do it again though, way cheaper to just buy something already done.Very nice! Buggies are so nice on the trails. Never had the chance to build one and really we have nowhere within 4-5 hours to play anymore. Everything has been shut down years ago.
Who did your suspension design? It looks like it's stout.
Nice build, very nice.
a cammed lq9/ptc th350/atlas and 14bolts f/r. Wod makes nice stuff too.Pretty badass. Kinda looks like a Wide Open buggy.
What motor & trans you running? And there is no way you only used 12 sticks.
Thanks alot buddy, lol...Rogue fab bender
My friend who owns iron duck fab did it. I don’t ride anymore but it was fun to build. I wouldn’t do it again though, way cheaper to just buy something already done.
a cammed lq9/ptc th350/atlas and 14bolts f/r. Wod makes nice stuff too.
View attachment 7654135
I went to the rouge website, super cool, cept, I saw their versi tubing cutter.
Now I've got to buy it.
New toy picked up at local community college auction. Maybe one day I'll actually learn how to use it!

Awesome! With a little practice you'll be up and rolling.New toy picked up at local community college auction. Maybe one day I'll actually learn how to use it!
View attachment 7689486
PITA!!
This is a small metalworking project, I learned how to cut inside and outside threads!
The 1946 lathe has no gearbox. To cut threads, individual gears are selected from a chart, and installed in various positions in the gear train.
Really primitive, but effective.
In keeping with 1946, I lubricated the gear teeth with some White Lead, also an artifact of ancient times.

The metal is Titanium, much more difficult to work with than I am accustomed to.

The 1946 lathe has no gearbox. To cut threads, individual gears are selected from a chart, and installed in various positions in the gear train.
Really primitive, but effective.
In keeping with 1946, I lubricated the gear teeth with some White Lead, also an artifact of ancient times.
The metal is Titanium, much more difficult to work with than I am accustomed to.
Similar threads
- Replies
- 0
- Views
- 566
- Replies
- 16
- Views
- 2K
- Replies
- 13
- Views
- 2K
