• Watch Out for Scammers!

    We've now added a color code for all accounts. Orange accounts are new members, Blue are full members, and Green are Supporters. If you get a message about a sale from an orange account, make sure you pay attention before sending any money!

Advanced Marksmanship Tips & Tricks, from Tripods to Stage Examples for - UKD Team Field Match or Hunting

Sneak peek to a Stage Spoiler

BT's One-Shot Team Challenge

Dave's Devious Dope Test

With all the stages, the names are hints in themselves. If you know Dave or @sfogold you know Dave likes to create side stages for his NRL22 matches involving match sticks.

Next week I'll finish the first 2020 Stage Spoiler. This one certainly will test your team's strategy to address targets that are *skylined, possibly the need to know how to work around parallax issues, ranging and shooting accuracy, as well as knowledge of your SOB and the trajectory it creates.

This image represents 2 hints of an upcoming stage. Teams will have to disable their targets to go to the next distance. The final target on this stage will produce a Stage Winner and receive a gift from BT Industries, also serving as the tie-breaking stage for the match.


FYI the image below is not the actual target hanger -- just used to proof the stage.
Daves dope BT One shot.jpeg

*Target with no visible backstop, misses will not have an impact signature to use for corrections.

Use the link below to return to the main index to view Key Segments and Tips:
spnsor logos for posts-01.png
 
Last edited:
  • Love
  • Like
Reactions: todd and EN2722
@johnrice @Diver160651

For time management, you always need to have the most experience shooter of the two go first. No such thing as having one be wind b* as y'all are teammates lol.

There's no such thing as split times. You're only as fast as your weakest link. Like diver said, if you skip a target, you'll just lose those points. And in some cases, you can't skip it. So you must try to engage it regardless. And no, don't shoot towards a different area cause you're struggling to find the target. That's a quick way to get you DQ'd.

@hic28 and I keep it simple. I'll find the target, range it and write my dope, while he shoots his pistol portion. If he needs me to spot him, he'll wait till I finish my pistol portion, if not, he'll shoot target 1 on his own and I'll play catch up. I give him the range so he can write down his dope as well. But we go fast enough that I'll be done with pistol as soon as he's done writing dope. He'll sometimes wait to get me on target before he starts engaging.


Here's a quick video. We where shooting same cartridge, but different bullet. He had to push his harder to match my dope as the bullet's BC I was using, was higher. It was so cold that day (hence mouth breathing) that I just went with his dope. They let us range and dope the targets prior to starting on this stage. So I was keeping warm in the truck hahaha. Since it was near identical. Maybe a tenth to half a tenth difference.

(Having a hard time posting vide...)


I had a bad batch of CCI 450. About 20% failure between 4 rifles. Contacted CCi and they said I didn’t know how to reload. Told them to kiss my Competition Primer seaters ass.
 
Preface:
For our first 2020 stage spoiler, I'm choosing one that helps me weave another layer into the skills we've been discussing. The end game may not be readily apparent with the 2019 Stage Wrap-up, the Tripod Tips, and now this first of several Stage Spoilers, but we have a strategy in mind that will make more sense once the stages and tips are complete. As mentioned early on, I have a general theme that is the undercurrent of the match. If you can figure it out, you'll realize that these stages work well together to test your overall-field knowledge, to have fun, or help those with less experience, gain the insight they might never have considered.​
This stage, BT's One-Shot Team Challenge - Dave's Devious Dope Test, will seem like an accuracy test, maybe out of place even, but it will help with the foundation of further testing the Team's knowledge of loops. The very fundamentals used in this stage are essential to other exciting stages you'll shoot. If you go back to the stage rollup, you'll remember that the stage names are clues in themselves, and we talked about managing the target side loops. Well, this stage is about understanding SOB (sight-over-bore), the base knowledge needed to understand near side loops. SOB, doesn't play much of a role as we approach and surpass our 100-yard zeros, so we tend to dismiss understanding where it is essential to account for it. I am not discussing rifle cant; I figure if you're shooting the Team Match, that fundamentals are not something we need to cover. While you can easily shoot this stage just showing up to the match and have fun, I am using it as an example to illustrate a couple of tips that some shooters might find useful for a more difficult stage or even possibly hunting.​

BT's One-Shot Team Challenge - Dave's Devious Dope Test, has 3 targets that are not hard to find. The Teams will have 6 minutes, and that is plenty of time for this stage. This stage has an unlimited ammo component, but you must defeat each target as a Team before moving forward. Like all stages, this stage is worth 32 team points, but the winner of this stage, is based on the performance of the last target, and will receive a certificate to BT-Atlas. Additionally, in the unlikely event of a tie for the match, the Team with the best performance on the last target will be the winner.

Dave's Devious Dope Test; for those of you that know Dave knows he shoots a lot of matches and likes shooting small interactive things. The pencils are his idea, turning them at a 45° ensures your windage and elevation need to be correct. If these pencils are getting in your head, call Dave; maybe I can post his phone number, LOL. This is a component of the stage that lets the teams use unlimited shots to disable the targets. Just like any other stage, teamwork is key, and if you hit a target other than yours, or shoot too many targets, your Team will get a zero for that target set. If you do not disable the targets, you can not advance to the next target

Target 1: The target is set between 12y and 50y and requires that the Teams brake the top 2 pencils on their assigned target stand to move on and each pencil is worth 5 points.
Pencils.png

It does not matter who ends up braking both targets, so working as a team is best. We're using target 1 to illustrate the techniques that one can use to gain an edge on other stages or in the field, and it is really what the entire preface is all about.

Target 2: The targets are between 80 yards and 125 yards, requires that the Teams hit 12 1" "spot and sees" on their assigned target stand to move on with each dot worth 1 point. It does not matter who shoots the dots, and you have no limit on the number of shots. We'll have a high-end spotter and able to judge if the dot is hit. Hint, if you think it is questionable sending another one to make sure, doesn't hurt.

Target 3 (the last target) is the BT One-Shot challenge that @Kasey let us modify for this UKD Team Challenge. The target is a standard size playing card with a single Ace of Spades printed of the face. The objective is to place your shots into the center of the Ace of Spades. The smallest 2 shot group and closet to the center by the Team is the stage winner. The only snag is there is only one certificate, and the Team will have to decide who gets the reward.
BT-Ace-Card.png

This target will be further than the standard BT One-Shot Challenge, between 150y and 200y. The Team must range the target and are ONLY allowed 2 shots, hit or miss, with hits worth 5 points each. Learn more about the regular BT Atlas Accu-shot One Shot Challenge her: https://www.accu-shot.com/bt/photos-one-shot-challenge

Tips for the Stage Target 1: See if you notice anything unusual in the video below. There is a very purposeful move that you normally do not see.

This is not the real stage: We videoed this to help illustrate the need for close-range targets or obstacles (hint for another stage), be as accurate as possible from the muzzle to the target. Most people range a target where they stand then shoot from that spot; it's often more than a 1 to 1-1/2 yards from the muzzle. That said, I am the first one to say that under normal circumstances, who would care. But remember, we are using these examples/discussion points in the hopes of building up to another skill test or stage. With that in mind, if we set target 1 at 12 yards, on my rifle with an SOB of 2.3"; a 1-1/2 yard ranging error is .6mils. It sounds worse than it is because we are mainly thinking of longer distance angular results. But it would be about the width of the pencil at 12 yards.

james-PRS-stock.png

This year make sure to bring your bipod and maybe a bag; you'll use it for at least 1 stage.

With targets SUPER Close, parallax can cause a real issue, as well as a blurry image. A blurry image can be especially problematic if you need ACCURATELY to identify an obstruction as not everyone's scope can adjust down parallax free to 6'-15'. (Hint for another stage).

Scope-looking-at-blurry.png

An old school trick used to ensure your scope is parallax free is scope shadowing. It is super fast and simple, move your head back slightly until you see even shadowing all around the ocular. It can be useful in several real word situations even today. Be it a stage with poor body position containing both near and far targets without the time to adjust the parallax to a long-range target where mirage makes it very difficult to ensure the parallax is correct. What's really happening is the even shadow around the ocular is indicating that your visual path through the scope is lined up and centered.
Scope-shadow1.png


If you need ACCURATELY to identify a close-range obstruction closer than your scope can resolve, you can pop a hole in your objective scope cap and drastically increase your depth of field. Unfortunately, smaller holes yield more depth of field and depending on the size of your hole; your image brightness will drastically decrease.
Scope-with-pin-hole-Dark.png
On the Vortex AMG as shown, I put two layers of tape back to back so that there was no adhesive and punched a small hole in it. Normally I just use a rubber band, but I decided to tape in orange, so it is easier to indicate that I was not using the adhesive from the duct tape to stick it to the scope. You can do the same with a thick piece of dark paper or similar.
pin-hole.png


Lastly, the last tip for this stage is that your dealing with targets that are effectively "Skylined." They are too close to use trace, too small anyway as well. So the best way generally to deal with a target you missed and have NO possible hope to identify misses is either bracket the target or try to pull off and send one into a similar range where you can locate your POI. If you choose to bracket the target, first, you have to be certain your shot execution was perfect. Then make sure you don't just make partial moves. Move about the full size of the target. Remember that you have the target width, plus your bullet width. Did I mention your bullet will be >.6mils at 12 yards or about .3mils at 25 yards?


spnsor logos for posts-01.png
 
Last edited:
thanks, i feel like im thrown in the deep end, my mind hurts, i appreciate all your time and effort.

John,

Don't worry; the match will have something for everyone. Again, we are adding elements as a learning aid online because our free clinics ended up with COVID restrictions. My hope is no matter what happens; we'll get more contributions from guys like @NoLegs24, @hic28 or @sfogold or @Swoodhouse19 (the MD), @Jabot @Mxridr, @Dthomas3523, etc... everyone brings another angle or more information that is key.

Hopefully, when we further along the image @Calvinho leaked will make more sense, when you see scope images like below, you know exactly what’s is happening; not everyone does. Hint, this uses and builds on the principles talked about in Dave's pencil stage spoiler... We'll have clear info later on and this will be easy stuff.

Loop-Scope-images-all-three.png


Loophole-Looking-out-a-blind_Hunting.png

Above is the practical application.

Your son and you will have fun.. hearing perspectives from all levels of shooters is beneficial.

spnsor logos for posts-01.png
 
Last edited:
  • Like
Reactions: johnrice

The iPad for practiscore is Velcrod on so it won’t fall off and I have a backup battery With 3 usb slots below so I can charge the ipad, shot timer and phone depending on how long the match is. Allcables are in the bottom portion of the cup holder. Fix it sticks on the left for helping anyone who forgot or doesn’t have tools. Those get used every time I’m at the rangeTo help someone who wasn’t prepared. There is also a clicker down there for counting hits.

View attachment 7317145


If enough people are interested, hit me up in PM if you want a table and I’ll make a discount code on the website.
[/QUOTE]

This represents approximately the last 10 years
Plates.png

Left to right: Pre-commercial table, JC Tac-Table, Gray Ops Elite Arca Multi-plate and Able Table.

Wood: Uber light and very cheap, but when wet, the bags slid around. I used this with the old Manfrotto 055s with the center column. The center column was fast, so you could quickly adjust the rear height.

Tac-Table: This cam out and seemed like it would offer more traction and be stronger. Unfortunately, these came out when most of us switched to column-less tripods, so I never used it much.

Gray Ops Elite Arca Multi-plate: While some use this as a "gamer plate," this is a very nice optics platform. It is the heaviest, but most elegant, but suffers from having the glass too close for two shooters to both have binos on the same plate. You also can not change the orientation of the dovetail mounts; if you add a panning head, the plate can get too small with a large spotter and binos.
gray-ops.png

Able Table: This is my second Able Table. In the raw form, the lightest commercial option and has the most mounting options. The Able Table also holds the shooting bag in place the best.

Once spruced up with the optional mounts is wide enough to have 2 people use Binos simultaneously, run a large spotter, and binos easily pan, use three optical devices or shoot on with your binos and PLRF attached.

Here is an image with it like @hic28 posted (he is offering 10% off to the thread users). I added these images because I wanted to illustrate why I came back to using the Able Table over the others. Not only are there 4 flush cup receivers, 1/20 threads down the center, and a 3/8 thread to mount a QR for a rifle if you wish, but the slots also allow for 1/4-20 bolts use as I did with the Kestrel on the swivel. (Note- I don't use the Kestrel often or for my dope- this was just for the picture).
rifle-able-table.png

I have a panning head on the PLRF so it is easy to get on targets precisely. With the ball head and QR, it now weighs a couple oz more than the Gray Opps.

You can use the plate as a gamer table if you wish, but I don't use them anyway. If you do direct mount a rifle as shown, I would not have your optics attached, I'm just guessing, but I bet recoil over and over isn't the best for them.
rifle-able-table2.png

A bag in the middle is ultra-fast, and the recoil is minimized to the optics as the gun slides over the bag.

I think it is worth noting that end of these as a rear support is all but gone; except in some very limited applications. Today, the technique of using a tall tripod leg to sandwich the butt of the rifle is so fast and so stable it is usually the best choice.

* The Able Table shown is going to use the RRS BH 30 on the left side for my spotter because it can hold the weight and has the panning base with the lighter Panning Micro Ball BPC-16 for the binos for better grid glassing this Elk season.
rrs-mini-heads.png


spnsor logos for posts-01.png
 
Last edited:
  • Like
Reactions: seansmd
Buy an $11 arca rail on amazon...some $6 arca clamps and mount away! :)

Does it work and shoot like the cheap tripod you got too? ;) Sorry could not help myself..

Guys please be aware that a lot of the cheap amazon stuff is not 1.5" dovetail and will not lock up securely with many of the RRS products or other higher end stuff using 1.5" (also called Arca).
 
HAHAHAHAHAHA lol Perhaps the "less expensive" tripod is not quite to the level of yours....but it still looks cool and that's all that matters! well except when the screws fall out in the middle of the match and such
 
HAHAHAHAHAHA lol Perhaps the "less expensive" tripod is not quite to the level of yours....but it still looks cool and that's all that matters! well except when the screws fall out in the middle of the match and such

FWIW - If anyone stumbles on this part, I was there when his tripod fell apart :() and Scott and I are playing. He is the MD.
 
  • Haha
Reactions: seansmd
I added this to the tripod post. I was not going to include it because it really doesn't work great in the tall grass, bushes or on steep slopes hunting or in the field. But a buddy said I should at least show this method. BTW I cut my own hair with an electric razor and cut the racing strip in by mistake!

Here is another method if you know the stage is going to require standing to kneeling or kneeling to standing; well, any combination.

This works best in a PRS/NRL type match where the ground is flat and not covered in brush or tall weeds. You use a reverse setup with two legs in front and one in the rear. You control the tripod with the one rear leg and use the Apex locks to control the height. You'll notice is once again, the low standing height you marked on your legs are again perfect to provide an excellent kneeling position.


spnsor logos for posts-01.png
 
Last edited:
Awesome information Diver. Team matches with ukd, loopholes, defiladed targets, and movers are the best!

I've shot quite a few of the RTC matches in the NW and here's two tips I give new shooters;

1) always look at how and where the RO/Spotter is positioned, and use his line-of-sight to the target array to plan your FFP and set-up height

2) never shoot high prone in grass when you can shoot low tripod, and never shoot low tripod without double kneeling and using your ruck and bags between your knees to support the rear of the rifle. It's the most stable postion outside of full prone, and it is also easier and faster to pan targets or shoot movers.
 
Quick question for you @Diver160651 and all who are hosting this event. @ThreeBravo and I were talking the other day (really about how we are going to get our butts spanked!) about what gear we are taking and in what ruck and for what reason.

I’m unsure if that topic has been thought of or worked into the plan, if it hasn’t I’m sure like myself, there’s always more to learn on what to carry, why, and in what ruck/device.

If it’s easier than I think, I’ll learn through pain this November and bring things I won’t use! Which will make 2021 better!
I plan on a segment on what to carry, but other than tripods, teamwork is the thing people miss the most, so I plan to roll out topics that all intertwine, supporting each other.

Can in point, the loophole stage will be tough for teams that have not taken the time to read the tripod thread or my comments on teamwork. Shooting through the loop is just the diversion, managing the tripod is the challenge. Teams that work thoroughly together, more than you might imagine is the key.

Teams that take the energy and time to read the thread, even if new, will have a significant advantage. Just for transparency, every team was sent this link several times. One thing you can count on, people are predictable. Like last year, good shooters will not review the tips.. this is to the advantage of the newer shooters that do.

If you guys keep this thread relevant, I will keep posting the tips. By the end, nothing will be a surprise. I will be available either via zoom or phone to help answer questions to any team that contributes or asks questions in this thread.

BTW I updated the OP with a few teaser images on the topics to come.
 
  • Like
Reactions: seansmd and EN2722
I plan on a segment on what to carry, but other than tripods, teamwork is the thing people miss the most, so I plan to roll out topics that all intertwine, supporting each other.

Can in point, the loophole stage will be tough for teams that have not taken the time to read the tripod thread or my comments on teamwork. Shooting through the loop is just the diversion, managing the tripod is the challenge. Teams that work thoroughly together, more than you might imagine is the key.

Teams that take the energy and time to read the thread, even if new, will have a significant advantage. Just for transparency, every team was sent this link several times. One thing you can count on, people are predictable. Like last year, good shooters will not review the tips.. this is to the advantage of the newer shooters that do.

If you guys keep this thread relevant, I will keep posting the tips. By the end, nothing will be a surprise. I will be available either via zoom or phone to help answer questions to any team that contributes or asks questions in this thread.

BTW I updated the OP with a few teaser images on the topics to come.

Thank you! I know I’ve read this thread at least 6 or 7 times and every time I learn something new.

I know there’s plenty of participants that will not read this and then complain; it’s human nature, unfortunately.

If you’re looking for questions to keep this alive I can think of at least a dozen! LOL!
 
Last edited:
  • Love
Reactions: Diver160651
I would ask more questions but then everyone would know what a idiot I am.
 
  • Like
Reactions: EN2722
How well do you really know your Range finder?

Here is an illustration that sums up what all PLRFs (personal laser range finder) like and struggle with, when attempting to provide an accurate distance return.
vectronix-factors-affecting-measurement-range1.png

However, this segment is not about what PLRF is best, or why a rangefinder doesn't like specific colors, textures, or reflectivity distances; it is about understanding what you're actually ranging—knowing exactly where your beam is significant when ranging through loops in foliage both near and far, around power lines, over rolling terrain or just a smaller target all further ranges.

Unfortunately, most of us are focused on the maximum distance our wallets can buy, and usually at the lowest price. But is that really what we should focus on as the primary driver for our purchases?
Vectronix.png

Above is an image from one of my range finders. Is this type of maximum distance return really that helpful, or is it better to know with certainty what your ranging?

How well do you know your Range finder? Is your range finder a circular beam, a landscape rectangle, portrait, or something else? I bet if I asked 20 people randomly, ten to fifteen people could not answer this simple question.

The average PRS/NRL target size is around 2MOA. This sounds rather large to some, but I know just how hard some of these targets are not only to hit but also to range properly. For what it's worth, that 2MOA target is only .58mrad, hence this topic. Let's put this into perspective by looking at just a few beam specifications on a couple of popular PLRFs.

Leica Rangemaster CRF 2800.COM
BEAM DIVERGENCE: 1.5 x 0.5 mils​
Gunwerks G7
BEAM DIVERGENCE: 0.75 x 1.5 mils​
Leupold RX-2800i TBRw
BEAM DIVERGENCE 1.2 x 1.2 mils​
Sig Sauer Kilo2400ABS
BEAM DIVERGENCE: 1.3 mils (round)​
Vector 23 7x42mm Binos
BEAM DIVERGENCE: < 0.3 mils​
Leica Geovid 3200.COM 10x42mm Binos
BEAM DIVERGENCE: 1.25 x 0.5 mils​
Vortex Optics Fury HD 10x42mm Binos
BEAM DIVERGENCE: 1.6 x 0.7 mils​
SIG Sauer KILO3000BDX 10x42mm Binos​
BEAM DIVERGENCE: 1.5 mils (round)​

Beam divergence, the angular measurement of how much a beam spreads out over distance, and it is essential to understand for our use. Ideally, we only want to range our targets, not the terrain, bushes, or other items that might lead to a false return. Targets close to the ground set in rolling terrain can be deceivingly hard to range accurately. Below is an illustration of an 18" target at 1,000 yards, this represents .5mil.
Rolling-Terrian-PLRF-issue.png


Looking at the listed beam divergence numbers and you'll note that they are a mix of portrait, landscape, or circular. The beams listed as rectangular are usually a bit more of an oval in appearance. So why does that matter? Well, in some cases, you may be more successful, ranging a target either off-center or with your range finder at 90° to how you usually hold it. Below are 3 images that represent landscape, portrait, and circular beam patterns.
beam-orientation.png


Let use the above patterns to see how it works on a target relatively close to the ground. The target is 18" and sitting at 1000 yards. Having a landscape orientation held off (away) from the small rise behind the target, you'll have the best chance for an accurate return from the target, as illustrated in the leftmost image. It might be worth noting that you can turn your PLRF on its side if you have a portrait beam when faced with a difficult scenario like this. You need to confirm where the beam is in your reticle before you can really begin using techniques like this.
beam-shapes-on-target.png


We are starting with a challenge since we already know that we are trying to range targets generally smaller than the beams of our PLRFs. Ground effects, loops through trees or foliage, and target sizes can be a challenge for your PLRF. I am going to single out one of the hottest new laser range finding Binos, the Sig Kilo3000BDX; mostly because of its popularity, but also because it happens to be perfect for several downstream discussion points. Notting that our targets are rough 2MOA and the Sigs beam, at least 1.5mrad/5.16MOA, the beam is over 61% larger than most of our targets; it should start to become apparent that we might be facing a few strange distance returns. Generally speaking, smaller beam divergence is better for our users, but tighter beams usually need more stability. In reality, most of us are shooting targets much closer than the maximum distance a modern PLRF is capable of reading, so we really should be paying attention to the beam divergence over the maximum range. Here is a 12" (.48mrad) target at 695y that often returns longer ranges to the user than it should. The green represents the size of the beam we found on the unit we tested; to be clear, this is only one sample, and the Sigs are a great value.
700-yard-target.png


There are several ways to control the beam size, the expensive way, through high-quality laser diodes and associated hardware or shifting more dependence on DSP (Digital Signal Processing). This is mainly important if you're using NV (Night Vision) to verify your PLRF's beam location. The truth is that all PLRFs use DSP to distinguish the real target from the noise that creates false returns. I'm only mentioning these to help put our discussion into a rough context when we look at images through NV.

There are two straightforward ways for you to confirm the size and location of your reticle and the lasers beam size that we'll discuss. The first is by using a NV device. Commercial grade lasers are visible under NV, but not all units are. The other is by trial and error; I call it Ghetto validation.

Below is what the beams look like under NV.

I generally use a grid target and place it at 30yards. In this case, I was at 27yards, so I drew black rectangles to match them as close to the specification of 1.5 x 0.5 mrad. 1.45" x .5". You do not have to be totally accurate. What you're after is that it lines up in your reticle and is close enough to what you expected. I use just enough artificial light to light the target, so I can align the reticle, and lock it down in the tripod. Well, don't do as I do - LOL I only brought out one tripod, I handheld this for the recording, so it was not steady or dead centered on the target.

After my buddy and I noticed his Sig Kilo3000BDX struggled to shoot through the opening in trees, that a Terrapin or Leica could easily navigate, we decided to compare the two under NV. This was just a quick and dirty NV comparison test we did while hand holding the devices.
Leica2800vrSig3000.png

Left image: The black square is the scaled target, The bright light above it is the beam of the Leica 2800 and the big oval light in the 7 o'clock position is the beam of the Sig Kilo3000BDX
Center image: The target is now Identified with a yellow dotted line around it. It represents 1 mrad. You can see just how large the Sig Kilo3000BDX beam is.
Right Image: A green box is placed around the Leica beam and a purple box around the Sig; these boxes represent the beams sizes. In the lower right, you see both boxes superimposed over each other to give a sense of scale.

If the Leica's beam tests as it did just under 1.5 mrad, then the Sig Kilo3000BDX's output beam is many times greater than 1.5 mrad. Realize that Sig is using DSP to try to reduce the beam divergence effectively. While this works, it still was significantly larger in practical use than the specified 1.5 round beam. Remember, we tested this because it didn't work as well through loops in the field as expected, again this is only one unit, so it is antidotal at best.


Ghetto validation:
If you do not have access to NV, this simple test works really well. Make sure to use a steady tripod, or you'll be wasting your time. The goal is to find the areas in your reticle that does not return yardage. Telephone poles are good targets to use. Ensure that the background is clear from all obstacles except the pole that could provide a false return, especially the wires. Try to estimate the diameter of the pole at the spot you'll set your reticle, in my case, it was 8."

The first thing you do is find a distance that just fills out your PLRFs reticle. Range the pole and note the distance, for me, it was 145 yards. At this point, you're just confirming the approximate size of your reticle in the PLRF, NOT the beam size, or really the alignment.

A version of mill ranging or loophole sizing (more on that later, you'll use this in a stage) works well to confirm the size of the reticle.
(27.78x inches)/yardage = mils in the reticle

in my example (27.78 x 8 inches) / 145 = 1.53mil reticle. I have confirmed it is close enough to the manufacturers' claim that the beam should be 1.5 mrad at its widest point.
PLRF-Getto-confirm1.png

The next series of 4 images should be fairly self-explanatory. You need to carefully make sure you place your reticle as close to the pole as possible without getting a distance return. You want to do this for the top, bottom, and both sides. Get as tight on all 4 sides as you can to confirm where your beam starts and stops.
PLRF-Getto-confirm2.png
PLRF-Getto-confirm3.png


PLRF-Getto-confirm4.png
PLRF-Getto-confirm5.png


PRACTICAL USE:
There are 4 targets, partially obscured by the trees. In a match setting, you will be task loaded by design. The clock plays a huge roll in creating this tension. Efficient shooters, don't do things over and over; this is especially true for ranging targets. Some will use a strategy to purposely range items that are NOT the target first to set known brackets. This allows them to quickly identify miss-reads and not have to try to range the targets over and over, hoping to get a good average return.
trees1-4-tragets-Shoot-order.png


Here is an example where the shooter is looking to figure out what distance the trees are and what is the rough distance to the hill the targets are set. It is super fast and sets an excellent baseline of knowledge.
trees1-4-tragets-general-bracketing.png


With the baseline known, my strategy for ranging a target like T4 would be to get a return above as the hill falls away. I expect this to be further than the 672 yards I ranged on the hill for my baseline. 710 yards makes sense with this return, so I will not try to verify it again.
trees1-4-tragets-target-bracket_just-ABOVE-target.png


I place the reticle on the target and get a return that is much closer than the slope that is falling away. It is very close to the expected distance on the hill that the baseline identified. Note that for T3, it is apparent that is is not on the same elevation as the other targets, so I'll range the hill to the right of that target. When I set the reticle on the target, I'll expect it to be 5-20 yards closer. The truth is, at these distances with a 2MOA target, 5-20 yards is not a deal-breaker and could be shot without verifying the actual plate.
trees1-4-tragets-target-bracket_-target.png


Please feel free to comment and share with friends if you find any of this stuff interesting.

Here is a link back to the main post with direct links to the other Tips and topics.

Special thanks to our sponsors who helped make this possible.
_spnsor logos for posts.png
 
Last edited:
thanks diver, im going to shoot my laser a whole lot more, actually make it part of my training when i shoot. i just took it for granted and never tried to understand it or get better, i blamed everything else on why i could not get a range.
 
  • Like
Reactions: Foxtrot Oscar
Match debrief and invite:

Special thanks
to Prime Ammo and Leopold for the support at this weekend's match. Congratulations to Paul Spriggs for winning and receiving a free case of Prime Ammo and to the Runner up Eric Severson for earning a 45% off certificate from Leupold! Thank again to MD Scott Woodhouse and Co-pilot, Jon Bibb, who decided to run a modified course of fire that cut the hike in half, just in case we ended up with 100° plus temps. The day turned out to be mild and virtually windless; windless 3-5 mph days are rare during this season. It was great to see many faces from surrounding clubs like SLO and even a visit by MPHReallyRightStuff Mike from RRS.

I had the pleasure of being in a squad with Jim O'Shaughnessy of Prime Ammo and Scott of Eagle Eye Firearms, who brought their daughters Natalie and Kylie, who were shooting their first match. They shot exceptionally well while keeping their composure together at all times, and it was pure inspiration.
Unknown-17.jpeg

It is tough trying something new or shooting with people you don't know, much less shooting your first match. I think we sometimes forget how it feels to be a new shooter. I know in some ways, I had forgotten how it "felt." Of course, I understand that shooters shooting an event style for their first time need information not readily available, especially with a UKD Field Match, hence this entire thread. But, I mean, I physically forgot how it feels to be new, how it impacts your shots, your stage timing, etc. I went from shooting almost 3 matches a month to not shooting a match in 7 months. Just for the record, I overdid the time away from my wife and was issued a mandatory time-out. While I was hunting and still shooting, that time away from a match setting, brought back the stage jitters, etc. It was a very humbling experience to struggle so much. I pressed the trigger as I felt the jitters starting on the first couple of stages when I had no business doing so and came off the stage with shaky hands I didn't know I had. Missing shots you know you shouldn't have, also gets in your head as you see your scorecard look way less full than it usually is and thus brings more bad trigger squeezes and missed shots; It is not easy to be new.
Unknown-16.jpeg

Seeing the two young ladies, Kylie and Natalie, have such composure during their first match, inspired me to share how I felt, re-living what it literally "feels" like to be new to a game. More importantly, to share an opportunity provided by @Swoodhouse19 to get the lay-of-the-land and practice some tripod shooting. During "most" matches, Scott has two divisions, Open, shot off barricades, or other twisted positions without tripod aid of any kind, and a new shooter/hunter division shoot all prone. In the prone division, you have the choice of trying obstacles, dabbing your toes into the much more difficult positional division. This is a creative way to experience and grow into positional shooting, the caveat is that you must still submit your scores in the prone division, so it is a distinct score handicap.

Scott is going to allow shooters to practice during some of the regular matches, for the UKD Team Match using their tripods, along the same line as the rules for the prone division. Please note that there will be additional safety restrictions, so you'll need to check in with Scott before you plan to use your tripod.

The next matches are:

PRS SW Regional Qualifier 6/28
PRS Regional Series 7/19
PRS SW Regional Qualifier 9/20

You can see the match schedule and register here:

If you are shooting the UKD Team Match, interested in shooting a UKD Team Match in the future, or even interested in your first match, you should come out and practice. If you have a daughter or son, life partner, or friend, Avenal is a great place to bring them to shoot. If you plan to practice on a tripod, register as you would in Practiscore but also contact @Swoodhouse19 and double-check the availability.

Hats off again to the two young Ladies in the Prime jerseys, it was a pleasure!

Jim

tag @Jabot

spnsor logos for posts-01.png
 
Last edited:
  • Like
Reactions: EN2722 and seansmd
Tripod has been kicking my ass lately. Been having misses that are almost 2 mils high. Finally realized I’m loading too much into my rifle. Did what @Diver160651 suggested and barely touched the rifle and magically I started getting impacts at 840. Also did a train up with @NoLegs24 and @hic28 and they’re great teachers. If you’re in the SoCal/San Diego area I’d recommend going to their train up.
 
Match debrief and invite:

Special thanks
to Prime Ammo and Leopold for the support at this weekend's match. Congratulations to Paul Spriggs for winning and receiving a free case of Prime Ammo and to the Runner up Eric Severson for earning a 45% off certificate from Leupold! Thank again to MD Scott Woodhouse and Co-pilot, Jon Bibb, who decided to run a modified course of fire that cut the hike in half, just in case we ended up with 100° plus temps. The day turned out to be mild and virtually windless; windless 3-5 mph days are rare during this season. It was great to see many faces from surrounding clubs like SLO and even a visit by MPHReallyRightStuff Mike from RRS.

I had the pleasure of being in a squad with Jim O'Shaughnessy of Prime Ammo and Scott of Eagle Eye Firearms, who brought their daughters Natalie and Kylie, who were shooting their first match. They shot exceptionally well while keeping their composure together at all times, and it was pure inspiration.
View attachment 7341133
It is tough trying something new or shooting with people you don't know, much less shooting your first match. I think we sometimes forget how it feels to be a new shooter. I know in some ways, I had forgotten how it "felt." Of course, I understand that shooters shooting an event style for their first time need information not readily available, especially with a UKD Field Match, hence this entire thread. But, I mean, I physically forgot how it feels to be new, how it impacts your shots, your stage timing, etc. I went from shooting almost 3 matches a month to not shooting a match in 7 months. Just for the record, I overdid the time away from my wife and was issued a mandatory time-out. While I was hunting and still shooting, that time away from a match setting, brought back the stage jitters, etc. It was a very humbling experience to struggle so much. I pressed the trigger as I felt the jitters starting on the first couple of stages when I had no business doing so and came off the stage with shaky hands I didn't know I had. Missing shots you know you shouldn't have, also gets in your head as you see your scorecard look way less full than it usually is and thus brings more bad trigger squeezes and missed shots; It is not easy to be new.
View attachment 7341134
Seeing the two young ladies, Kylie and Natalie, have such composure during their first match, inspired me to share how I felt, re-living what it literally "feels" like to be new to a game. More importantly, to share an opportunity provided by @Swoodhouse19 to get the lay-of-the-land and practice some tripod shooting. During "most" matches, Scott has two divisions, Open, shot off barricades, or other twisted positions without tripod aid of any kind and a new shooter/hunter division shoot all prone. In the prone division, you have the choice of trying obstacles, dabbing your toes into the much more difficult positional division. This is a creative way to experience and grow into positional shooting, the caveat is that you must still submit your scores in the prone division, so it is a distinct score handicap.

Scott is going to allow shooters to practice during some of the regular matches, for the UKD Team Match using their tripods, along the same line as the rules for the prone division. Please not that there will be additional safety restrictions, so you'll need to check in with Scott before you plan to use your tripod.

The next matches are:

PRS SW Regional Qualifier 6/28
PRS Regional Series 7/19
PRS SW Regional Qualifier 9/20

You can see the match schedule and register here:

If you are shooting the UKD Team Match, interested in shooting a UKD Team Match in the future, or even interested in your first match, you should come out and practice. If you have a daughter or son, life partner or friend, Avenal is a great place to bring them to shoot. If you plan to practice on a tripod, register as you would in Practiscore but also contact @Swoodhouse19 and double check the availability.

Hats off again to the two young Ladies in the Prime jerseys, it was a pleasure!

Jim

tag @Jabot
It's a lot easier to be the new person when everyone actually wants you to be there. The act of being truly inviting to new people in any activity is one of the finest human qualities. This quality was on full display at the Avenal Gun Club as during last Sunday's match every single participant Kylie and Natalie came into contact with was genuinely kind and inviting to them.

Just some of the examples of what made our first trip to your club memorable:

- Calvin's generosity on the pistol range and epic cinnamon rolls
- Sean took the time to show the girls the ropes up top at 900 yards
- John sharing, some barricade tips, perfectly BBQ'd tri-tip and then insisting on giving back an ice cream when he realized it was that last one
- Geroge being quick to hand out his beer and engaging conversation
- Sean running a safe, fun, cost-effective, and, efficient match
- Paul in his appreciation of our modest sponsorship

My late father had a very important saying: "Rarely will people remember what you say. However, they will always remember how you make them feel." Natalie and Kylie felt that they were actually welcome and that the other shooters genuinely wanted them to be there, to participate, and to enjoy themselves. It is important to us that everyone we met knows just how much we appreciate what we experienced as guests at your club. It was an excellent match ran by and attended by people who obviously work hard to do things well.

On behalf of Natalie, Kylie, Scott, and myself - thank you very much. We all cannot wait to come back and to also tell people about the Avenal Gun Club.

Sincerely,

Jim O
PRIME Ammunition
Clarification above Scott @Swoodhouse19 ran another great and safe match.
 
Diver are you going to go over typical team stratagies? i could be the first team ever to not get a shot off the whole match,
there was a reply earlier but still dont have a grasp on it, I listend to Frankies pod cast on team safari, just trying to get a handle on this.
 
Yes, as we co
Diver are you going to go over typical team stratagies? i could be the first team ever to not get a shot off the whole match,
there was a reply earlier but still dont have a grasp on it, I listend to Frankies pod cast on team safari, just trying to get a handle on this.
Yes, it is a big picture thing. I figured the best way to really see the value in the “team” was first to get an idea of the challenges. When I talk about the loophole stage, It might be apparent on how this is actually a “team” challenge. Then when we talk about creating a team dope card, it will be easier to understand how the teams members can interface effectively.

Before the match near the end of the series, I am thinking of doing a zoom call in for question and answers. Really, you’ll have more info going in than any other match :)

I think it’s great to ask questions even if you think they are silly.
 
  • Like
Reactions: seansmd
Diver my son lives out of state from me , il probably shoot 2 to 3 times with him before the match. what are some things you would work on with your team mate if you wre in my shoes? not so much fundamentals other than shoot a lot from a tripod. but other aspects. thanks
 
@Diver160651 what's your favorite lrf obs device/setup?
I think I need to preface my “opinion” on why I use what I use today. The answer might not be the same if I was using the same load and rifle in a team event and wanted something specific to that type of shooting. I’ll also talk a bit about the choices when I load up the team dope card discussion.

Long story, short. I got rid of my more expensive Vectronix PLRFs and use a tiny Leica 2800 now. Mostly because I want something independent of my optics, something with a fast read, small beam, fair glass (without getting into the bino category) that is Light weight and double as a light weight hunting tool.
 
Last edited:
Saw a lot of you guys out at the Avenal PRS Regional Series Qualifier this weekend and had a great time shooting with some of you!

The Hide:
This stage spoiler is a hair out of sequence; I should have posted the "reticle ranging pitfalls" tips segment first as they both use the same base math. This stage also relies on some of the skill sets discussed in "Dave's devious dope stage," If you haven't seen that post, I recommend you go back and review it quickly.
loop James roomSM.png

This stage simulates setting up deep inside of a homemade hunting blind or other hides where the shooter is set back from a small opening in foliage or other obstructions. The stage will have a boundary area between point-blank and 5 or 6 yards (see the orange flag tape), with a makeshift wall with two small ports that the shooters must shoot through to hit targets between 900yards and 700yards. This is a true team stage, if the shooters operate independently, they'll probably time out.


What it looks like - This 6-second clip shows Jon on the left and me on the right, proofing the stage. We are shooting a 900yard target through a 1-1/2" loophole. For the record, staying on glass is not helpful because you can NOT see your partner's target from the loop your shooting, that why I just came off the glass, I have a better chance of helping with my naked eyes, even better with Binos looking over the top.

The stage setup and scoring:
The guns may be staged with the mag out and bolt back inside the makeshift room marked by the boundaries of the flagging tape. Tripods and mags in hand, time starts. One shooter will shoot out of the upper loop, and the other shooter will choose the lower loop, shooters will engage two targets each at one of two specified distances and communicate to the RO their loop and target choice. The shooters may NOT use the same loop height as their teammate, and each shooter must shoot a different distance. There will be a small and large target at each of the two ranges.​
Shooter one will let the RO know what loop and target distance they choose, then engaged the small target first, worth 4pts for a first-round hit, 3pts for a second and third-round impact. Then the large target with the points value being 3pts for a first-round hit, 2pts for a second, and 1pt for a third-round impact. Shooter two will follow confirming they are shooting out of the alternate loop and alternate distance using the same points schedule. This is a high-value stage, so that time management will play a key role. We will have a tape measure on site.​
What's the catch? Well, if there is any contact with the loop board or the tape surrounding the loophole that shooter will score a 0 for their stage, the other teammate's score will count as long as they shot cleanly without damaging a tape or loop board. The RO will inspect the tape and board once the team finishes their time. New tape will be installed after the teams examine and score their stage.​
loop board closeSM.png
Above is what it looks like when you miss the loop window. If you look closely at the upper loop on the left side, you can see three bullets that clipped the loophole. The target might still have an impact, but this shooter zeroed his attempts.​
How does a loop Look through my scope? Below is a bit of over dramatic representation, but I think it helps illustrate a major issue.​
Loop-Blurry.png
Parallax can be a huge issue and does not allow the shooter to see the boundaries of the loophole's actual location when you're not centered in the scope. An old school trick used to ensure your scope is parallax free is scope shadowing. It is super fast and simple, move your head back slightly until you see even shadowing all around the ocular. It can be useful in several real word situations even today. Be it a stage with poor body position containing both near and far targets without the time to adjust it to a long-range target where mirage makes it very difficult to ensure the parallax is correct. What's happening is the even shadow around the ocular is indicating that your optical path through the scope is lined up and centered, or make a pinhole in your cap. See more here: https://www.snipershide.com/shootin...allenge-match-11-22-2020.6980614/post-8556127
It would be best if you lined up correctly, and that parallax doesn't make you think the loop window is clear. The other issue you'll encounter is that you can not accurately scale the opening. In this case, We'll give you the opening size so you'll be able to work out the math if you want to understand what's happening.​
First, think of the loophole as a near range target with a secondary target at the end. So, let's use the very same base number for the reticle ranging stage. 27.78 is the number used to mil range targets in the distance using inches of target height - (Target size in inches x 27.78) / Mils = yardage
1. Let's rearrange that formula slightly to get the mil size of a target. In this case, we'll use a 2" target (or opening) and known yardage.​
1mil = 3.6” @ 100y​
100mil = 3.6” @ 1y or 3’​
3.6” is 0.2778 of 1”​
100mil x 0.2778 = 27.78​
27.78 mil per 1” opening @ 3’​
At 12’ (3’x4) it is : 27.78 / 4 = 6.945mil per “ of opening​
2” opening at 12’ measures 13.89mils​
The formula shows us our operational window, even if it is too close to the reticle measure clearly via our scopes.​
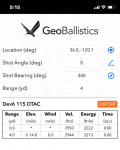
2. Using your solver, set the target distance to the distance of the obstruction. We need to find out what problems the distance creates for or SOB and the bullet arc at the loop wall. This will show you just how low the center of your projectile will be below your POA.​
Here I set my target distance to 12' or 4 yards to see how many mils below my crosshairs the bullet's center​
loop image from ballisticARC.png
3. Account for your bullet.
Here I set my target distance to 12' or 4 yards to see how many mils below my crosshairs the bullet's center. At 12 feet, 6.5mm bullet is .264" or 1.83mils thick; we need to be concerned with the bottom half in this example.​
6.5mm at 12' is 1.83mils​
1.83mils / 2 = .915mils​
So I have 15mils let say 17mils, for safety under my unaltered crosshairs to clear the lower part of the loop.​
4. Subtract your come-ups from your intended target from the bullet path.
Target @ 900Y = U6mils​
17-6mils = 11mils​
As long as I can see 11 mills under my targe I should be GTG - (remember the loop is 13.9 mils from that distance)​
But wait, some cases are not that simple; if the distance creates a larger come-up than the bullet path is at or about your LOS, you have to be concerned about the top of the loop. Let's say I am back further, and the target is further. Let's use 10y; at 10y, I only need U5.2, let's say U7 for safety. With a target at 1400 yards, I'd need U13. Now your safety is also above the crosshairs with maybe 10mils (8mils + 2mils for safety), as well as below.​
5. Or you can use a program like FFS and all the math is done for you. But really the thread is about understanding a bit more and, if nothing else, just to get you to think how all these parts work together.​
5. The entire key is in the tripod height setup.
If you set the target up like most people would, your sure to impact the loop's boundary.​
Loop-Alinged-WRONG.png
If we remember from the above sample we needed about 11mils of clearance below our POA in order not to clip the bottom of the loophole. The way to accomplish this is to set your tripod height high enough so the target is very close to the top of the loophole, not centered.​
Depending on the distance to the loop and target distance, the image below is how the sight picture might look.​
Loop-Alinged-correctly.png

The truth be told, for the set up we're presenting, if you do this and set up towards the rear of the hide, you'll do just fine without any math— just don't tell anyone you know the code.​

6. The Key is teamwork
The Key to this stage is how your team helps each other fine-tune their tripod heights to set up the sight picture like above and to fight the clock. When we used adjustable center columns, this was much easier to do by yourself. But the tripods were so wobbly the target needed to be substantial. It might be a good idea to go back to the tripod tips segment and see why I suggested always error on setting up too high. It is just way easier and faster to micro-adjust your height using gravity, don't try to fight it. Consent communication is going to play a role in your team's organization at every stage, but this one will take more than most. If you are moving the rifle in this stage OR making a tripod adjustment, the gun must be safe, unloaded, bolt back, and mag removed.
My approach would be (not the only way):​
1. Both teammates use their binos and line up their loop with their selected target choice. Ensure that the target appears near the top of the loop but in the center of the Binos. Each shooter should make a mental note of exactly how high their Binos need to be to look at the target correctly.​
2. Each teammate should reference the bino height of the other as well so that when tripods are set you’ll have a second set of memories and communicate if you see your partner is setting up at the wrong height. These levels will be just about the same for your scopes. Again, if you are going to error, and you will, error on the slightly higher side.​
3. Both shooters start setting up their tripods at the rough height with the rifles still staged on the dirt, bolts back mags out.​
4. The shooter in the higher loop would get the most attention first; as soon as he thinks he's close to having the height, he should mount his rifle, noting the above safety rule (his teammate can help). On the glass, the shooter, should be communicating to his teammate if he needs the tripod to go up or down. I would have my teammate helping make these adjustments. Once shooter one is ready, he should confirm with the RO he is making ready, firing through the appropriate loop, and confirm the target.​
5. Shooter two should be on his tripod with his gun mounted (bolts back mags out) and adjusting solo while shooter one is shooting. When ready, he can tell the RO he is making ready. Shooter two should be on his target and ready, if not, shooter one will need to finish his COF and make safe before they can help shooter two.​
As I said, you should always be talking, shooter one should be giving wind to shooter two because shooter two can not see shooter one’s targets through their loop and probably will be setting up.​

The shooting will be relatively easy, the time management difficult. This is something as a team you can practice; you do not even need to fire a shot, so practicing at home is valuable. Time can slip away, again as a team; you should be watching your timer or watch. Remember, the smaller targets three impacts are worth a high point value; if the first shooter runs over their time, it might make sense to skip the bigger target and let shooter two, bank points. That said, if you practice, you will have time.​
How does this apply in the wild?
HUnting-Hide---Blind.png
Of course, if you make a makeshift Hide like above it is easy to see the application. Knowing your limitations and windows will allow you to make a more stealthy natural hide/blind.​
Loophole-Looking-out-a-blind_Hunting.png
Shooting over walls, stumps, rocks, etc. that are between you and the animal is a good example of where you need to think about this very process. Hopefully, if nothing else this provides a bit of entertainment or maybe even inspiration to make a natural hide/blind next season.​
Back to the index of Tips and tricks:​

spnsor logos for posts-01.png
 

Attachments

  • loop image from ballisticARC.png
    loop image from ballisticARC.png
    161.2 KB · Views: 2,153
Last edited:
diver i listend to a podcast i believe and i dont remember who's they enterd tgt range as thier zero, they put thier range card in 1 yard increments and where the numbers went from negative to positive was where the bullet crossed thier line of sight at loop hole and at tgt. as a example a 900 yd tgt put the loop hole at6yds, at 5yds im .6 inch low and so on. will this be that involved?
 
I had a question about the loop hole shooting when it comes to tripod setup. How does the height of tripod play into this? Is there a specific height the weapon has to be at in order to engage each target or is the trick setting up at a specific distance from the loophole?
 
I had a question about the loop hole shooting when it comes to tripod setup. How does the height of tripod play into this? Is there a specific height the weapon has to be at in order to engage each target or is the trick setting up at a specific distance from the loophole?
Best question ever! You are on to the winning idea. When we had center columns loops were a breeze. Now you need a team to do it ultra-fast. I am only about 1/4 way through that post, but your question is the key to the stage.. Even if you don't do math..
 
  • Like
Reactions: EN2722
diver i listend to a podcast i believe and i dont remember who's they enterd tgt range as thier zero, they put thier range card in 1 yard increments and where the numbers went from negative to positive was where the bullet crossed thier line of sight at loop hole and at tgt. as a example a 900 yd tgt put the loop hole at6yds, at 5yds im .6 inch low and so on. will this be that involved?
I do not know what podcast. But treat the Wall as a target distance and you'll have the solution. The SH Cup this year added loops, but they were from 10 yards and 2 to 6" shooters choice. Expect 4 yards and only 2" in ours.

I don't think in inches, but mils are kinda the same idea, I'll steep through it. But it is really not all that complicated unless your target is ultra far or the loop wall ultra close.
 
  • Like
Reactions: TheOtherAndrew
Best question ever! You are on to the winning idea. When we had center columns loops were a breeze. Now you need a team to do it ultra-fast. I am only about 1/4 way through that post, but your question is the key to the stage.. Even if you don't do math..
Thanks, look forward to the rest of the post as you update it. I'm sure I'll have more questions as you go.
 
  • Like
Reactions: Diver160651
This question may be as in line with the more information that’s coming, but should we prepare formulas and bring small calculators to do the math along with one of those cloth tape rulers to get information required?

Or, will standard numbers be provided during the stage brief? Maybe too much info lol
 
  • Like
Reactions: Diver160651
Am I looking at the math right, a 1.5 inch loop at 4 yards is about 10mils?
 
Am I looking at the math right, a 1.5 inch loop at 4 yards is about 10mils?
OK, looks good. now, how low is the bullet under your crosshairs?

Think of the loop as a target and the actual target as a modifier. Need 6 mils to get to 900, you can subtract that from your path - less a couple of mils for the bullet width.

Truth be told, we will dive into the weeds, but simply put if you set the target right you'll clean it without any math.
 
  • Like
Reactions: seansmd
OK, looks good. now, how low is the bullet under your crosshairs?

Think of the loop as a target and the actual target as a modifier. Need 6 mils to get to 900, you can subtract that from your path - less a couple of mils for the bullet width.

Truth be told, we will dive into the weeds, but simply put if you set the target right you'll clean it without any math.
So my target is 13.4mil at 4 yards, your 890 target is 6.5mils. if I'm thinking of this right as long as 13.4-6.5 is less than the 10mils of the loop. I can position the target near the top of the loop assuming I am level with the top of the tripod, the loop, and the target?
 
So my target is 13.4mil at 4 yards, your 890 target is 6.5mils. if I'm thinking of this right as long as 13.4-6.5 is less than the 10mils of the loop. I can position the target near the top of the loop assuming I am level with the top of the tripod, the loop, and the target?

Ok, you finished the thread :) That is perfect. I'll still step back through and try to explain it so non-engineers can figure it out. Now of the loop was at 100 yards you be concerned in just the opposite direction.
 
  • Like
Reactions: seansmd
100y would be easy if you zero there, since the bullet is poa/poi and zero elevation and crossing the loop wherever you have the target placed. So you can place the target in the middle of the loop and create the angle with the tripod?
 
100y would be easy if you zero there, since the bullet is poa/poi and zero elevation and crossing the loop wherever you have the target placed. So you can place the target in the middle of the loop and create the angle with the tripod?
At 100 you worry solely about the top of the loop
 
I understand the solution to the problem that was presented, just trying to get a grasp so I can apply it on my own in future situations.