looking forward to the tripod class also, you are putting out so much info, i really appreciate the time your putting into this.
Join the Hide community
Get access to live stream, lessons, the post exchange, and chat with other snipers.
Register
Download Gravity Ballistics
Get help to accurately calculate and scope your sniper rifle using real shooting data.

Install the app
How to install the app on iOS
Follow along with the video below to see how to install our site as a web app on your home screen.
Note: This feature may not be available in some browsers.
You are using an out of date browser. It may not display this or other websites correctly.
You should upgrade or use an alternative browser.
You should upgrade or use an alternative browser.
Advanced Marksmanship Tips & Tricks, from Tripods to Stage Examples for - UKD Team Field Match or Hunting
- Thread starter Diver160651
- Start date

Just finished reading the roll up from that stage.
@Diver160651, amazing job sir. I thank you for starting this and for everyone else that’s contributed thus far.
I’m not going to BS, I’ve never thought about my max ord in relation to engaging a target in defilade. I’ll continue to add this stuff to the list of practice items for this summer.
@Diver160651, amazing job sir. I thank you for starting this and for everyone else that’s contributed thus far.
I’m not going to BS, I’ve never thought about my max ord in relation to engaging a target in defilade. I’ll continue to add this stuff to the list of practice items for this summer.
Tripod Tips - Field Based
You need to be signed in to see the images with enough detail to read the information contained on them.
There are a lot of ways to adjust and use your tripod, many of them are carryovers from a decade ago when we used skinny-legged aluminum 055 Manfrotto Tripods with shaky center columns. These tripods required a lot of shooter input and even more practice. Loading hard into the tripod, using a reversed hand on the legs, and using slings to stabilize those shaky beasts, was a needed skill-set. Fast forward to today, and the tripods are made of stiff and fat CF (carbon fiber) legs, with a robust Apex/Canopy/Base (the part that connects the legs all together), and almost shoot themselves. In the interest of transparency, I am assuming that you've made the jump to a modern, high-quality CF tripod. If you're still using something that is designed similarly to the old Manfrotto 055, even if it is CF, some of the tips might not work for you. The tips are field-based, some of the positions hasty (made in the interest of speed or quietness), tailored to a match like ours with angled shooting positions and what you might encounter hunting in the hills. I am not covering tripods as rear support like you might find in a PRS/NRL-styled match.
I am not attempting to teach people how to shoot from a tripod, everyone on YouTube is doing that, but rather show a few tips to consider if you are interested in increasing your speed or reducing your wobble zone when shooting from a tripod. Your final body position is going to be unique to you, maybe your hips are a bit less bent, whatever, but if you can grasp the ideas, I believe it will be helpful. Even if just one tip saves you a few seconds, it might make a difference in a hunt or during a field match. Any time you save, or complexity you remove from your tripod set up in the field, allows you to use more of your brain to problem solve, break a better shot and make your outing more enjoyable. That said, I am illustrating what for best accuracy, as such, you need to let go of the past and let the tripod do the work. It may look like we're loading hard into the tripod, but we are barely making contact; what we are doing is setting NPA so that once the rifles begin to recoil, we are in a position that is straight and square with a super strong position to manage the recoil so we can still see the impact, but not driving into the tripod, AKA loading the tripod.
PRO TIP: Bend at the waist! Note: when shooting an ultra-lightweight hunting magnum, you might actually be pulling the rifle into you a bit, but still looking for minimal influencing interaction with the rifle. Part 2 to this note, some instructors teach you to stand tall (not bent at the waist) to let the spine take up your body weight. On a square range when you're shooting a 20+ lbs 6mm non-recoiling match rifle, sure you can stand tall, But be aware of the tradeoffs, as, in the endgame of field skills, this has many disadvantages from not working well with lightweight hard-hitting hunting rifles, to jacking you up if you also need to engage a target lower than your initial set-up. See tip #3 and the top three horizontal images, if you started tall during your initial setup, you can not then shoot lower without readjusting the tripod, losing valuable time and making more noise and movement.


Recap:
The outcome:
Just a reminder, you might not even notice the benefits of some of this stuff if you are always shooting in the same place, without time pressure, mainly shooting on flat ground, and know your tripod setting. If you can put all these pieces together, add in your spin and practice a lot, you'll be efficient and far less task-loaded. You'll be ready when you have to set up on a funky area you've never seen while hoping that Elk doesn't walk away, or able to concentrate far more on the series of targets you are about to shoot because you saved a few seconds, or worse yet, didn't set up completely wrong in your first field match.
The thread only lets me post so many images, so I had to be as brief as I could, and I choose to pick the topics that I've witnessed that seemed to contribute to shooters struggling. Like I said in the intro (post 29), I do not have all the answers, many will have better ways to skin a cat. If you have tips or tricks that can save seconds, feel free to post them up.
Postscript:
Although I have an Able Table, I didn't cover it or using a bag for a field match. A bag on a tripod actually provides an ultra-fast way to change between targets. For the ultimate in speed, between spotting and shooting, check out this link.
 www.snipershide.com
BTW you can really deck out your tripod.

Hopefully, @hic28 and @NoLegs24 can chime in on the use of the Able Table and maybe offer a few tips. These guys do well at team matches (so do a bunch of other shooters).
Below is a video comparison of an old-school Manfrotto 055 vs. an RRS tripod illustrating the raw stability differences. (This is from a thread I did compare RRS and Feisol legs as well as head options.)
A dirty non-scientific look through my night vision shot on my pest control PCP. The purpose is to illustrate the difference in stability between a high-quality setup and what we used to use. The house in the video is at 350 yards, at 14x. NOTE that my match gun is way better balanced, more substantial, and way less shaky in general.
I purposely mounted the gun and unmounted it without much technique to show how the vibration, the time it takes to settle or how the wind might vibrate the gun. (remember wind causes a lot of issues with vibration.)
Here is a link to the tripod comparison thread:
www.snipershide.com
Here is a link back to the original post. You will see an index to other topics.
www.snipershide.com
2020 UKD TEAM Match Sponsors:

You need to be signed in to see the images with enough detail to read the information contained on them.
There are a lot of ways to adjust and use your tripod, many of them are carryovers from a decade ago when we used skinny-legged aluminum 055 Manfrotto Tripods with shaky center columns. These tripods required a lot of shooter input and even more practice. Loading hard into the tripod, using a reversed hand on the legs, and using slings to stabilize those shaky beasts, was a needed skill-set. Fast forward to today, and the tripods are made of stiff and fat CF (carbon fiber) legs, with a robust Apex/Canopy/Base (the part that connects the legs all together), and almost shoot themselves. In the interest of transparency, I am assuming that you've made the jump to a modern, high-quality CF tripod. If you're still using something that is designed similarly to the old Manfrotto 055, even if it is CF, some of the tips might not work for you. The tips are field-based, some of the positions hasty (made in the interest of speed or quietness), tailored to a match like ours with angled shooting positions and what you might encounter hunting in the hills. I am not covering tripods as rear support like you might find in a PRS/NRL-styled match.
I am not attempting to teach people how to shoot from a tripod, everyone on YouTube is doing that, but rather show a few tips to consider if you are interested in increasing your speed or reducing your wobble zone when shooting from a tripod. Your final body position is going to be unique to you, maybe your hips are a bit less bent, whatever, but if you can grasp the ideas, I believe it will be helpful. Even if just one tip saves you a few seconds, it might make a difference in a hunt or during a field match. Any time you save, or complexity you remove from your tripod set up in the field, allows you to use more of your brain to problem solve, break a better shot and make your outing more enjoyable. That said, I am illustrating what for best accuracy, as such, you need to let go of the past and let the tripod do the work. It may look like we're loading hard into the tripod, but we are barely making contact; what we are doing is setting NPA so that once the rifles begin to recoil, we are in a position that is straight and square with a super strong position to manage the recoil so we can still see the impact, but not driving into the tripod, AKA loading the tripod.
PRO TIP: Bend at the waist! Note: when shooting an ultra-lightweight hunting magnum, you might actually be pulling the rifle into you a bit, but still looking for minimal influencing interaction with the rifle. Part 2 to this note, some instructors teach you to stand tall (not bent at the waist) to let the spine take up your body weight. On a square range when you're shooting a 20+ lbs 6mm non-recoiling match rifle, sure you can stand tall, But be aware of the tradeoffs, as, in the endgame of field skills, this has many disadvantages from not working well with lightweight hard-hitting hunting rifles, to jacking you up if you also need to engage a target lower than your initial set-up. See tip #3 and the top three horizontal images, if you started tall during your initial setup, you can not then shoot lower without readjusting the tripod, losing valuable time and making more noise and movement.
Tip 1: Keep it simple
So simple, but few seem to do this primary operational step as efficiently as they could. When deploying your tripod to a standing position, extend the lowest leg fully first, then work towards the head. This keeps the tripod adjustment area in your control hand in front of your body and keeps you from having to shuttle it back and forth, reverse the process to stow. Here is a spoiler alert for Tip 2; leaving the lower leg non-extended for stability, is a throwback idea and not needed with today's larger-legged, high-quality CF tripods. It will come back and bite you with a time penalty if you later need to adjust the lower section of the leg.
Note: I am purposefully going slowly in this example so that it is easy to see the concept.
I am loosening both leg locks but retain a bit of finger pressure on the middle section by holding the lower leg lock. As the lower approaches full extension, I release the tension on the leg-lock as I continue to pull on the lower leg while I simultaneously lock the lower leg. My hand is already at the upper lock, so I fine-tune my height and lock the leg. While this is only marginally faster, it does keep the tripod from moving all over and contacting brushes, etc., a value in some situations. Setting up for kneeling is of course much simpler and faster, as is setting up the tripod only as rear support.
Tip 2: Adjust from the top
All micro height adjustments, especially if a rifle is on the tripod, should be done with the uppermost leg section. All other legs need to be fully extended before the top leg section. I can't tell you how many times I have seen a person with the rifle on the tripod, realize they need more height adjustment, dangerously, and slowly try to perform a three-handed change because the only leg available are the ones at the bottom. The chance of dropping your rifle, having to take your eyes off the target, and just being ultra-slow is not worth any perceived stability enhancement with our modern large-legged CF tripods.
It is always hard to adjust up with a gun on the tripod. You must remain in 100% control of the rifle.
Below is not the way to do it!
If you are using the middle legs fully extended and you need extra height, the INCREASE adjustment must come from the bottom leg, and now it is a complete mess, and you'll no longer have control of the weapon system.
In truth, you generally only have to increase the height on a single leg. If you only had to adjust a single leg UP or down, the two rear-facing legs are easy to reach, with the shooter still facing the target. The safest way is to remove the gun. The videos adjusting all the legs are to illustrate the point.
Choose a leg height that works in multiple positions. Many people might be surprised that standing, kneeling, and sitting can share the same leg adjustments. Your tripod may only accommodate two of the three, but finding that sweet spot will save you a bunch of time. To do this, extend all your legs; adjust only one TOP section to find your "perfect standing height." With most 3 section tripods, simply collapsing the remaining fully extended legs will result in a stable kneeling position. Often then just widening the legs by unlocking the leg locks will work for a seated position. The idea here is that standing is the most critical to get correct, and the other two shoot well with more flexibility. If you find time to micro-adjust the kneeling or sitting, it should be so close already that it takes little time. With a bit of imagination, you can see that setting up with the legs super-wide, legs extended for a seated position, is really stable and perfect for a day at the range or maybe from inside a Hide. But getting in and out of that position to shoot super-wide seating, might take more clock time than it is worth. Vegetation and topography also can limit the ability of super-wide setups. If you can find a setup that works for standing, kneeling sitting, you'll be surprised how fast you can go between them.
Note this is my Son on my gun, the LOP is a bit long, but most importantly, these are hasty positions. Let's say you set up too high and need to get lower to see through a loop. If you have time, you could easily fine-tune the legs. * See Tip 9 for an alternate method.
Tip 3: It hangs in the balance
It's all a balancing act, generally, keeping your gun as close to the magazine well as possible without causing lever or mag interference on one of the legs, is going to be close to the balancing point, and that is what you are after. It is generally the most stable and a bit more resistant to the shooter's erroneous input, as the shooter side lever arm is as small as can be. But there are other reasons sometimes not considered.
For those that run their mounts far forward of the mag well, they'll get more height variation with significant angle changes. With my match rifle and my typical standing setup, only moving my legs together and straightening my back (while not ideal), allows me to shoot from approximately -21% (downhill) to +32% uphill on a knee as the butt of the rifle swings 19" when completing its arc. On that rifle, mounting just a 6" forward creates 5" more vertical movement, resulting in 21% less range of motion.
Tip 4: Mark your stuff
As simple as this sounds, this is a time-saving measure that takes almost no time to accomplish. Once you've found your perfect standing height as described in tip 3, Get a white paint marker or silver sharpie and clearly mark the leg position as shown in the image below. I use "arrows" because they are fast and easier to know where you are; even the mark is not fully exposed. You can make multiple marks if kneeling requires an adjustment. You can also make a mark for your Binos that's usually the very highest position someone needs; in my case, I use a second mark to use for the front leg, see Tip 6.
The paint marker shown is from C.H. Hanson and lasts a long time.
Tip 5: You're High
People often set up higher when standing than they should. Make sure even with your feet spread at least shoulder-width wide, with a nice bend at the hips so that your back tilted forward and all principal body parts square; you are comfortable on the gun. An excellent place to start is just about with the top of the tripod at sternum height. As an individual, you'll need to experiment.
If you set up too high, you'll lose much of your range, especially if you need to shoot at an angle lower than you planned for during your setup. See Tip 3.
Tip 6: Don't work so hard
Lower the front leg position and let the tripod do more of the work; this enables the shooter to load a tiny bit less, and reduce the cheek pressure required, thus making the shot more stable. It has the added benefits of changing where the support hand rides; rather than reversed on the legs, it can remain on the head for rapid target adjustment while reducing the reach, keeping the shoulders a hair more square and less tense. With proper body position with your feet wide, hips bent forward, feet, hips, and shoulders square with less tension on the gun, your wobble zone will decrease, and your impact and miss identification will be reliable, and the tripod will not jump. You will really have to experiment and practice with the correct leg position for stability, amount of pressure, and balance of recoil management, and a light hunting magnum is going to take more force than a heavy match gun. Admittedly, it is a tip that takes a bit of practice.
The scale test was on level concrete to provide a fair comparison.
Notice the angles of the rear legs and the height reduction of the front-facing leg in the right side image. On the left side, the tripod having all legs with the same adjustment as most people set up; my match gun averages about 6LBS of force pulling straight back along the bore axis to lift the front leg. With the change suggested, it takes about 10-11lbs, Kneeling 7lbs vs. 14lbs. The point being, if you experiment, you might suddenly find yourself with less wobble and better POI tracing. Both pictures have the gun level. A 40% improvement is nice, but it is crucial to acknowledge that with a leveling base, you may not have enough headroom to utilize this suggestion. A ball head guy that takes the time to run the apex perfectly level (I do not) will lose the pan feature of the base, but see the last image in Tip 8. If you are shooting a 6br variant with almost no recoil, and realistically up to a 6.5, just about any leg orientation will work fine. But when you get to the lightweight hunting magnums, this setup helps.
Note: When glassing in high wind, the kind of wind that threatens to blow over your tripod if you leave it unattended, spin the single leg (the one that is usually in the front) into the wind. You need to make sure it is much shorter (lower) so that you are creating resistance to the wind force like you are above the recoil path; by having the two leeward legs, angled more steeply into the wind. You may want to attach your pack at some point, but that tends to swing around and create its issues. The hanging bag for me is the last resort.
In the videos below, both guns are shooting about 3100fps at the 700y plate and using the suggested leg arrangement. Obviously, you can load into the gun much harder, but I wanted to show the extreme of almost no shooter influence, eliminate the wobble while simultaneously illustrating just how much the rear legs angled more by the lower front leg (shorter), helps.
Match gun, ultra-light shooter load & input, and can easily see the impact. Watch the front leg, no big deal here it is a 20lbs match gun.
This is not a match gun, it is Lightweight Carbon Fiber barreled, Hunting Magnum, you can see the impact, but more shooter input is needed. If you've shot a lightweight hunting magnum, you have an appreciation for how much work this tripod mod is doing. The front leg does not hop and relocate; the rear legs bend to absorb recoil. Make sure you use a good tripod!
If you have a leveling base or that ball head that you feel that you must use the pan feature, you can keep the apex level and accomplish some recoil mitigation by rear-facing a leg to 5 or 7 o'clock (hand dominance dependent and if mag clearance is needed). This will take more practice; the gains are smaller, and you will need to be careful that you are not letting the tripod hop. The school of thought is that the recoil can spin if the back legs are not perfectly perpendicular to the bore axis. This is true if all other parts are not squared away. Strangely you'll get more hop with the standard method, especially if you lock out your support elbow and stiffen your shoulders as some guys recommend. Each technique has disadvantages; all could fail if a total system, implementation, and practice are wrong. All the ways are also useful if mastered.
This is an example of groups from standing position on a tripod using the suggested techniques. Standing tripod on RRS TV33 is the lower-left group, the control group was shot prone and the upper left group.
Tip 7: Work the angles
On an angled slope, not only do you want to adjust the legs to be at the correct height, but often will run out of adjustment, especially if shooting from a lower position. Don't forget to use the additional angles the leg catches at the apex provide to enhance your tripod's flexibility. It's often better to reduce the effective height of a leg by actually extending it outward, unlocking the apex leg lock, and drastically opening up the leg. The mistake people seemed to make at our last match, was becoming confused with the initial setup height.
When shooting from a slope set up higher than you think. Because you probably can't set up your body as stable as you can on flat ground, sitting is usually hard or impossible from some of the positions. When shooting downward, modify the above lower, and when shooting upward, modify your tripod lower. Angled, shooting often dictates a rear racing leg for speed of deployment, micro height adjustment, and simplicity.
On a downslope, the shooter on the uphill side, you need to set up higher than you might think because the distance where the gun mounts, with the length of the buttstock, moves toward the slope as the slope rises. See the image in Tip 9. When shooting on a steep uphill, the opposite is true, but you're not going to be stable sitting on your ass. The same is true for a steep sidehill position; you'll need to modify your legs and, in turn, your position, to keep from sliding down the hill.
Hills sloping away with cross canyon shots are often another problematic scenario if you have a bush or other obstructions that require you to take a standing shot. With the down legs fully extended, most tripods will still be too short if the shooter has to stand on the uphill side; essentially the slope makes the shooter much taller than the tripod. Both images below have the downhill tripod legs extended 100%. The image on the left has a maximum height that would be very uncomfortable for a standing shot, while on the right, it provides almost another foot of elevation. Comfort aside, this might make the difference between making a shot or not having a clear bullet path. It's straightforward to gain extra height out of your tripod without adjusting your trip leg locks; just like in Tip 3, where we bring our feet together to get more shooter elevation, you'll do the same with the tripod legs. You may want to utilize this even on flat ground if you notice you set up a hair too low and need to get the bullet path to clear an obstruction quickly and quietly. It's not quite as stable as the legs set to their maximum width, but we're talking about hasty field positions throughout this thread. If you're on a slope, you'll need to also extend the uphill leg that was not fully extended, to keep the apex level.
While I've talked about the most efficient way to shoot off a tripod, is generally with two rear-facing legs; not all situations are best served by trying to force this setup. You've probably noticed when I display pictures where the ground is sloping or where I tend two need to make a height adjustment quickly; I will use a rear-facing leg so that I have to adjust only one leg rather than two. It will give you more stability in some situations, but primarily, the ease of setup is worth the trade-off.
For high-angle shooting, it is ideal to have a full-length rail. It allows the shooter to micro-adjust the gun by sliding the mount more forward if needed to find the perfect setup height and fit. Even if the angles at not at the FFP, maybe just a small obstruction that requires high or medium prone that a bipod can not accomplish; the full-length rail is key to the field shooter as it provides the ultimate in flexibility. High prone below, two lower positions are easily possible, I no longer carry a bipod when hunting.
Personally, I run Henderson ARCA rails on all my hunting rifles and field guns. the 12" version is just over 3.5 oz and actually lighter than some 3" rails and a pic front mount.
Low prone below: It's about the same height as an Atlas or Harris in the standard position - there is another position in the middle even before pulling the legs out and getting all funky
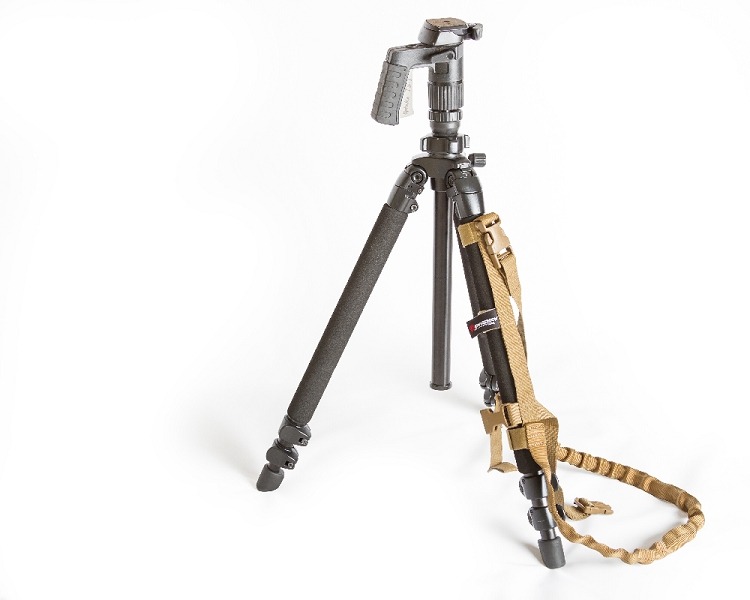
Tip 8: Dressed for speed
Sling your tripod, so you are ready; this might be in the dead space just before you anticipate your final stock, or help when moving from the staging area to the FFP, especially if they happen to be far apart. Extended tripods are hard to carry, even harder if you need to move through, over, or under the brush, as you approach your FFP. Anything you can do before you move to your final stock, to stay quiet and speed the setup will be helpful. So, if you can preset your primary adjustment legs as illustrated in Tip 2, and easily carry the tripod slung either under your arm or like your rifle, you'll be one step ahead. If you expect to stand, full extended also works well with an underarm slung carry. RRS makes flush cups for this hands-free purpose.
Left image: Leave your Binos attached, and sling the tripod extended. This is an example that saves a ton of time, all the complexity of breaking your gear down, repacking only to unpack it at the staging areas that are maybe a hike just several hundred yards away. It also keeps you from banging people on the hike and your hands-free. Of, course if your match only has the stages a few yards apart, just carry the darn thing in your hand.
Center image: Packed for a hunt preset to kneeling, But it is fast to extend the lowers 100% for a fast standing position. For a general pack-in, I'd have it collapsed fully and the rifle in the Kifaru Gun Bearer.
Right image: On the approach to a stock I sling the tripod, sometimes, fully deployed like the left image. I sling it horizontally, so it doesn't hang on bushes, or overhead vegetation, especially when on your hands and knees. The gun would then also be off the sling and in my hand. The orange tape on the sling is used to show how I tape all metal and plastic parts that might make noise.
Tripods are changing the game and worth taking on your hunt.
Left image: Here is an example, although not as steep as what was shown in Tip 7, the first and second images shown. I set my gun up for my brother-in-law (my tags were already filled), The setup was fast; I set up as low as I could from a modified kneeling position and opened the apex leg lock on the uphill side. Of 6 Elk taken on that trip, this was the lowest setup we were able to shoot; no prone opportunities were available the entire trip. The gun is the same magnum in the video in Tip 6. The shot was over 900y, and it dropped instantly.
Center image: This is a good example but not unique; you need a strategy for going over and underbrush especially if you are adding in a tripod. Both your rifle and tripod may need to be horizontal at times. Anything above your pack will hang up, even when you are on your knees or sliding down the very steep hills on your butt. My buddy Max (on the hide) is a tall guy and retrieving an Elk. He has been hunting in this BLM area, for 20+ years and is simply amazing.
Right image: In Tip 6, I made this comment, "A ball head guy that takes the time to run the apex perfectly level (I do not) will lose the pan feature of the base." Well, while "movers" can travel a predictable path, most animals do not. This pig was running at full-gate, my son leads it with a crazy lead using the Anvil 30 at about 400y. It did a front flipped and died. The point is don't be so worried about leveling your apex and using a pan function; you'll get the job done faster and maybe more stable using some of the tips where the apex is NOT level.
Tip 9: It's easy to come down
By default, it is always easier to set up the tripod too high, and micro-adjust down, or for that matter, go from standing to kneeling than it is the other way. On your range or flat ground, your height marks will always be useful, but once out on an untested slope with untried angles, that will no longer be true for all the legs. Going from the gun setup for kneeling to standing, is really hard, but the other way almost manageable.
The main takeaway here is that this method allows you to keep control of your gun "if" for some reason, you need to go from standing to kneeling after making the mistake of having a weapon deployed. This is anything but elegant or something I'd suggest unless you had no other choice.
Tip 9b: Think differently
Here is another method if you know the stage is going to require standing to kneeling or kneeling to standing, or any combination, there is a fast hack.
This works best in a PRS/NRL-type match where the ground is flat and not covered in brush or tall weeds. You use a reverse setup with two legs in front and one in the rear. You control the tripod with one rear leg and use the “apex lock” on the rear to control the height. You'll notice once again, the low standing height you marked on your legs from Tip 4, is again perfect to provide an excellent kneeling position.
In a field scenario, this will take a bit of imagination. Imagine you have cover (a bush etc) and you want to stay out of sight while you set up, the movement and time setting up for that standing or even kneeling shot has a high probability of giving your position away. If that cover allows you to stay concealed at a low height, you can fully set up while concealed in the lower position shown below and very quickly raise to a standing shot to clear the obstruction to take a shot.
Again, using your imagination you can do the same if the cover is lower and provides a kneeling shot, you just set up the legs for kneeling when you laying low and run that apex lock and leg in the same manner, just staring from a much lower crouch.
In addition to using the Apex leg lock to swiftly go from standing to kneeling, or the other way around as shown above, if you carry your tripod pre-staged and slung like in Tip 8, you can swiftly set up at any height. This could come in handy if you just were not sure of the tripod height you need. I am shooting left-handed on a right-handed PCP to illustrate this (it has about the same recoil as a 6br). BTW It is much faster if you use the correct gun.
Either way, the point is you just do not need to shoot a long-range target off-hand even if rushed; this method is certainly capable of very good accuracy.
Last year it seemed shooters set up their tripods before they found all the targets. Many of them are set up in the most stable positions rather than spotting and shooting from a more reasonable level. They often ended up timing out trying to adjust their tripods back to a standing position. Remember, it is much harder to adjust UP with a rifle on the tripod than it is down.
In the image shown, the tripod is too low, see the "red arrow" in the picture. Make sure you set up the tripod from where you are going to shoot. The shooter has not noticed the issue with the slope causing an impossible position to shoot from, because the shooter didn't build the tripod position from where he planned to shoot, nor took notice of the significant difference in his and his spotter's height. More to this, see Tip 10.
Tip 10: See what your spotter sees
When glassing, especially with a teammate, don't set your rifle too low until you know you can see the targets from your intended height. Vegetation, ridges, or slight ground height differences could create dead space and hide the target even though while glassing standing, the target was visible. The same can be said the other way if you shooting under or in trees. If your glassing by yourself, the same principle holds true. If you plan on shooting seated, you might as well glass from that same height or decide to set up your gun higher to match your glassing height. If you are glassing from a position that differs from where you plan on shooting, pay particular attention to anything in your peripheral vision that might present a visual obstacle from the shooting position. If you are unsure, pop your binos off and take a quick peek from the other height.
Just like above, I saw many teams with one guy standing glassing and the shooter setting up kneeling or sitting at our 2019 match. There is no way the shooter setting up is going to be able to see at least 1 of the targets from his low position. The glassing teammate should notice that a ridge between the FFP and target, is relatively close to the LOS from his position. That would be a huge RED FLAG. The two shooters have a LOS offset that is about 5'. (side note: The RO missed that the spotter was outside the FFP before time started, this is a stage DQ in our UKD Team Match.)
Recap:
- Two rear-facing legs are usually best, lowering the front leg can really help with recoil when using light rifles or hunting guns.
- Some angles and situations are best suited to a rear-facing leg, like high angles, downward and upward FFPs.
- Spot your targets before you set up to shoot, you never know what height is required.
- Bend more at the waist than you think you should, using the stance of your feet to make height adjustments.
- Get a full-length rail even on a hunting rifle, it will offer the ultimate in flexibility.
- Mark your tripod legs and practice going from position to position.
- Practice setting up quickly, be ready when you approach and FFP.
- It is much easier to default to a higher position and come down with the tripod height than to go up.
- Buy a great tripod, it will become one of your most valued assets if you’re a long-range hunter and field shooter.
The outcome:
Just a reminder, you might not even notice the benefits of some of this stuff if you are always shooting in the same place, without time pressure, mainly shooting on flat ground, and know your tripod setting. If you can put all these pieces together, add in your spin and practice a lot, you'll be efficient and far less task-loaded. You'll be ready when you have to set up on a funky area you've never seen while hoping that Elk doesn't walk away, or able to concentrate far more on the series of targets you are about to shoot because you saved a few seconds, or worse yet, didn't set up completely wrong in your first field match.
The thread only lets me post so many images, so I had to be as brief as I could, and I choose to pick the topics that I've witnessed that seemed to contribute to shooters struggling. Like I said in the intro (post 29), I do not have all the answers, many will have better ways to skin a cat. If you have tips or tricks that can save seconds, feel free to post them up.
Postscript:
Although I have an Able Table, I didn't cover it or using a bag for a field match. A bag on a tripod actually provides an ultra-fast way to change between targets. For the ultimate in speed, between spotting and shooting, check out this link.
Advanced Marksmanship - Tips & Tricks, from Tripods to Stage Examples for - UKD Team Field Match or Hunting
looking forward to the tripod class also, you are putting out so much info, i really appreciate the time your putting into this.
www.snipershide.com
BTW you can really deck out your tripod.
Hopefully, @hic28 and @NoLegs24 can chime in on the use of the Able Table and maybe offer a few tips. These guys do well at team matches (so do a bunch of other shooters).
Below is a video comparison of an old-school Manfrotto 055 vs. an RRS tripod illustrating the raw stability differences. (This is from a thread I did compare RRS and Feisol legs as well as head options.)
A dirty non-scientific look through my night vision shot on my pest control PCP. The purpose is to illustrate the difference in stability between a high-quality setup and what we used to use. The house in the video is at 350 yards, at 14x. NOTE that my match gun is way better balanced, more substantial, and way less shaky in general.
I purposely mounted the gun and unmounted it without much technique to show how the vibration, the time it takes to settle or how the wind might vibrate the gun. (remember wind causes a lot of issues with vibration.)
I ran 9 steps to show instability, both the same (times below are only for the RRS video)
1. Turned on to see how much vibration takes to settle. Please pay attention to the test in this area. All I did was press firmly on the scopes power button. I did not touch the gun in any other way.
2. Mounting gun, getting comfortable with NPA. 0:12 –o:15
3a Moving to target - holding the tripod loaded on the target (note you can free recoil and be dead still on the target, but I was purposely trying to show realistic shake if your loading the gun) 0:16-0:20
3b Deciding on target 0:21-023
3c Holding target 0:34-0:26
4. On mounting the gun 0:27-0:29
5. 1st of 2 Tapping HARD on the Buttstock sideways to show how long it takes to settle 0:30
6. 2nd of 2 Tapping HARD on the Buttstock sideways to show how long it takes to settle 0:36
7 Mounting the Gun 0:40
8a Moving to a new Target 0:41-0:46
8b Setting on Target 0:47
9. Un-mounting the gun 0:50
HINT: Play both at the same time. Turn up your sound and listen for when I hit the stock with my hand.
RRS with Anvil 30 stability, video 1 of 2 comparing Manfrotto Takes 50 seconds to complete even taking extra time, not sure what I was really planning on doing. Also, going super slow even though the gun settled.
RRS Anvil test
Manfrotto 055 with center column up the match the RRS height. Video 2 of 2 comparing Manfrotto Takes 1:46 to complete.
.NOTE the first few seconds of this video as all I did was press the power button on the NV just like all three tests; holy smokes, there is a HUGE difference!!
Here is a link to the tripod comparison thread:
RRS Leveling heads- RRS TVC-33 & Feisol 3372 + Anvil 30 comment
My intent here is to add a few images comparing the setup of the RRS TVC-33 with the TA-3 to the TA-3 used on the 3372 and add a couple of comments about the TA-UL on the 3372 and 3342. Plus, a quick note after a ton of time on the RRS Anvil 30, my overview of the different RRS head options...
www.snipershide.com
Here is a link back to the original post. You will see an index to other topics.
Advanced Marksmanship - Tips & Tricks, from Tripods to Stage Examples for - UKD Team Field Match or Hunting
See the 2021 match schedule here: https://www.avenaltactical.com/ including the next UKD Team Match, 2 PRS Pro Bolt series, PRS SW Regional Qualifier, and monthly Hunter and PRS regional series, matches. Because our match was sold out 10 months in advance, we feel we should offer a spin up...
www.snipershide.com
2020 UKD TEAM Match Sponsors:
Last edited:
what diver needs to do is put this in a book, ill buy 2@Jack Master some of this would be great as links in you list you created.
This match will hopefully continue to grow. I do have plans to add a second match next year. One in early spring....then Nov.
Really appreciate the information. Most of my shooting has been from the prone or from a barrier of some sort so I am new to shooting from a tripod. I'm actually still waiting for my tripod to get here so I can start practicing but really looking forward to applying this.
Please share when you do, this kind of discussion is awesome.Really appreciate the information. Most of my shooting has been from the prone or from a barrier of some sort so I am new to shooting from a tripod. I'm actually still waiting for my tripod to get here so I can start practicing but really looking forward to applying this.
Will do!Please share when you do, this kind of discussion is awesome.
Nice write up Jim. You definitely spent some time on this. Maybe next year.
Tripod Tips - Field Based
You need to be signed in to see the images with enough detail to read the information contained on them.
There are a lot of ways to adjust and use your tripod, many of them are carryovers from a decade ago when we used skinny leged aluminum 055 Manfrotto Tripods with shaky center columns. These tripods required a lot of shooter input and even more practice. Loading hard into the tripod, using a reversed hand on the legs, and using slings to stabilize those shaky beasts, was a needed skillset. Fast forward to today, and the tripods are made of stiff and fat CF (carbon fiber) legs, with a robust Apex/Canopy/Base (the part that connects the legs all together), and almost shoot themselves. In the interest of transparency, I am assuming that you've made the jump to a modern, high-quality CF tripod. If you're still using something that is designed similarly to the old Manfrotto 055, even if it is CF, some of the tips might not work for you. The tips are field-based, some of the positions hasty (made in the interest of speed or quietness), tailored to a match like ours with angled shooting positions and what you might encounter hunting in the hills. I am not covering tripods as rear support like you might find in a PRS/NRL styled match.
I am not attempting to teach people how to shoot from a tripod, everyone on youtube is doing that, but rather show a few tips to consider if you are interested in increasing your speed or reducing your wobble zone when shooting from a tripod. Your final body position is going to be unique to you, maybe your hips are a bit less bent, whatever, but if you can grasp the ideas, I believe it will be helpful. Even if just one tip saves you a few seconds, it might make a difference in a hunt or during a field match. Any time you save, or complexity you remove from your tripod set up in the field, allows you to use more of your brain to problem solve, break a better shot and make your outing more enjoyable.
Tip 1: Keep it simpleSo simple, but few seem to do this primary operational step as efficiently as they could. When deploying your tripod to a standing position, extend the lowest leg fully first, then work towards the head. This keeps the tripod adjustment area in your control hand in front of your body and keeps you from having to shuttle it back and forth, reverse the process to stow. Here is a spoiler alert for Tip 2; leaving the lower leg non-extended for stability, is a throwback idea and not needed with today's larger legged, high-quality CF tripod's. It will come back and bite you with a time penalty if you later need to adjust the lower section of the leg.
Note: I am purposefully going slowly in this example, so that it is easy to see the concept.I am loosening both leg locks but retain a bit of finger pressure on the middle section by holding the lower leg-lock. As the lower approaches full extension, I release the tension on the leg-lock as I continue to pull on the lower leg while I simultaneously lock the lower leg. My hand is already at the upper lock, so I fine-tune my height and lock the leg. While this is only marginally faster, it does keep the tripod from moving all over and contacting brushes etc., a value in some situations. Setting up for kneeling is of course much simpler and faster, as is setting up the tripod only as a rear support.Tip 2: Adjust from the topAll micro height adjustment, especially if a rifle is on the tripod, should be done with the uppermost leg section. All other legs need to be fully extended before the top leg section. I can't tell you how many times I have seen a person with the rifle on the tripod, realize they need more height adjustment, dangerously, and slowly try to perform a three-handed change because the only leg available are the ones at the bottom. The chance of dropping your rifle, having to take your eyes off the target, and just being ultra-slow is not worth any perceived stability enhancement with our modern large legged CF tripods.
It is always hard to adjust up with a gun on the tripod. You must remain in 100% control of the rifle.Below is not the way to do it.
If you are using the middle legs fully extended and you need extra height, the INCREASE adjustment must come from the bottom leg, and now it is a complete mess, and you'll no longer have control of the weapon system.In truth, you generally only have to increase the height on a single leg. If you only had to adjust a single leg UP or down, the two rear-facing legs are easy to reach, with the shooter still facing the target. The safest way is to remove the gun. The videos adjusting all the legs are to illustrate the point.Choose a leg height that works in multiple positions. Many people might be surprised that standing, kneeling, and sitting can share the same leg adjustments. Your tripod may only accommodate two of the three, but finding that sweet spot will save you a bunch of time. To do this, extend all your legs; adjust only one TOP section to find your "perfect standing height." With most 3 section tripods, simply collapsing the remaining fully extended legs will result in a stable kneeling position. Often then just widening the legs by unlocking the leg locks will work for a seated position. The idea here is that standing is the most critical to get correct, and the other two shoot well with more flexibility. If you find time to micro-adjust the kneeling or sitting, it should be so close already that it takes little time. With a bit of imagination, you can see that setting up with the legs super-wide, legs extended for a seated position, is really stable and perfect for a day at the range or maybe from inside a Hide. But getting in and out of that position to shoot super-wide seating, might take more clock time than it is worth. Vegetation and topography also can limit the ability of super-wide setups. If you can find a set up that works for standing, kneeling sitting, you'll be surprised how fast you can go between them.Note this is my Son on my gun, the LOP is a bit long, but most importantly, these are hasty positions. Let's say you set up too high and need to get lower to see through a loop. If you have time, you could easily fine-tune the legs.Tip 3: It hangs in the balanceIt's all a balancing act, generally, keeping your gun as close to the magazine well as possible without causing lever or mag interference on one of the legs, is going to be close to the balancing point, and that is what you are after. It is generally the most stable and a bit more resistant to the shooter's erroneous input, as the shooter side lever arm is as small as can be. But there are other reasons sometimes not considered.For those that run their mounts far forward of the mag well, they'll get more height variation with significant angle changes. With my match rifle and my typical standing setup, by only moving my legs together and straightening my back (while not ideal), allows me to shoot from approximately -21% (downhill) to +32% uphill on a knee as the butt of the rifle swings 19" when completing its arc. On that rifle, mounting just a 6" forward creates 5" more vertical movement, resulting in 21% less range of motion.Tip 4: Mark your stuffAs simple as this sounds, this is a timesaving measure that takes almost no time to accomplish. Once you've found your perfect standing height as described in tip 3, Get a white paint marker or silver sharpie and clearly mark the leg position as shown in the image below. I use "arrows" because they are fast and easier to know where you are; even the mark is not fully exposed. You can make multiple marks if kneeling requires an adjustment. You can also make a mark for your Binos that's usually the very highest position someone needs; in my case, I use a second mark to use for the front leg, see Tip 6.The paint marker shown is from C.H. Hanson and lasts a long time.Tip 5: You're HighPeople often set up higher when standing than they should. Make sure even with your feet spread at least shoulder-width wide, with a nice bend at the hips so that your back tilted forward and all principal body parts square; you are comfortable on the gun. An excellent place to start is just about with the top of the tripod at sternum height. As an individual, you'll need to experiment.If you set up too high, you'll lose much of your range, especially if you need to shoot at an angle lower than you planned for during your set up. See Tip 3.Tip 6: Don't work so hardLower the front leg position and let the tripod do more of the work; this enables the shooter to load a tiny bit less, and reduce the cheek pressure required, thus making the shot more stable. It has the added benefits of changing where the support hand rides; rather than reversed on the legs, it can remain on the head for rapid target adjustment while reducing the reach, keeping the shoulders a hair more square and less tense. With proper body position with your feet wide, hips bent forward, feet, hips, and shoulders square with less tension on the gun, your wobble zone will decrease, and your impact and miss identification will be reliable, and the tripod will not jump. You will really have to experiment and practice with the correct leg position for stability, amount of pressure, and balance of recoil management, and a light hunting magnum is going to take more force than a heavy match gun. Admittedly, it is a tip that takes a bit of practice.The scale test was on level concrete to provide a fair comparison.Notice the angles of the rear legs and the height reduction of the front-facing leg in the right side image. One the left side, the tripod having all legs with the same adjustment as most people set up; my match gun averages about 6LBS of force pulling straight back along the bore axis to lift the front leg. With the change suggested, it takes about 10-11lbs, Kneeling 7lbs vs. 14lbs. The point being, if you experiment, you might suddenly find yourself with less wobble and better POI tracing. Both pictures have the gun level. A 40% improvement is nice, but it is crucial to acknowledge that with a leveling base, you may not have enough headroom to utilize this suggestion. A ball head guy that takes the time to run the apex perfectly level (I do not) will lose the pan feature of the base; but see the last image in Tip 8.
In the videos below, both guns are shooting about 3100fps and using the suggested leg arrangement. Obviously, you can load into the gun much harder, but I wanted to show the extreme of almost no shooter influence, eliminate the wobble while simultaneously illustrating just how much the rear legs being more angled (lower front leg) help.
Match gun, ultra-light shooter load & input, and can easily see the impact. Watch the front leg.
Lightweight Carbon Fiber barreled Hunting Magnum, you can see the impact, but more shooter input is needed. If you've shot a lightweight hunting magnum, you have an appreciation for how much work this tripod mod is doing. The front leg does not hop and relocate; the rear legs bend to absorb recoil. Make sure you use a good tripod!
If you have a leveling base or that ball head that you feel that you must use the pan feature, you can keep the apex level and accomplish some recoil mitigation by rear-facing a leg to 5 or 7 o'clock (hand dominance dependent). This will take more practice; the gains are smaller, and you will need to be careful that you are not letting the tripod hop. The school of thought is that the recoil can spin if the back legs are not perfectly perpendicular to the bore axis. This is true if all other parts are not squared away. Strangely you'll get more hop with the standard method, especially if you lock-out your support elbow and stiffen your shoulders as some guys recommend. Each technique has disadvantages; all could fail if a total system, implementation, and practice are wrong. All the ways are also useful if mastered.
This is an example of groups from standing position on a tripod using the suggested techniques. Standing tripod on RRS TV33 is the lower-left group, the control group was shot prone and the upper left group.Tip 7: Work the anglesOn an angled slope, not only do you want to adjust the legs to be at the correct height, but often will run out of adjustment, especially if shooting from a lower position. Don't forget to use the additional angles the leg catches at the apex provide to enhance your tripod's flexibility. It's often better to reduce the effective height of a leg by actually extending it outward, by unlocking the apex leg lock and drastically opening up the leg. The mistakes people seemed to make at our last match, was becoming confused with the initial setup height.When shooting from a slope set up higher than you think. Because you probably can't set up your body as stable as you can on flat ground, sitting is usually hard or impossible from some of the positions. When shooting downward, modify the above lower, and when shooting upward, modify your tripod lower.On a downslope, the shooter on the uphill side, you need to set up higher than you might think because the distance where the gun mounts, with the length of buttstock, moves toward the slope as the slope rises. See the image in Tip 9. When shooting on a steep uphill, the opposite is true, but you're not going to be stable sitting on your ass. The same is true for a steep sidehill position; you'll need to modify your legs and, in turn, your position, to keep from sliding down the hill.Tip 8: Dressed for speedSling your tripod, so you are ready; this might be in the dead space just before you anticipate your final stock, or help when moving from the staging area to the FFP, especially if they happen to be far apart. Extended tripods are hard to carry, even harder if you need to move through, over, or under the brush, as you approach your FFP. Anything you can do before you move to your final stock, to stay quiet and speed the setup will be helpful. So, if you can preset your primary adjustment legs as illustrated in Tip 2, and easily carry the tripod slung either under your arm or like your rifle, you'll be one step ahead. If you expect to stand, full extended also works well with an underarm slung carry. RRS makes flush cups for this hands-free purpose.Left image: Here is an example, although not as step using what was shown in Tip 7. When I set my gun up for my brother-in-law (my tags were already filled)Center image: Packed for a hunt preset to kneeling or standing by simply extend the lowers 100%. For a general pack-in, I'd have it collapsed and the rifle in the Kifaru Gun Bearer.Right image: On the approach to a stock I sling the tripod, sometimes, fully deployed like the left image. I sling it horizontally, so it doesn't hang on bushes, or overhead vegetation, especially when on your hands and knees. The gun would then also be off the sling and in my hand. The orange tape on the sling is used to show how I tape all metal and plastic parts that might make noise.Tripods are changing the game and worth taking on your hunt.Left image: Here is an example, although not as step using what was shown in Tip 7, the first and second image shown. I set my gun up for my brother-in-law (my tags were already filled), The set up was fast; I set up as low as I could from a modified kneeling position and opened the apex leg lock on the uphill side. Of 6 Elk taken on that trip, this was the lowest setup we were able to shoot; no prone opportunities were available the entire trip. The gun is the same magnum in the video in Tip 6. The shot was over 900y, and it dropped instantly.Center image: This is a good example but not unique; you need a strategy for going over and under brush especially if you are adding in a tripod. Both your rifle and tripod may need to be horizontal at times. Anything stilling above your pack will hang up, even when you are your knees or sliding down the very steep hills on your butt. Max (on the hide) is a tall guy and retrieving an Elk. He has been hinting in this BLM area for 20+ years and is simply amazing.Right image: In Tip 6, I made this comment, "A ball head guy that takes the time to run the apex perfectly level (I do not) will lose the pan feature of the base." Well, while "movers" can travel a predictable path, most animals do not. This pig was running at full-gate, my son lead it with a crazy lead using the Anvil 30 at about 400y. It did a front flipped and died. The point is don't be so worried about leveling your apex and using a pan function; you'll get the job done faster and maybe more stable using some of the tips where the apex is NOT level.Tip 9: It's easy to come downBy default, it is always easier to set up the tripod too heigh, and micro-adjust down, or for that matter, go from standing to kneeling, than it is the other way. On your range or flat ground, your height marks will always be useful, but once out on an untested slope with untried angles, that will no longer be true for all the legs. Going from the gun setup for kneeling to standing, is really hard, the other way almost manageable.
The main takeaway here is that this method allows you to keep control of your gun "if" for some reason, you need on the go from standing to kneeling after making the mistake of having a weapon deployed. This is anything but elegant or something I'd suggest unless you had no other choice.Last year it seemed shooters set up their tripods before they found all the targets. Many of them set up in the most stable positions rather than spotting and shooting from a more reasonable level. They often ended up timing out trying to adjust their tripods back to a standing position. See Tip 2 to see how much harder it is to come up with a rifle on the tripod. In the image shown, the tripod is so low, see the "red arrow" in the image, that the shooter would almost have to lay on his back to get behind the gun.Tip 10: See what your spotter seesWhen glassing, especially with a teammate, don't set your rifle to low until you know you can see the targets from your intended height. Vegetation, ridges, or slight ground height differences could create dead space and hide the target even though while glassing standing, the target was visible. The same can be said the other way if your shooting under or in trees. If your glassing by yourself, the same principle holds true. If you plan on shooting seated, you might as well glass from that same height or decide to set up your gun higher to match your glassing height. If you are glassing from a position that differs from where you plan on shooting, pay particular attention to anything in your peripheral vision that might present a visual obstacle from the shooting position. If you are unsure, pop your binos off and take a quick peek from the other height.
Just like above, I saw many teams with one guy standing glassing and the shooter setting up kneeling or sitting at our 2019 match. There is no way the shooter setting up is going to be able to see at least 1 of the targets from his low position. The glassing teammate should notice that a ridge between the FFP and target, is relatively close to the LOS from his position. That would be a huge RED FLAG. The two shooters have a LOS offset that is about 5'. (side note: The RO missed that the spotter was outside the FFP before time started, this is a stage DQ in our UKD Team Match.)
The outcome:
Just a reminder, you might not even notice the benefits of some of this stuff if you are always shooting in the same place, without time pressure, mainly shooting on flat ground and know your tripod setting. If you can put all these pieces together, add in your spin and practice a lot, you'll be efficient and far less task loaded. You'll be ready when you have to set up on a funky area you've never seen while hoping that Elk doesn't walk away, or able to concentrate far more on the series of targets you are about to shoot because you saved a few seconds, or worse yet, didn't set up completely wrong in your first field match.
The thread only lets me post ten images, so I had to be as brief as I could, and I choose to pick the topics that I've witnessed that seemed to contribute to shooters struggling. Like I said in the intro (post 29), I do not have all the answers, many will have better ways to skin a cat. If you have tips or tricks that can save seconds, feel free to post them up.
Postscript:
You can really deck out your tripod.
View attachment 7312087
Although I have one, I didn't cover using a TacTable for a field match. Hopefully, @hic28 and @NoLegs24 can chime in on the use of the Able Table and maybe offer a few tips. These guys do well at team matches (so do a bunch of other shooters).
Below is a video comparison of an old school Manfrotto 055 vs. a RRS tripod illustrating the raw stability differences. (This is from a thread I did compare RRS and Feisol legs as well as head options.)
A dirty non-scientific look through my night vision shot on my pest control PCP. The purpose is to illustrate the difference in stability between a high quality set up and what we used to use. The house in the video is at 350 yards, at 14x. NOTE that my match gun is way better balanced, more substantial, and way less shaky in general.
I purposely mounted the gun and unmounted without much technique to show how the vibration, the time it takes to settle or how wind might vibrate the gun. (remember wind causes a lot of issues with vibration.)
I ran 9 steps to show instability, both the same (times below are only for the RRS video)1. Turned on to see how much vibration takes to settle. Please pay attention to the test in this area. All I did was press firmly on the scopes power button. I did not touch the gun in any other way..2. Mounting gun, getting comfortable with NPA. 0:12 –o:153a Moving to target - holding the tripod loaded on the target (note you can free recoil and be dead still on the target, but I was purposely trying to show realistic shake if your loading the gun) 0:16-0:203b Deciding on target 0:21-0233c Holding target 0:34-0:264. On mounting the gun 0:27-0:295. 1st of 2 Tapping HARD on the Butt-stock sideways to show how long it takes to settle 0:306. 2nd of 2 Tapping HARD on the Butt-tstock sideways to show how long it takes to settle 0:367 Mounting the Gun 0:408a Moving to a new Target 0:41-0:468b Setting on Target 0:479. Un-mounting the gun 0:50HINT: Play both at the same time. Turn up your sound and listen for when I hit the stock with my hand.
RRS with Anvil 30 stability, video 1 of 2 comparing Manfrotto Takes 50 seconds to complete even taking extra time, not sure what I was really planning on doing. Also, going super slow even though the gun settled.RRS Anvil test
Manfrotto 055 with center column up the match the RRS height. Video 2 of 2 comparing Manfrotto Takes 1:46 to complete..NOTE the first few seconds of this video as all I did was press the power button on the NV just like all three tests; holy smokes, there is a HUGE difference!!
Here is a link to the tripod comparison thread:
RRS Leveling heads- RRS TVC-33 & Feisol 3372 + Anvil 30 comment
My intent here is to add a few images comparing the setup of the RRS TVC-33 with the TA-3 to the TA-3 used on the 3372 and add a couple of comments about the TA-UL on the 3372 and 3342. Plus, a quick note after a ton of time on the RRS Anvil 30, my overview of the different RRS head options...
Here is a link back to the original post. You will see an index to other topics.
Advanced Marksmanship - Tips & Tricks, from Tripods to Stage Examples for - UKD Team Field Match or Hunting
See the 2021 match schedule here: https://www.avenaltactical.com/ including the next UKD Team Match, 2 PRS Pro Bolt series, PRS SW Regional Qualifier, and monthly Hunter and PRS regional series, matches. Because our match was sold out 10 months in advance, we feel we should offer a spin up...
Great Stuff man!! Thanks for the post!!
Hey Jim @Diver160651 , on tip #6, I would love to test out the shorter front leg and maybe video recoil directly from the side short front leg vs all legs the same height.
Ya, great point. I was supposed to, but my Son was super impatient and rushing everything. My small brain could not keep up, and I forgot to video it. I'll post what I see normally taught, then see if I can get him back out so that he loads the sam between both shots. Remember, he is almost adding zero cheek and forward pressure. He is just behind the gun so that it doesn't completely free recoil, but is crazy light for demonstration.Hey Jim @Diver160651 , on tip #6, I would love to test out the shorter front leg and maybe video recoil directly from the side short front leg vs all legs the same height.
Last edited:
There is a lot of really good, useful information here. I picked up quite a few thoughts and ideas to implement with my own game-day planning and tripod shooting between now and November.
There is a lot of really good, useful information here. I picked up quite a few thoughts and ideas to implement with my own game-day planning and tripod shooting between now and November.
Todd, That's super nice to say coming from such a good shooter..
I have mine now with the 55 ballhead. It’s awesome and I should have bought an RRS sooner.
It’s definitely PRS/flat range oriented (and they were very up front about it). Not something I’d want to strap to a ruck for any amount of decent distance/time.
But for the use I bought it for, it’s badass.
Dave,
I know you bought the NEW the RRS PRS 2 section Tripod for PRS/NRL style competition, where spotting and rear support, are the main two uses. This tripod seems to be the ticket for speed. But it would be great if it works for hunting, maybe it is just a question of working the apex locking levers more.
Can you post a couple of pictures (your living room is fine), of you standing, kneeling, and sitting using the tripod? Also, can you interest the distance from the top of the QR plate to the leg lock? When set up, my lower leg locks are 32".
My primary field position is probably, kneeling, the height of 30" to the top of the quick release when setup. I carry the tripod partially extended at the ready, at 35" QR to feet; with the front leg at 30". Simply by opening, it is prepared, for standing, I only have one set leg to work with, and they just fully extend.
This is how I carry the tripod as the base position; maybe the NEW PRS PRS 2 section works much the same as it is already longer when collapsed.
I do not have experience with this new tripod, and you are one of the first to own it in the wild. It would be great for people to see what it sets up like fo the other positions. The more information here, the better, not everyone is hunting or shooting on funky angles anyway.
Thank in advance,
Jim
No just any cheap sling will do. But in those images I am using the RRS flush cup QR leg mounts.Hey @Diver160651 how are you carrying the tripod their, do you have a tripod specific sling?
When I was using the old O55s, I just tied on paracord loops.
@Diver160651 Damn Jim! This is a hell of a post man! A ton of great info and a lot of time of time went into this. This Definitely needs to be a sticky. Probably gonna read through this a few more time. Thanks for putting this together man! Good on you dude. A lot of people are gonna benefit from this. 
Hey @Diver160651 how are you carrying the tripod their, do you have a tripod specific sling?
@seansmd
Here are the RRS tripod leg and apex flush mounts I use:
They come for series 1 through 4 tripods; but can be used on some other tripods if the kegs have the correct diameter. You'd need two of the leg versions if mounting on a non-RRS tripod.
Series 4 Tripod Leg QD Collar
- Length: 2.07" /53mm
- Width: 2.13" /54mm
- Thickness: 0.69" /18mm
- ID: 40.7mm
- Weight: 1.3oz /35g
Series 3 Tripod Leg QD Collar
- Length: 1.97" /50mm
- Width: 1.91" /49mm
- Thickness: 0.69" /18mm
- ID: 36.7mm
- Weight: 0.94oz /27g
Series 2 Tripod Leg QD Collar
- Length: 1.81" /46mm
- Width: 1.75" /45mm
- Thickness: 0.69" /18mm
- ID: 32.6mm
- Weight: 0.85oz /24g
Series 1 Tripod Leg QD Collar
- Length: 1.65" /42mm
- Width: 1.58" /40mm
- Thickness: 0.69" /18mm
- ID: 28.4mm
- Weight: 0.89oz /25g


But for non-RRS tripods, the one from Armageddon Gear might be a good choice.
Tripod Sling - Armageddon Gear
the tripod sling fills the need for a comfortable way to carry your weapon or camera tripod while allowing the user the ability to put the tripod into operation in seconds from the carried position.
Last edited:
Please share when you do, this kind of discussion is awesome.
Finally got my tripod and the range I shoot at locally opened back up so I got to make it out Saturday and get some rounds down range off the tripod. Definitely a lot different than the shooting I am used to. I spent most of the time adjusting the height of the tripod in the standing to test out what worked best for me in feeling like I was in a stable position as well as allowing enough room adjust the rifle to engage targets at different distances. My first setup was too high as I found myself almost standing on my toes to hit targets that were at lower elevation. My initial comfort zone was to get the tripod up to a height where I was basically standing fully upright which worked for one specific target but when I transitioned to other targets my position was compromised and I could not get a good position on the weapon. I found as I lowered the tripod and opened my stance a little it gave me a much larger range of adjustment to transition target to target. I definitely have a lot of work to do between now and November!
Finally got my tripod and the range I shoot at locally opened back up so I got to make it out Saturday and get some rounds down range off the tripod. Definitely a lot different than the shooting I am used to. I spent most of the time adjusting the height of the tripod in the standing to test out what worked best for me in feeling like I was in a stable position as well as allowing enough room adjust the rifle to engage targets at different distances. My first setup was too high as I found myself almost standing on my toes to hit targets that were at lower elevation. My initial comfort zone was to get the tripod up to a height where I was basically standing fully upright which worked for one specific target but when I transitioned to other targets my position was compromised and I could not get a good position on the weapon. I found as I lowered the tripod and opened my stance a little it gave me a much larger range of adjustment to transition target to target. I definitely have a lot of work to do between now and November!
You'll do fine, it takes a few times but then comes together.
The correct height, in my opinion, is lower than most people think.
My suggestion is to take the tripod at set the very top of it below your pecs at about sternum height. You'll still need to bend forward at the hips with your legs forming a wide solid base. Rather than lean 100% into the gun, I'll use my hand near the ball head, Anvil 30, or in the case of the leveling base, on the 4" adjustment arm below the apex, letting that hand help stabilize my upper body by lightly pressing forward on the tripod.
On a heavy match gun, you're looking to back-off until the wobble goes away, but then add back in until you and see your impacts. Just restating, were not having to take all the shakey slope out as you did on the 055s. I am not trying to "stop" the gun's recoil, just slowing it down enough to see the impacts.
Side note: Something I didn't cover and hopeful that @hic28 will get some time to explain the benefits of using a bag on the tripod rather than locking down the gun. His product, the Able Table adds a ton of functionality to the tripod game.
Thanks, I definitely found adjusting lower took some getting used to but I can see it has a lot of advantages. The next thing I need a lot of work with is how much I press into the tripod and gun. The more I shot I feel like less is more almost.You'll do fine, it takes a few times but then comes together.
The correct height, in my opinion, is lower than most people think.
My suggestion is to take the tripod at set the very top of it below your pecs at about sternum height. You'll still need to bend forward at the hips with your legs forming a wide solid base. Rather than lean 100% into the gun, I'll use my hand near the ball head, Anvil 30, or in the case of the leveling base, on the 4" adjustment arm below the apex, letting that hand help stabilize my upper body by lightly pressing forward on the tripod.
On a heavy match gun, you're looking to back-off until the wobble goes away, but then add back in until you and see your impacts. Just restating, were not having to take all the shakey slope out as you did on the 055s. I am not trying to "stop" the gun's recoil, just slowing it down enough to see the impacts.
Side note: Something I didn't cover and hopeful that @hic28 will get some time to explain the benefits of using a bag on the tripod rather than locking down the gun. His product, the Able Table adds a ton of functionality to the tripod game.
This is dry firing practice at what feels most natural, and leaves room for up/down angle corrections.

You can really deck out your tripod.
View attachment 7312087
Although I have one, I didn't cover using a TacTable for a field match. Hopefully, @hic28 and @NoLegs24 can chime in on the use of the Able Table and maybe offer a few tips. These guys do well at team matches (so do a bunch of other shooters).
[/QUOTE]
Tripod tables are extremely useful in a ton of different ways. Wether It’s shooting off them after building a hasty shooting position or using it for admin work with spotters/binos/rangefinders/umbrellas/beer holders/impromptu love swings, I’d highly recommend having one in your pack.

I run the AbelCoUSA table (Abel Table) for a number of reasons. https://abelcousa.com/collections/vendors?q=Abel Company
- all slots are mlock so you can attach anything that is Mlock Compatible
- quick locks for attaching a sling/bag attached to a bungee
- it’s aluminum for weight savings
- center is cut out for mounting binos
- RRs rail is part of the bottom and plenty of threaded holes for mounting other attachment points up top
The situation is going to dictate if i shoot clamped in or off the table. Most of that is based on time and target size and distance.

I’ll throw a pint size Game changer between the binos and rangefinder and I can find targets, range them and toss the rifle up, check my arm board and dial dope.


this works best with the Binos at sitting height then when I grab the rifle to shoot, I’m in the double kneeling and it’s incredibly stable. More stable than most barricades ive come across nrl/prs matches.
this style setup works best for me when prairie dog hunting since I’m stationary looking around for dogs then getting on them quick before they go back underground.
At matches I usually leave my binos attached to the table for observing shooters before and after.

Then I’ll pop the whole table off and clamp the rifle in for the stage if it’s from one shooting position

here you can see Jorge was ranging the targets from on top of the jeep cause he couldn’t see the targets from prone or his chair. I clipped my pack onto the tripod for more weight which adds stability at standing height.
Spotting and ROing
I use a dedicated RRS TVC-44 with a BH55 for this. The Traust tripod attached shit keeper (TASK) bag keeps all my shit handy. https://www.snipershide.com/shooting/threads/traust-task-tripod-attached-shit-keeper.6961411/

The iPad for practiscore is Velcrod on so it won’t fall off and I have a backup battery With 3 usb slots below so I can charge the ipad, shot timer and phone depending on how long the match is. Allcables are in the bottom portion of the cup holder. Fix it sticks on the left for helping anyone who forgot or doesn’t have tools. Those get used every time I’m at the rangeTo help someone who wasn’t prepared. There is also a clicker down there for counting hits.

If enough people are interested, hit me up in PM if you want a table and I’ll make a discount code on the website.
View attachment 7312087
Although I have one, I didn't cover using a TacTable for a field match. Hopefully, @hic28 and @NoLegs24 can chime in on the use of the Able Table and maybe offer a few tips. These guys do well at team matches (so do a bunch of other shooters).
[/QUOTE]
Tripod tables are extremely useful in a ton of different ways. Wether It’s shooting off them after building a hasty shooting position or using it for admin work with spotters/binos/rangefinders/umbrellas/beer holders/impromptu love swings, I’d highly recommend having one in your pack.
I run the AbelCoUSA table (Abel Table) for a number of reasons. https://abelcousa.com/collections/vendors?q=Abel Company
- all slots are mlock so you can attach anything that is Mlock Compatible
- quick locks for attaching a sling/bag attached to a bungee
- it’s aluminum for weight savings
- center is cut out for mounting binos
- RRs rail is part of the bottom and plenty of threaded holes for mounting other attachment points up top
The situation is going to dictate if i shoot clamped in or off the table. Most of that is based on time and target size and distance.
I’ll throw a pint size Game changer between the binos and rangefinder and I can find targets, range them and toss the rifle up, check my arm board and dial dope.
this works best with the Binos at sitting height then when I grab the rifle to shoot, I’m in the double kneeling and it’s incredibly stable. More stable than most barricades ive come across nrl/prs matches.
this style setup works best for me when prairie dog hunting since I’m stationary looking around for dogs then getting on them quick before they go back underground.
At matches I usually leave my binos attached to the table for observing shooters before and after.
Then I’ll pop the whole table off and clamp the rifle in for the stage if it’s from one shooting position
here you can see Jorge was ranging the targets from on top of the jeep cause he couldn’t see the targets from prone or his chair. I clipped my pack onto the tripod for more weight which adds stability at standing height.
Spotting and ROing
I use a dedicated RRS TVC-44 with a BH55 for this. The Traust tripod attached shit keeper (TASK) bag keeps all my shit handy. https://www.snipershide.com/shooting/threads/traust-task-tripod-attached-shit-keeper.6961411/
The iPad for practiscore is Velcrod on so it won’t fall off and I have a backup battery With 3 usb slots below so I can charge the ipad, shot timer and phone depending on how long the match is. Allcables are in the bottom portion of the cup holder. Fix it sticks on the left for helping anyone who forgot or doesn’t have tools. Those get used every time I’m at the rangeTo help someone who wasn’t prepared. There is also a clicker down there for counting hits.
If enough people are interested, hit me up in PM if you want a table and I’ll make a discount code on the website.
Last edited:
Todd, That's super nice to say coming from such a good shooter..
Dave,
I know you bought the NEW the RRS PRS 2 section Tripod for PRS/NRL style competition, where spotting and rear support, are the main two uses. This tripod seems to be the ticket for speed. But it would be great if it works for hunting, maybe it is just a question of working the apex locking levers more.
Can you post a couple of pictures (your living room is fine), of you standing, kneeling, and sitting using the tripod? Also, can you interest the distance from the top of the QR plate to the leg lock? When set up, my lower leg locks are 32".
My primary field position is probably, kneeling, the height of 30" to the top of the quick release when setup. I carry the tripod partially extended at the ready, at 35" QR to feet; with the front leg at 30". Simply by opening, it is prepared, for standing, I only have one set leg to work with, and they just fully extend.
View attachment 7314937
This is how I carry the tripod as the base position; maybe the NEW PRS PRS 2 section works much the same as it is already longer when collapsed.
I do not have experience with this new tripod, and you are one of the first to own it in the wild. It would be great for people to see what it sets up like fo the other positions. The more information here, the better, not everyone is hunting or shooting on funky angles anyway.
Thank in advance,
Jim
Damnit. I just saw this post requesting pics. I’ll see what I can do.
Most of the things mentioned here I utilize with tripod shooting. Sometimes I face the single leg away from me and sometimes it’s towards me and I’m straddling it. Just depends on how I’m loading or not loading into the rifle.
Another very good trick is when deploying the tripod (extend the bottom legs first so your adjustments are always within your workspace like mentioned already) hold the tripod apex suspended in the air at the height you want it. Then started from bottom of a leg open the first 2 all the way, then the top section as much as it takes for the leg to just touch the ground with the apex being held where you want it.
Do this with all 3 legs and the apex of your tripod will be pretty damn close to where you want it. Close enough that when under the clock you can make it work.
Good read on tripod setup! I will definitely mark my tripod legs for easy transition/ deployment. Since this will be my first field/team match, any suggestions/tips for type of backpack for rifle carry and load out. I know less is more but just don't want miss out on essential gear for the match.
This is a great question, this match you can hike up to 2-3 miles fitting the day. Jim will follow up with excellent pictures of his kit and load out.Good read on tripod setup! I will definitely mark my tripod legs for easy transition/ deployment. Since this will be my first field/team match, any suggestions/tips for type of backpack for rifle carry and load out. I know less is more but just don't want miss out on essential gear for the match.
Expect to carry everything you will need, riffle, sling, ammo, dope, lrf, bino, tripod, snacks, water. Weight matters and with your ability to carry that weight, clothing, shoes, sunblock, etc. Weigh your kit and evaluate everything you and your partner will carry. Do you need 2 binos, 2 lrf, etc. Weigh your rifle too, and do these weights with the ammo you plan to carry.
This is a great question, this match you can hike up to 2-3 miles fitting the day. Jim will follow up with excellent pictures of his kit and load out.
Expect to carry everything you will need, riffle, sling, ammo, dope, lrf, bino, tripod, snacks, water. Weight matters and with your ability to carry that weight, clothing, shoes, sunblock, etc. Weigh your kit and evaluate everything you and your partner will carry. Do you need 2 binos, 2 lrf, etc. Weigh your rifle too, and do these weights with the ammo you plan to carry.
I will weigh the rest of my gear. I know for a fact that my rifles weighs 17 lbs .
 !!! That alone will be the bulk weight of the back pack. It will be a heavy pack including other gear. I guess need to start rucking now. Thanks for info!
You will want to practice with your full pack and rifle, is it better or easier to carry the rifle slinged, or in the pack. Some stations are close others are a hike depending on where you start.I will weigh the rest of my gear. I know for a fact that my rifles weighs 17 lbs .
Good read on tripod setup! I will definitely mark my tripod legs for easy transition/ deployment. Since this will be my first field/team match, any suggestions/tips for type of backpack for rifle carry and load out. I know less is more but just don't want miss out on essential gear for the match.
I certainly can share with you my load-out. The hike is not bad because you'll go from station to station.
But first, I want to focus on the next Topic. It will be a stage spoiler and is sponsored by BT industries - The Atlas guys. It will be a stage unlike any other I've shot, or seen. This stage will be super fun but challenge the conventional distances we think about with centerfires.
A hint: It will be a precision stage, with unlimited shots on the first two targets, the final target is the stage winner and will be used as a tie-breaking stage. But that target is limited to 2 rounds.
Hopefully, this one will make @Kasey proud. I most likely will post the Topic at the end of next week.
Good read on tripod setup! I will definitely mark my tripod legs for easy transition/ deployment. Since this will be my first field/team match, any suggestions/tips for type of backpack for rifle carry and load out. I know less is more but just don't want miss out on essential gear for the match.
One more Tip that really is worth considering is looking at shooting off a bag from the tripod. It saves time, mounting the gun, time transitioning from Binos-PLRF to the rifle, and very efficient target to target as you don't have to fuss with trying to get the ball head, Anvil or leveling base lined up.
Last year, there was not a stage that needed a rear bag; this year, we are adding 2 where that would be helpful, so you need a bag anyway.
Serge is offering a 10% discount code to anyone in this thread; just PM him here: @hic28
I hijacked a couple of his picture and reposted it below.
Click the link below to jump back to the info on using a bag in a field match - too bad we didn't have a video on how fast the transition is from spotting to target.
Advanced Marksmanship - Tips & Tricks, from Tripods to Stage Examples for - UKD Team Field Match or Hunting
looking forward to the tripod class also, you are putting out so much info, i really appreciate the time your putting into this.
www.snipershide.com
Just to reiterate the point above. Unless you need some very tight precision, consider a bag off a tripod (with something like and able table above). It’s faster to setup and faster to shoot. Basically, it’s a barricade. You’ll still be able to keep it under 1-1.5moa.
Here’s 3 locked into a tripod and here’s 10 off a bag.
Here’s 3 locked into a tripod and here’s 10 off a bag.
Attachments
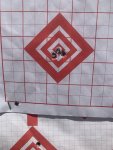
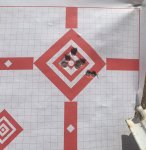
The able table with a gamechanger layed on its side is pretty damn stable especially when in the kneeling or sitting position ,it's almost like cheating
does each shooter in a team need a tripod ? i have 1 tripod for a rifle and a smaller 1 for binos and range finder, would this work for a team to shoot the match?
me and my son are new to precision rifle, we are not going to be knocking on the door of the top 20,
me and my son are new to precision rifle, we are not going to be knocking on the door of the top 20,
does each shooter in a team need a tripod ? i have 1 tripod for a rifle and a smaller 1 for binos and range finder, would this work for a team to shoot the match?
me and my son are new to precision rifle, we are not going to be knocking on the door of the top 20,
yes. Just practice swapping between the two shooters and you’ll be good. Time management is usually what gets most new shooters
does each shooter in a team need a tripod ? i have 1 tripod for a rifle and a smaller 1 for binos and range finder, would this work for a team to shoot the match?
me and my son are new to precision rifle, we are not going to be knocking on the door of the top 20,
I asked that same question the first RTC match I shot with my Son. I was planning on air travel, so while I had two great shooting tripods, I wanted to limit as much gear as I could. The simply reply I got, is the same as our match; yes, you can share equipment. Based on the simple “yes” I received, I only brought one shooting tripod and an ultralight carbon spotting tripod. I wish I brought both shooting tripods.
That experience and recommendation, lead us to this match and this spin up series. So while you “can” share tripods, that’s not the entire answer. On some stages, both shooters will alternate shots, some they can shoot at the same time, and others, one will shoot the whole COF, before the next shooter the second. While it technically is not required that both shooters have their tripod, it is from a practical sense.
The easiest way to get a cheaper tripod to work well is to make sure it DOES NOT HAVE A CENTER COLUMN and can still be tall enough to shoot from a standing height. Then, just lay a Game Changer type bag over the top of the apex of the tripod and shoot like @hic28 images above.
If you use a bag setup rather than a direct attachment you can make ONE shooting tripod kinda work, but you will have to make safe between swaps and a couple of stages were both shooters can shoot at the same time will be rough. Expect to time out a lot. As mentioned in the general intro., this match is 90% tripod based. We do not have the trees, fences, and rocks to shoot from, so we are using the sloping Central California hills to make the shooting a bit more challenging and thus more dependent on tripods or tall shooting sticks.
Last edited:
speaking of time management , do most teams split time in 1/2 ? or let first shooter finish and second shooter gets what time is remaining?
if a shooter is struggling on a stage can he be pulled and the second shooter pick up where the first shooter left off?
sorry for the stupid questions.
if a shooter is struggling on a stage can he be pulled and the second shooter pick up where the first shooter left off?
sorry for the stupid questions.
speaking of time management , do most teams split time in 1/2 ? or let first shooter finish and second shooter gets what time is remaining?
if a shooter is struggling on a stage can he be pulled and the second shooter pick up where the first shooter left off?
sorry for the stupid questions.
Actually, this question is probably not asked enough based on last year. We have a point system with the first shots counting more, and camouflage targets scoring even more than the ones that an almost impossible NOT to find.
If you skip targets, you lose the points and can not go back and reshoot them. That said, there are strategic reasons for skipping a target or targets. Getting your teammate on targets is certainly one reason to skip targets. If the shooter or team decides to skip targets, it is part of the game that they are organized enough to let the RO know, or the hits will be considered out of the COF, and scores as a miss.
For time management, I’d love to hear what @hic28 am @NoLegs24 do. Although, both those guys can really shoot and do so very quickly.
@johnrice @Diver160651
For time management, you always need to have the most experience shooter of the two go first. No such thing as having one be wind b* as y'all are teammates lol.
There's no such thing as split times. You're only as fast as your weakest link. Like diver said, if you skip a target, you'll just lose those points. And in some cases, you can't skip it. So you must try to engage it regardless. And no, don't shoot towards a different area cause you're struggling to find the target. That's a quick way to get you DQ'd.
@hic28 and I keep it simple. I'll find the target, range it and write my dope, while he shoots his pistol portion. If he needs me to spot him, he'll wait till I finish my pistol portion, if not, he'll shoot target 1 on his own and I'll play catch up. I give him the range so he can write down his dope as well. But we go fast enough that I'll be done with pistol as soon as he's done writing dope. He'll sometimes wait to get me on target before he starts engaging.
Here's a quick video. We where shooting same cartridge, but different bullet. He had to push his harder to match my dope as the bullet's BC I was using, was higher. It was so cold that day (hence mouth breathing) that I just went with his dope. They let us range and dope the targets prior to starting on this stage. So I was keeping warm in the truck hahaha. Since it was near identical. Maybe a tenth to half a tenth difference.
(Having a hard time posting vide...)
Last edited:
Sneak peek to a Stage Spoiler Coming Week of 5/18
This stage will have a skill set regarding dope that will be KEY in one of the most interesting stages to be revealed.
This stage will have a skill set regarding dope that will be KEY in one of the most interesting stages to be revealed.
Last edited:
If your team is shooting this, read the tips; some of the stages will use strategies from multiple tips segments - a few stages will flat out crush your team if you are unprepared. Everything you need to sail through the stages will be shared here. Make sure to create an account so that you can see the details shared in the pictures.
More tips and stage spoilers coming- Link back to the topic index:
www.snipershide.com

More tips and stage spoilers coming- Link back to the topic index:
Advanced Marksmanship - Tips & Tricks, from Tripods to Stage Examples for - UKD Team Field Match or Hunting
See the 2021 match schedule here: https://www.avenaltactical.com/ including the next UKD Team Match, 2 PRS Pro Bolt series, PRS SW Regional Qualifier, and monthly Hunter and PRS regional series, matches. Because our match was sold out 10 months in advance, we feel we should offer a spin up...
www.snipershide.com
Last edited:
Similar threads
- Replies
- 4
- Views
- 853
- Replies
- 33
- Views
- 5K
- Replies
- 1
- Views
- 926
